Configure ARC welder to access local folder

ARC Welder is an amazing tool. It’s a chrome extension that allows you to take an android APK file and convert it into a chrome extension. This means you can run android apps on any device with Chrome installed. Sweet!

I came across a need for an arc welder app to access my local filesystem. I wanted to share a file that was on my host system with the android app. After some digging I came across this forum post which details what you need to do.

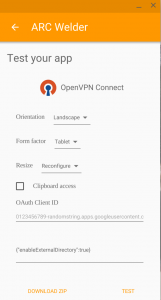
The solution is specify a certain option when using arc welder:

{"enableExternalDirectory": true}

You do this on the final screen before you click test app / download zip.

Screenshot 2016-01-28 at 1.24.25 PM

Arc welder will prompt you to pick a folder. Once that’s done, you can navigate to the Downloads folder in your app and your linked folder will be there. Pretty slick.

(No, OpenVPN ended up not working, but I wanted to save this knowledge in case I want to try a different app that needs / creates files.)

Configure HDHR Viewer XMLTV in CentOS Linux

Recently I’ve accomplished the herculean task of setting up my parents’ cable connection to stream through Plex using a HD Homerun 3 cablecard network tuner. It works! This is how I got XMLTV guide working for the HDHR Viewer plugin for Plex on CentOS 7 Linux.

Required reading: http://hdhrviewer.zynine.net/hdhrviewerv2-initial-setup/xmltv-zap2xml/

First, install and configure the required perl and java packages

sudo yum install perl-Compress-Zlib perl-HTML-Parser perl-HTTP-Cookies perl-LWP-Protocol-https perl-JSON gcc cpan java-1.7.0-openjdk-headless 
sudo cpan JSON::XS 
#accept all defaults when prompted

Download the zap2xml perl module (zap2xml.pl) Place it somewhere it can be easily accessed.

Test to make sure the script will run properly:

perl zap2xml.pl -u <zap2it username> -p <zap2it password>

If you get an error like this:

Can't locate Compress/Zlib.pm in @INC (@INC contains: /usr/local/lib64/perl5 /usr/local/share/perl5 /usr/lib64/perl5/vendor_perl /usr/share/perl5/vendor_perl /usr/lib64/perl5 /usr/share/perl5 .) at zap2xml.pl line 26.

It means you haven’t installed the correct perl modules. Double check that you installed them all.

Once we know it runs properly e need to configure a cron job to run zap2xml daily (to make sure the guide data is always up to date.)

crontab -e
#press i to begin inserting
0 0 * * * perl <full path to where you downloaded zap2xml>/zap2xml.pl -u <zap2it e-mail> -p <zap2it password>
#ESC :wq to save and exit


Next download and unzip the Channel Guide app. I placed it in the same place I downloaded zap2xml to keep things simple.

Test it out to make sure it works:

java -jar channel-guide-app-0.0.3.jar server app-config.yml

If it starts and doesn’t crash, you know it’s working.

Now we want to configure the channel guide app to run on startup

sudo vi /etc/systemd/system/channelguide.service
[Unit]
Description=Plex Channel Guide

[Service]
TimeoutStartSec=0
ExecStart=/usr/bin/java -jar <full path to channel-guide dir>/channel-guide-app-0.0.3.jar server <full path to channel-guide dir>/app-config.yml

[Install]
WantedBy=multi-user.target

Make sure this systemd service is enabled:

sudo systemctl enable /etc/systemd/system/channelguide.service

Lastly make sure you’ve configured the HDHRViewer plugin in Plex to use xmltv and rest API as per the how-to on their site.

Success!

Use FFMPEG to batch convert video files

Below are the tips and tricks I’ve learned in my quest to get all my family home movies working properly in Plex. I ended up having to re-encode most of them to have a proper codec.

ffmpeg is what I ended up using. Thanks to here and here I found a quality setting that I liked: x264 video with crf of 18 and veryslow encoder preset, AAC audio at 192kbps, mp4 container.

ffmpeg -i <file> -acodec libfdk_aac -b:a 192k -ac 2 -vcodec libx264 -crf 18 -preset veryslow <filename>.mp4

I tried to use exiftools to add metadata to the file but Plex wouldn’t read it. Instead I discovered you can use ffmpeg to encode things like title and date taken directly into the file. The syntax for ffmpeg is

-metadata "key=value"

The metadata values I ended up using were:

  • date – Plex looks at this
  • Title – what’s displayed in plex
  • comment – not seen by plex but handy to know about anyway

Encoding

My first pass at encoding combined find with ffmpeg to re-encode all my avi files. I used this command:

find . -name *.avi -exec ffmpeg -i {} -acodec libfdk_aac -b:a 192k -ac 2 -vcodec libx264 -crf 18 -preset veryslow {}.mp4 \;

Interrupted

I bit off more than I could chew with the above command. I had to kill the process because it was chewing up too much CPU. There are two ways to figure out which file ffmpeg is on:

ps aux|grep ffmpeg

will list the file that ffmpeg is currently working on. Take note of this because you’ll want to remove it so ffmpeg will re-encode it.

You can also run this command to see the last 10 most recently modified files, taken from here:

find $1 -type f -exec stat --format '%Y :%y %n' "{}" \; | sort -nr | cut -d: -f2- | head

Resume

Use the above command to remove what ffmpeg was working on when killed. Append -n to tell ffmpeg to exit and not overwrite existing files

find . -name *.avi -exec ffmpeg -n -i {} -acodec libfdk_aac -b:a 192k -ac 2 -vcodec libx264 -crf 18 -preset veryslow {}.mp4 \;

Cleanup

The command above gave me a bunch of .avi.mp4 files. To clean them up to just be .mp4 files combine find with some bash-fu (thanks to this site for the info)

find . -name “*.avi.mp4” -exec sh -c ‘mv “$1” “${1%.avi.mp4}.mp4″‘ _ {} \;

Finally, remove original .avi files:

find . -name "*.avi" -exec rm {} \;


Update 2/3/2016: Added a verification step.

Verification

Well, it looks like the conversion I did was not without problems. I only detected them when I tried to change the audio codec I used. You can use ffmpeg to analyze your file to see if there are any errors with it. I learned this thanks to this thread.

The command is:

ffmpeg -v error -i <file to check> -f null -

This will have ffmpeg go through each frame and log and tell you any errors it finds. You can have it dump them to a logfile instead by redirecting the output like so:

ffmpeg -v error -i <file to scan> -f null - >error.log 2>&1

What if you want to check the integrity of multiple files? Use find:

find . -type f -exec sh -c 'ffmpeg -v error -i "{}" -f null - > "{}".log 2>&1' \;

The above command searches for any file in the current directory and subdirectories, uses ffmpeg to analyze the file, and will output what it finds to a log file of the same name as the file that was analyzed. If nothing was found, a 0 byte file was created. You can use find to remove all 0 byte files so all that’s left are logs of files with errors:

find . -type f -size 0 -exec rm {} \;

You can open each .log file to see what was wrong, or do what I did and see that the presence of the log file at all means that the file needs to be re-encoded from source.

Checking the integrity of the generated files themselves made me realize I had to re-encode part of my home movie library. After re-encoding, there were no more errors. Peace of mind. Hooray!
Change the hostname on a Splunk Indexer

Recently I set about to change the hostname on a Splunk indexer. It should be pretty easy, right? Beware. It can be pretty nasty! Below is my experience.

I started with the basics.

  • hostname command
    hostname <newhostname>
  • Modify /etc/system/network to make it persistent (CentOS specific)
    sed -i 's/<old hostname>/<new hostname>/g' /etc/system/network
  • Inform Splunk of the hostname change
    sed -i 's/<old hostname>/<new hostname>/g' $SPLUNK_HOME/etc/system/local/server.conf
  • Restart Splunk

Sadly, that wasn’t the end of it. I noticed right away Splunk complained of a few things:

TcpOutputProc - Forwarding to indexer group default-autolb-group blocked for 300 seconds.
WARN TcpOutputFd - Connect to 10.0.0.10:9997 failed. Connection refused

Running

netstat -an | grep LISTEN

revealed that the server was not even listening on 9997 like it should be. I found this answer indicating it could be an issue with DNS tripping up on that server. I edited $SPLUNK_HOME/etc/system/local/inputs.conf with the following:

[splunktcp://9997]
connection_host = none

but I also noticed that after I ran the command a short time later it was no longer listening on 9997. Attempting to telnet from the forwarder to the indexer in question revealed the same results – works at first, then quit working. Meanwhile no events are getting stored on that indexer.

I was pulling my hair out trying to figure out what was happening. Finally I discovered this gem on Splunk Answers:

Are you using the deployment server in your environment? Is it possible your forwarders’ outputs.conf got deployed to your indexer?

On the indexer:
./splunk cmd btool outputs list –debug

Sure enough! after running

./splunk cmd btool outputs list --debug

I discovered this little gem of a stanza:

/opt/splunk/etc/apps/APP_Forwarders/default/outputs.conf [tcpout]

That shouldn’t’ have been there! Digging into my deployment server I discovered that I had a server class with a blacklist, that is, it included all deployment clients except some that I had listed. The blacklist had the old hostname, which meant when I changed the indexer’s hostname it no longer matched the blacklist and thus was deployed a forwarder’s configuration, causing a forwarding loop. My indexer was forwarding back to the forwarder everything it was getting from the forwarder, causing Splunk to shut down port 9997 on the offending indexer completely.

After getting all that set up I noticed Splunk was only returning searches from the indexers whose hostnames I had not changed. Everything looked good in the distributed search arena – status was OK on all indexers; yet I still was not getting any results from the indexer whose name I had changed, even though it was receiving events! This was turning into a problem. It was creating a blind spot.

Connections great, search status great, deployment status good.. I didn’t know what else to do. I finally thought to reload Splunk on the search head that had been talking to the server whose name I changed. Success! Something in the search head must have made it blind to the indexer once its name had changed. Simply restarting Splunk on the search head fixed it.

In short, if you’re crazy enough to change the name of one of your indexers in a distributed Splunk environment, make sure you do the following:

  • Change hostname on the OS
  • Change ServerName in Splunk config files
    • Add connection_host = none in inputs.conf (optional?)
  • Clean up your deployment server
    • Delete old hostname from clients phoning home
    • MAKE SURE the new hostname won’t be sucked up into an unwanted server class
  • Clean up your search head
    • Delete old hostname search peer
    • Add new hostname search peer
    • Restart search head
  • Profit