I had an annoying “chicken and egg” problem with nginx proxy manager. It has hosts configurations that reference DNS names that are only reachable over VPN. It also hosts headscale, which is required for VPN to establish properly for said DNS entries. Brought up from scratch (say, after a reboot) NPM fails to launch because it can’t resolve the DNS entries. Headscale therefore isn’t reachable by the other nodes, and we’re stuck.
I developed a script to be run at boot to get around this annoying behavior of nginx proxy manager. It disables all other hosts in NPM except headscale, which doesn’t need DNS resolution as it resides on the same host. It then fires up NPM, and then tailscale, and waits to confirm the VPN is established and DNS resolution is working. Then it restores all the other hosts and restarts NPM. This script was 100% done myself, no AI assistance was used.
#!/bin/bash
# Script to properly bring things up after a reboot
# Name resolution doesn't happen until vpn VIP comes up
# NPM doesn't spin up until name resolution works
# vpn headscale is part of NPM
#
# Replace all VPN DNS host entries with 127.0.0.1
# Wait for NPM to come up
# Restore original host entries to get name resolution to work
# restart npm
#
# Run on a cron job @reboot. Ensure cron service is enabled.
# @reboot /docker/npm/reboot-script.sh | tee /tmp/reboot-script.log

# Variables
DOCKER_DIR=/docker/npm
CONF_DIR=$DOCKER_DIR/data/nginx/proxy_host
TEMP_DIR=/tmp/$(basename $CONF_DIR)
VPN_IP=100.1.1.1

# Log start of script
echo "Reboot script started on $(date)"

# Backup host entries
rsync -aP --delete $CONF_DIR $(dirname $TEMP_DIR)

# Disable all hosts except for headscale
sed -i  's/\".*.<VPN_DNS_SUFFIX>\"/\"127.0.0.1\"/g' $CONF_DIR/*.conf
sed -i  's/http:\/\/.*.<VPN_DNS_SUFFIX>/http:\/\/127.0.0.1/g' $CONF_DIR/*.conf

# Listen on 127.0.0.1 for npm
sed -i "s/$VPN_IP/127.0.0.1/g" $DOCKER_DIR/docker-compose.yml

# Stop and restart npm
cd $CONF_DIR && docker compose down && docker compose up -d

# Wait for NPM to launch
until netstat -an|grep 0.0.0.0:80 >/dev/null; do echo "Waiting for NPM"; sleep 5; done; echo "NPM up"

# Restart tailscale
systemctl restart tailscaled

# Wait until VPN pings are successful
until ping -w 1 -c 1 <VPN_DNS_IP> >/dev/null; do echo "Waiting for VPN"; sleep 5; done; echo "VPN Successful"

# Restore config files
rsync -aP $TEMP_DIR/ $CONF_DIR
sed -i "s/127.0.0.1/$VPN_IP/g" $DOCKER_DIR/docker-compose.yml

# Restart npm
cd $CONF_DIR && docker compose down && docker compose up -d

echo "Reboot script completed on $(date)"
I recently upgraded to Proxmox Virtual Environment 9 and was dismayed to see the server just hung forever after saying disks were initialized. A boot in debug mode (advanced grub boot option) revealed that systemd was hanging forever on waiting for the network service to start.
My first trick was to give the networking service a timeout by modifying /etc/systemd/system/network-online.target.wants/networking.service and adding TimeoutStartSec=90sec to the [Service] section. This at least allowed the system to boot normally and not hang anymore.
After boot, however, networking did not work. After much troubleshooting I found this article explaining it has to do with a post-up command I had for my mesh networking interface: post-up /usr/bin/systemctl restart frr.service
Once I removed that line, I was able to boot normally.
I followed this guide to get NVIDIA drivers working on my Proxmox machine. However when I tried to get them working in my container I couldn’t see how to get nvidia-smi installed. Thankfully this blog had what I needed.
The step I missed was copying & installing the NVIDIA drivers into the container with this flag:
--no-kernel-module
That got me one step closer but I could not spin up open-webui in a container. I kept getting the error
Error response from daemon: could not select device driver "nvidia" with capabilities: [[gpu]]
An additional hurtle I encountered was this error:
Error response from daemon: failed to create task for container: failed to create shim task: OCI runtime create failed: runc create failed: unable to start container process: error during container init: error running prestart hook #0: exit status 1, stdout: , stderr: Auto-detected mode as 'legacy'
nvidia-container-cli: mount error: failed to add device rules: unable to find any existing device filters attached to the cgroup: bpf_prog_query(BPF_CGROUP_DEVICE) failed: operation not permitted: unknown
I found here that the fix is to change a line in /etc/nvidia-container-runtime/config.toml. Uncomment and change no-cgroups to true.
no-cgroups = true
Success.
Not working after reboot
I had a working config until I rebooted the host. It turns out that two services need to run on the host:
I encountered an error when trying to set up alltalk tts:
nvidia-container-cli: mount error: stat failed: /dev/nvidia-modeset: no such file or directory: unknown
It turns out I needed to expose /dev/nvidia-modeset to the container as well. Thanks to this reddit post for the answer. The complete container passthrough config is now this:
Follow a similar procedure above of downing each OSD one by one on the old host. Remove the drives and place them in the new host. Then run the following:
As time goes on it’s getting harder to access the remote console on one of my older systems. It requires an old version of Java that just doesn’t work right on modern operating systems. Fortunately, Docker has come to my rescue.
ipmi-kvm-docker is a simple docker setupthat will spin up an old version of firefox with the old version of Java that’s required. It wraps it all nicely in a graphical environment inside the docker container and uses novnc to serve this environment up as a web page. You can configure which port it uses, and then you simply connect to your docker host on that port. You can also specify a volume to mount if you have ISOs or other files you’d like your IPMI environment to see. Brilliant.
I simply ran these commands on my docker system to get it up and running:
docker run -p 8080:8080 -v /your/local/folder:/root/images solarkennedy/ipmi-kvm-docker
Then all I had to do was connect to my docker system on port 8080 in a browser. It worked great. My 10+year old server is still going strong, and easy to reinstall now thanks to this tool.
I needed to add multiple domains to search DNS with on my Cent7 box. It turns out there are two ways to do it. Cent7 uses networkmanager, so you can use the cli tool to add what you want, or you can edit the file directly.
Using nmcli:
sudo nmcli con mod eth0 ipv4.dns-search "domain1.org,domain2.org,domain3.org"
This causes nmcli to add this line to your network interface config file (/etc/sysconfig/network-scripts/ifcfg-eth0 in my case)
DOMAIN="domain1.org domain2.org domain3.org"
After either using nmcli or manually editing your file, simply restart the network service and your search domains now work!
My off-site backup involves sending borgbackup archives of VM images to a remote synology server. I recently needed to restore a single file from one of the VM images stored within this borg backup repository on the remote server. My connection to this server is not very fast so I didn’t want to wait to download the entire image file to mount it locally.
My solution was to mount the remote borgbackup repository on my local machine over SSH so I could poke around for and copy the specific file I wanted. This requires the borgbackup binary to be present on the remote machine. Since it’s a synology, I simply copied the standalone binary over.
The restore process was complicated by the fact that the VM disk image is owned by root, so in order to access the file I needed to mount the remote repository as root.
I needed to send some test packets over UDP to make sure connectivity was working. I found this site which outlined how to do it really well
nc -u <IP/hostname> <port>
Then on the next line you can send test messages, then hit CTRL+D when done. In my case I wanted to test sending syslog data, so I did nc -u <hostname> 514, then wrote test messages. the -u specifies UDP and 514 is the syslog port. I was then able to confirm on the other end the message was received. Handy.
I’ve once again switched from Proxmox to Arch Linux for my desktop machine. Both use KVM so it’s really just a matter of using the different VM manager syntax (virt-manager vs qm.) I used my notes from my previous stint with Arch, my article on GPU Passthrough in Proxmox as well as a thorough reading of the Arch wiki’s PCI Passthrough article.
Enable IOMMU
Configure GRUB to load the necessary iommu modules at boot. Append amd_iommu=on iommu=pt to the end of GRUB_CMDLINE_LINUX_DEFAULT (change accordingly if you have Intel instead of AMD)
sudo vim /etc/default/grub
...
GRUB_CMDLINE_LINUX_DEFAULT="loglevel=3 amd_iommu=on iommu=pt"
Run update-grub
sudo update-grub
Reserve GPU for VFIO
Reserve the GPU you wish to pass through to a VM for use with the vfio kernel driver (so the host OS doesn’t interfere with it)
Determine the PCI address of your GPU
Run lspci -v and look for your card. Mine was 01:00.0 & 01:00.1. You can omit the part after the decimal to include them both in one go – so in that case it would be 01:00
Run lspci -n -s <PCI address from above> to obtain vendor IDs. Example : lspci -n -s 01:00 01:00.0 0300: 10de:1b81 (rev a1) 01:00.1 0403: 10de:10f0 (rev a1)
Assign your GPU to vfio driver using the IDs obtained above. Example using above IDs: echo "options vfio-pci ids=10de:1b81,10de:10f0" >> /etc/modprobe.d/vfio.conf
Reboot the host to put the kernel / drivers into effect.
Assuming you’re using network manager for your connections, create a bridge (thanks to ciberciti.biz & the arch wiki for information on how to do so.) Replace interface names with ones corresponding to your machine:
sudo nmcli connection add type bridge ifname br0 stp no
sudo nmcli connection add type bridge-slave ifname enp4s0 master br0
sudo nmcli connection show
#Make note of the active connection name
sudo nmcli connection down "Wired connection 2" #from above
sudo nmcli connection up bridge-br0
Create a second bridge bound to lo0 for host-only communication. Change IP as desired:
sudo nmcli connection add type bridge ifname br99 stp no ip4 192.168.2.1/24
sudo nmcli connection add type bridge-slave ifname lo master br99
sudo nmcli connection up bridge-br99
Configure VM
Initial configuration
When creating the passthrough VM, make sure chipset is Q35.
Set the CPU model to host-passthrough (type it in, there is no dropdown for it.)
When adding disks / other devices, set the device model to virtio
Add your GPU by going to Add Hardware and finding it under PCI Host Device.
Windows 10 specific tweaks
If your passthrough VM is going to be windows based, some tweaks are required to get the GPU to work properly within the VM.
Ignore MSRs (blue screen fix)
Later versions of Windows 10 instantly bluescreen with kmode_exception_not_handled unless you pass an option to ignore MSRs. Add the kvm ignore_msrs=1 option in /etc/modprobe.d/kvm.conf to do so. Optionally add the report_ignored_msrs=0 option to squelch massive amounts of kernel messages every time an MSR was ignored.
Use the virsh edit command to make some tweaks to the VM configuration. We need to hide the fact that this is a VM otherwise the GPU drivers will not load and will throw Error 43. We need to add a vendor_id in the hyperv section, and create a kvm section enabling hidden state, which hides certain CPU flags that the drivers use to detect if they’re in a VM or not.
If you operate on a multi-core system such as my AMD Ryzen Threadripper the you will want to optimize your CPU core configuration in the VM per the CPU Pinning section in the Arch Wiki
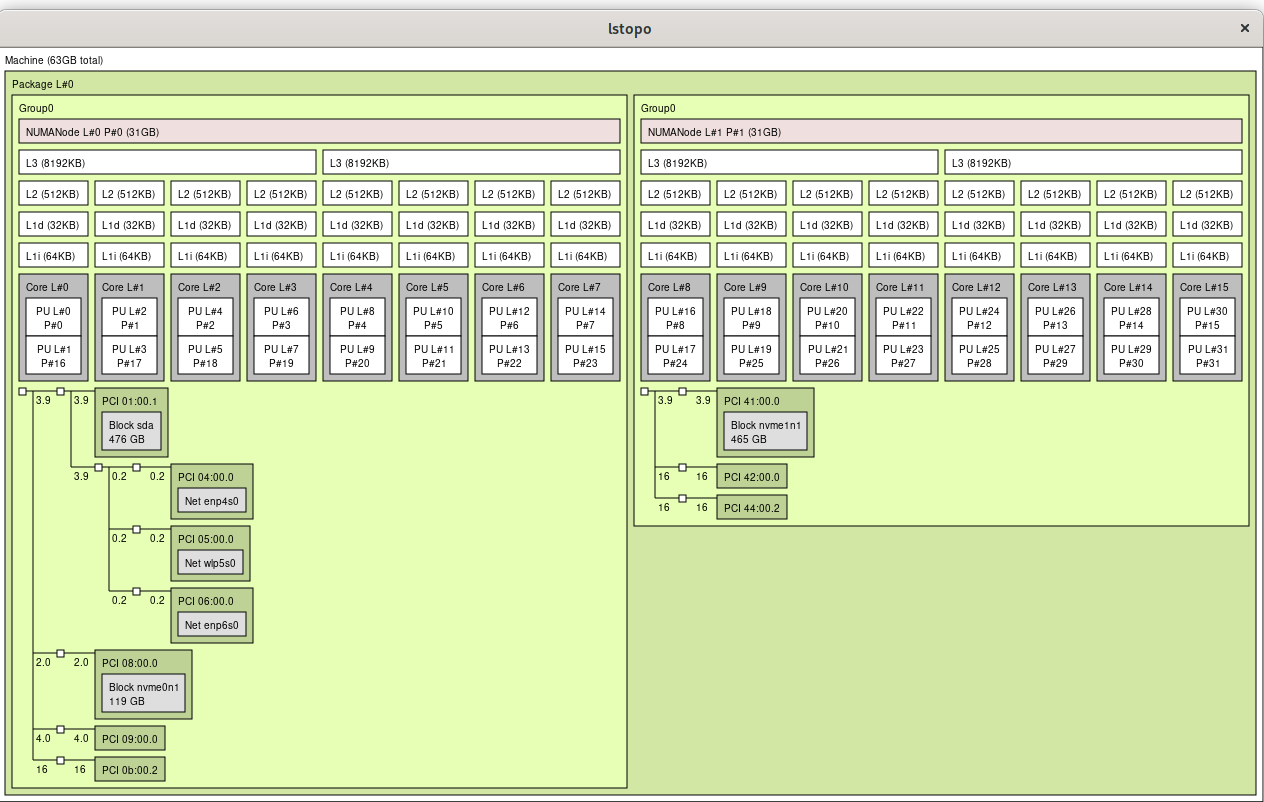
Determine your CPU topology by running lscpu -e and lstopo The important things to look for are the CPU number and core number. On my box, it looks like this:
From the above output I see my CPU core 0 is shared by CPUs 0 & 16, meaning CPU 0 and CPU 16 (as seen by the Linux kernel) are hyperthreaded to the same physical CPU core.
Especially for gaming, you want to keep all threads on the same CPU cores (for multithreading) and the same CPU die (on my threadripper, CPUs 0-7 reside on one physical die, and CPUs 8-15 reside on the other, within the same socket.)
In my case I want to dedicate one CPU die to my VM with its accompanying hyperthreads (CPUs 0-7 & hyperthreads 16-23) You can accomplish this using the virsh edit command and creating a cputune section (make sure you have a matching vcpu count for the number of cores you’re configuring.) Also edit CPU mode with the proper topology of 1 socket, 1 die, 8 cores with 2 threads. Lastly, configure memory to only be from the proper NUMA node the CPU cores your VM is using (Read here for more info.)
Non-uniform memory access is essential for 1st and 2nd gen Ryzen chips. It turns out that by default my motherboard hid the real NUMA configuration from the operating system. Remedy this by changing the BIOS setting to set Memory Interleaving = Channel (for my ASRock X399 motherboard it’s in CBS / DF options.) See here: https://www.reddit.com/r/Amd/comments/6vrcq0/psa_threadripper_umanuma_setting_in_bios/
After changing BIOS setting, lstopo now shows proper configuration:
CPU frequency
Change CPU frequency setting to use performance mode:
Append default_hugepagesz=1G hugepagesz=1G hugepages=16 to the kernel line in /etc/default/grub and re-run sudo grub-mkconfig -o /boot/grub/grub.cfg
Configure FIFO CPU scheduling
The Arch Wiki mentions to run qemu-system-x86_64 with taskset and chrt but doesn’t mention how to do so if you’re using virt-manager. Fortunately this reddit thread outlined how to accomplish it: libvirt hooks. Create the following script and place it in /etc/libvirt/hooks/qemu , change the VM variable to match the name of your VM, mark that new file as executable (chmod +x /etc/libvirt/hooks/qemu ) and restart libvirtd
#!/bin/bash
#Hook to change VM to FIFO scheduling to decrease latency
#Place this file in /etc/libvirt/hooks/qemu and mark it executable

#Change the VM variable to match the name of your VM
VM="win10"

if [ "$1" == "$VM" ] && [ "$2" == "started" ]; then
  if pid=$(pidof qemu-system-x86_64); then
     chrt -f -p 1 $pid
    echo $(date) changing CPU scheduling to FIFO for VM $1 pid $pid >> /var/log/libvirthook.log
  else
    echo $(date) Unable to acquire PID of $1 >> /var/log/libvirthook.log
  fi
fi
#Additional debug
#echo $(date) libvirt hook arg1=$1 arg2=$2 arg3=$3 arg4=$4 pid=$pid >> /var/log/libvirthook.log
Isolate CPUs
Update 7/28/20: I no longer do this in favor of the qemu hook script above, which prioritizes to p1 the qemu process for the cores it needs. I’m leaving this section here for historical/additional tweaking purposes.
Update 6/28/20: Additional tuning since I was having some stuttering and framerate issues. Also read here about the emulatorpin option
Dedicate CPUs to the VM (host will not use them) – append isolcups, nohz_full & rcu_nocbs kernel parameters into /etc/default/grub
Update 7/8/2020: I found this article and this reddit thread (and this one) on how to use pulseaudio for your guest VM to get low latency guest VM audio piped to the host machine.
Update qemu config
edit /etc/libvirt/qemu.conf: uncomment the line #user = "root" and replace “root” with your username
Update pulseaudio config
Edit /etc/pulse/daemon.conf and uncomment the following lines (remove semicolon)
Make mirrorlist use only xmission sed -i 's/^Server/#Server/g;s/#Server\(.*xmission.*\)/Server\1/g' /etc/pacman.d/mirrorlist
Install base system plus extra packages: pacstrap /mnt base linux linux-firmware lvm2 efibootmgr samba vim htop networkmanager inetutils man-db man-pages texinfo openssh grub
Generate fstab genfstab -U /mnt >> /mnt/etc/fstab
Enter new environment chroot arch-chroot /mnt
Set timezone ln -sf /usr/share/zoneinfo/America/Boise /etc/localtime
Configure en_US locales sed -i 's/^#en_US\(.*\)/en_US\1/g' /etc/locale.gen locale-gen
Make dvorak layout permanent echo "KEYMAP=dvorak" > /etc/vconsole.conf