Tag Archives: php

Fix wordpress PHP change was reverted error

Since WordPress 4.9 I’ve had a peculiar issue when trying to edit theme files using the web GUI. Whenever I tried to save changes I would get this error message:

Unable to communicate back with site to check for fatal errors, so the PHP change was reverted. You will need to upload your PHP file change by some other means, such as by using SFTP.

After following this long thread I saw the suggestion to install and use the Health Check plugin to get more information into why this is happening. In my case I kept getting this error message:

The loopback request to your site failed, this may prevent WP_Cron from working, along with theme and plugin editors.<br>Error encountered: (0) cURL error 28: Connection timed out after 10001 milliseconds

I researched what a loopback request is in this case. It’s the webserver reaching out to its own site’s url to talk to itself. My webserver was being denied internet access, which included its own URL, so it couldn’t complete the loopback request.

One solution, mentioned here, is to edit the hosts file on your webserver to point to 127.0.0.1 for the URL of your site. My solution was to open up the firewall to allow my server to connect to its URL. I then ran into a different problem:

The loopback request to your site failed, this may prevent WP_Cron from working, along with theme and plugin editors.<br>Error encountered: (0) cURL error 60: Peer's Certificate issuer is not recognized.

After digging for a while I found this site which explains how to edit php.ini to point to an acceptable certificate list. To fix this on my Cent7 machine I edited /etc/php.ini and added this line (you could also add it to /etc/php.d/curl.ini)

curl.cainfo="/etc/pki/tls/cert.pem"

This caused php’s curl module to use the same certificate trust store that the underlying OS uses.

Then restart php-fpm if you’re using it:

sudo systemctl restart php-fpm

Success! Loopback connections now work properly.


Update 7/16/2018: I still had a wordpress site that was giving me certificate grief despite the above fix. After MUCH frustration I finally found this post where André Gayle points out that wordpress ships with its own certificate bundle, independent of even curl’s ca bundle! It’s located in your wordpress directory/wp-includes/certificates folder.

My solution to this extremely frustrating problem was to remove their bundle and symlink to my own (Cent 7 box – adjust your path to match where your wordpress install and certificate trust store is located)

sudo mv /var/www/html/wordpress/wp-includes/certificates/ca-bundle.crt /var/www/html/wordpress/wp-includes/certificates/ca-bundle.crt.old
sudo ln -s /etc/pki/tls/cert.pem /var/www/html/wordpress/wp-includes/certificates/ca-bundle.crt

FINALLY no more loopback errors in the Health Check plugin, and thus the ability to edit theme files in the editor.

Fix WordPress “Sorry, you are not allowed to access this page.”

I recently came across an issue with my WordPress installation. It’s situated behind a load balancer where SSL is terminated. The load balancer takes HTTPS traffic, then forwards it as HTTP on port 80 to the wordpress server.

I was running issues with a redirect loop after installing wordpress. The solution was to add this bit of code to wp-config.php:

define('FORCE_SSL_ADMIN', true);
if ($_SERVER['HTTP_X_FORWARDED_PROTO'] == 'https')
 $_SERVER['HTTPS']='on';

This solves the redirect loop issue but then I ran into a different problem. When I tried to sign into wp-admin I would get this message:

Sorry, you are not allowed to access this page.

After much digging I found this post which emphasizes that you must place that code BEFORE anything else in wp-config.php (except for the beginning PHP tag.) Success!

Monitor your servers with phpservermonitor

I have a handful of servers and for years I’ve been wanting to get some sort of monitoring in place. Today I tried out php server monitor and found it was pretty easy to set up and use.

Download

The installation process was pretty straightforward.

  • Install PHP, mysql, and apache
  • Create database, user, password, and access rights for mysql
  • Download .tar.gz and extract to /var/www
  • Configure Apache site file to point to phpservermonitor directory
  • Navigate to the IP / URL of your apache server and run the installation script

The above process is documented fairly well on their website. I configured this to run on my Raspberry Pi 2. This was my process:

Install dependencies:

sudo apt-get install php5 php5-curl php5-mysql mysql-server

Configure mysql:

sudo mysql_secure_installation

Create database:

mysql -u root -p
create database phpservermon;
create user 'phpservermon'@'localhost' IDENTIFIED BY 'password';
 grant all privileges on phpservermon.* TO 'phpservermon'@'localhost'; 
flush privileges;

Extract phpservermon to /var/www and grant permissions

tar zxvf <phpservermon_gzip_filename> -C /var/www
sudo chown -R www-data /var/www/*

Configure php:

sudo vim /etc/php5/apache2/php.ini
#uncomment date.timezone and set your timezone
date.timezone = "America/Boise"

Configure apache:

sudo cp /etc/apache2/sites-available/default /etc/apache2/sites-available/phpservermon

#Modify /etc/apache2/sites-available/phpservermon server root to point to directory above, also add a ServerName if desired

sudo a2ensite phpservermon
sudo service apache2 reload

Configure cron (I have it check every minute but you can configure whatever you like)

*/1 * * * * /usr/bin/php /var/www/phpservermon/cron/status.cron.php

Navigate to the web address you’ve configured in apache and follow the wizard.

It’s pretty simple but it works! A nice php application to monitor websites and services.


Purge Varnish cache by visiting URL

I came across a need to allow web developers to purge Varnish cache. The problem is the developers aren’t allowed access to the production machine and our web application firewall blocks purge requests. I needed for there to be a way for them to simply access a page hosted on the webserver and cause it to purge its own varnish cache.

I was able to accomplish this by placing a PHP file in the webserver’s directory and controlling access to it via .htaccess. Thanks to this site for the php script and this one for the .htaccess guidance.

Place this PHP file where the web devs can access it, making sure to modify the $hostname variable to suit your needs and to rename the file to have a .php extension.

<?php

#Simple script to purge varnish cache
#Adapted from the script from http://felipeferreira.net/index.php/2013/08/script-purge-varnish-cache/
#This script runs locally on the webserver and will purge all cached pages for the site specified in $hostname
#Modify the $hostname parameter below to match the hostname of your site

$hostname = $_SERVER['SERVER_NAME'];

header( 'Cache-Control: max-age=0' );

$port     = 80;
$debug    = false;
$URL      =  "/*";

purgeURL( $hostname, $port, $URL, $debug );

function purgeURL( $hostname, $port, $purgeURL, $debug )
{
    $finalURL = sprintf(
        "http://%s:%d%s", $hostname, $port, $purgeURL
    );

    print( "<br> Purging ${finalURL} <br><br>" );

    $curlOptionList = array(
        CURLOPT_RETURNTRANSFER    => true,
        CURLOPT_CUSTOMREQUEST     => 'PURGE',
        CURLOPT_HEADER            => true ,
        CURLOPT_NOBODY            => true,
        CURLOPT_URL               => $finalURL,
        CURLOPT_CONNECTTIMEOUT_MS => 2000
    );

    $fd = true;
    if( $debug == true ) {
        print "<br>---- Curl debug -----<br>";
        $fd = fopen("php://output", 'w+');
        $curlOptionList[CURLOPT_VERBOSE] = true;
        $curlOptionList[CURLOPT_STDERR]  = $fd;
    }

    $curlHandler = curl_init();
    curl_setopt_array( $curlHandler, $curlOptionList );
    $return = curl_exec($curlHandler);

    if(curl_error($curlHandler)) {
    print "<br><hr><br>CRITICAL - Error to connect to $hostname port $port - Error:  curl_error($curl) <br>";
    exit(2);
 }

    curl_close( $curlHandler );
    if( $fd !== false ) {
        fclose( $fd );
    }
    if( $debug == true ) {
        print "<br> Output: <br><br> $return <br><br><hr>";
    }
}
?>

<title>Purge cache</title>
Press submit to purge the cache
<form method="post" action="<?php echo $PHP_SELF;?>">
<input type="submit" value="submit" name="submit">
</form>

Place (or append) the following .htaccess code in the same directory you placed the php file:

#Only allow internal IPs to access cache purge page
<Files "purge.php">
    Order deny,allow
    Deny from all
    SetEnvIf X-Forwarded-For ^10\. env_allow_1
    Allow from env=env_allow_1
    Satisfy Any
</Files>

The above code only allows access to the purge.php page from IP addresses beginning with “10.” (internal IPs)

This PHP / .htaccess combo allowed the web devs to purge cache without any system access or firewall rule changes. Hooray!

Speed up WordPress in CentOS7 using caching

It has recently come to my attention that WordPress has a serious design flaw: it’s trivially easy to execute a denial of service attack against it in its default state. One simply has to hold down F5 to cause the site to slow to a crawl and in many cases crash entirely.

The reason behind this is that every single page request turns into the server parsing PHP code and executing a database call. Holding down F5 initiates hundreds of page view requests, which turn into hundreds of PHP code execution threads (each taking up CPU and memory) and hundreds of database calls. The server becomes quickly overwhelmed and runs out of resources.

The solution to this problem (on CentOS 7 at least) is a combination of php-fpm, zendopcache, APC, varnish and W3 Total Cache. It’s definitely more complicated but it eliminates this problem and massively increases site load times and general responsiveness.

Repositories

To install the required addons we will need to have the epel repository enabled:

yum -y install epel-release

zend-opcache

This caches PHP opcode to greatly speed up PHP code execution. It’s included in later versions of PHP but alas CentOS 7 is stuck on PHP 5.4, which does not include such caching. You have to install it manually. Thanks to this site for the information.

sudo yum -y install php-pecl-zendopcache

apc

This is another kind of of cache – this time for database operations.

sudo yum -y install php-pecl-apcu php-devel gcc
sudo pecl install apc
#accept defaults when prompted

php-fpm

php-fpm is a different way to serve up PHP code. Instead of apache running a module to interpret php code, it will send all php requests to a separate PHP server, optimized for speed. That php server will interpret the code and return the results to your browser.

sudo yum -y install php-fpm
sudo systemctl enable php-fpm

Modify your apache config to forward all php requests to php-fpm. Be sure to modify this to match your site URL setup:

sudo sh -c "echo '
    <LocationMatch \"^/(.*\.php(/.*)?)$\"> 
        ProxyPass fcgi://127.0.0.1:9000/var/www/html/\$1 
    </LocationMatch>' >> /etc/httpd/conf/httpd.conf"

Varnish

Varnish is a reverse proxy server optimized for caching pages. It sits between your visitors and your webserver and caches whatever it can to increase responsiveness and speed. This site pointed me in the right direction for configuring Varnish  in CentOS 7.

sudo yum -y install varnish
sudo systemctl enable varnish

Change apache to listen on port 8080 instead of port 80:

sudo sed -i /etc/httpd/conf/httpd.conf -e 's/Listen 80/&80/'

Change varnish to listen on port 80 instead of port 6081:

sudo sed -i /etc/varnish/varnish.params -e 's/VARNISH_LISTEN_PORT=6081/VARNISH_LISTEN_PORT=80/g'

Now we need to configure Varnish to properly cache wordpress sites. I found the configuration from this site to be the most helpful. I normally include code blocks to copy and paste but the configuration file is pretty big.

Instead, click here for the configuration code, then copy the whole page and paste it into your terminal.

Update 12/28/2016: I’ve updated the varnish configuration code slightly to allow the “purge all caches” button of W3 Total cache to work. Thanks to this site for pointing me in the right direction and this thread for getting me there.

After varnish has been configured, restart your new PHP / caching stack:

sudo systemctl restart httpd varnish php-fpm

Logging

Update: added this section on 11/4/2016

By default varnish does not log its traffic. This means that your apache log will only log things varnish does not cache. We have to configure varnish to log traffic so you don’t lose insight into who is visiting your site.

Update 2/14/2017:  I’ve discovered a better way to do this. The old way is still included below, but you really should use this other way.

New way:

CentOS ships with some systemd scripts for you. You can use them out of the box by simply issuing

systemctl start varnishncsa
systemctl enable varnishncsa

If you are behind a reverse proxy then you will want to tweak the varnishncsa output a bit to reflect x-forwarded-for header values (thanks to this github discussion for the guidance.) Accomplish this by appending a modified log output format string to /lib/systemd/system/varnishncsa.service:

sudo sed -i /lib/systemd/system/varnishncsa.service -e "s/ExecStart.*/& -F \'%%{X-Forwarded-For}i %%l %%u %%t \"%%r\" %%s %%b \"%%{Referer}i\" \"%%{User-agent}i\"\' /g"

Lastly, reload systemd configuration, enable, and start the varnishncsa service:

sudo systemctl daemon-reload
sudo systemctl enable varnishncsa
sudo systemctl start varnishncsa

Old way:

First, enable rc.local

sudo chmod +x /etc/rc.local
sudo systemctl enable rc-local #you can ignore errors here

Next, add this entry to the rc.local file:

sudo sh -c 'echo "varnishncsa -a -w /var/log/varnish/access.log -D -P /var/run/varnishncsa.pid" >> /etc/rc.local'

If your varnish server is behind a reverse proxy (like a web application firewall) then modify the above code slightly (thanks to this site for the information on how to do so)

sudo sh -c "echo varnishncsa -a -F \'%{X-Forwarded-For}i %l %u %t \"%r\" %s %b \"%{Referer}i\" \"%{User-agent}i\"\' -w /var/log/varnish/access.log -D -P /var/run/varnishncsa.pid >> /etc/rc.local"

W3 Total Cache

The improvements above will greatly increase your speed and eliminate the F5 denial of service issue. The last bit to make it even sweeter is to install the W3 Total Cache wordpress plugin. Thanks to this site for the information that pointed me in the right direction.

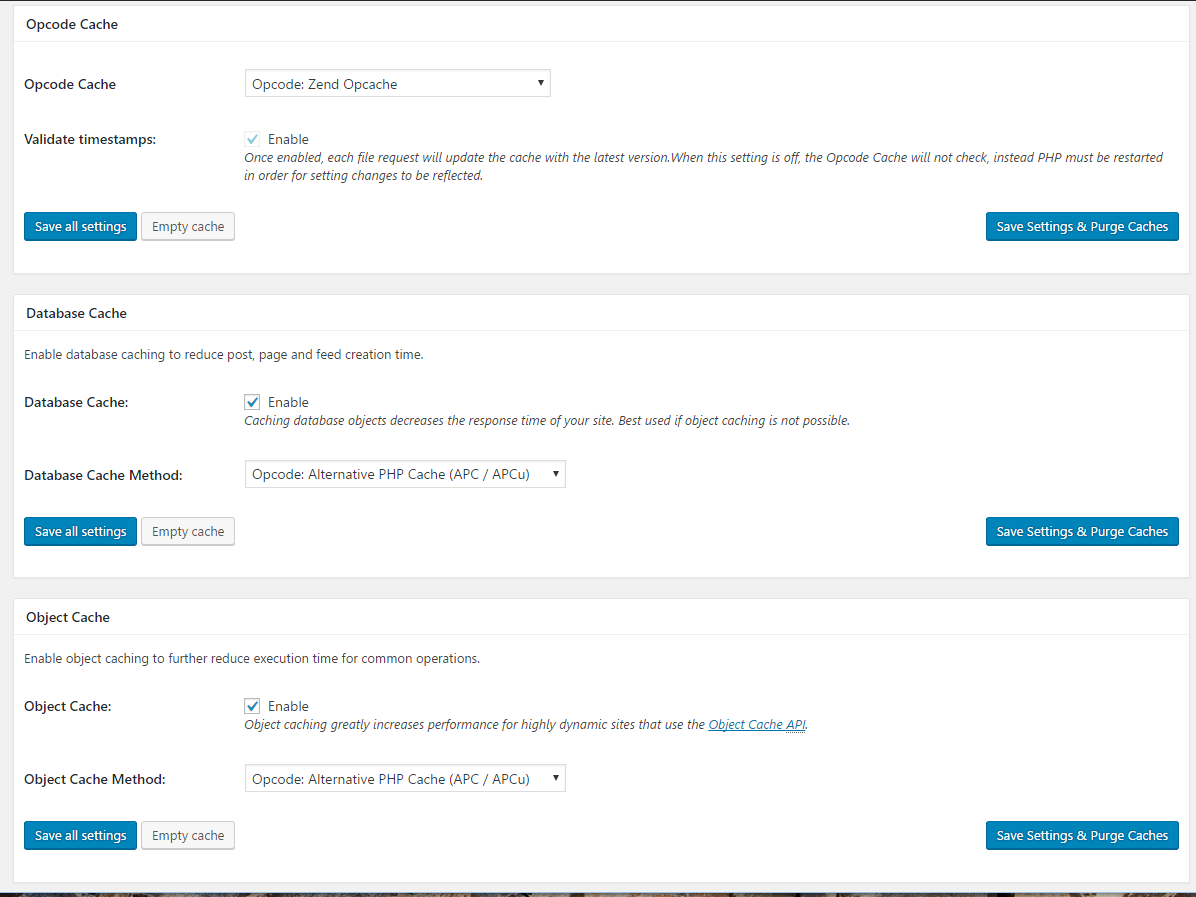
There are a ton of options in W3 Total cache that are beyond the scope of this tutorial. For our purposes we will enable the following options in the General Settings tab of the plugin:

opcode-database-object

Opcode cache: Opcode:Zend Opcache

Database cache: Check enable, select Opcode: Alternative PHP Cache (APC / APCu)

Object cache: Check enable, select Opcode: Alternative PHP Cache (APC / APCu)

proxy

Reverse Proxy: Check “Enable reverse proxy caching via varnish”
Specify 127.0.0.1 in the varnish servers box. Click save all settings.

Full speed ahead

With all of these pieces into place your site is definitely more complicated, but it is also much faster to load. Enjoy.

Troubleshooting

If you go through all these steps only to see this very non-descriptive message:

File not found

it means you have PHP forwarding to the wrong directory. Modify the LocationMatch section you inserted at the bottom of /etc/httpd/conf/httpd.conf earlier to ensure the correct directory structure is passed for php files.

Install WordPress on CentOS 7 with SELinux

I’ve been frustrated lately with the number of tutorials for installing WordPress on CentOS 7 that say to simply turn SELinux off. This is an unacceptable workaround. It’s simply lazy administration. SELinux is not designed to make your job harder (although it can do that pretty well), it’s there to make your system safer.

I have scoured the internet and pieced together bits of information from several sources – mainly here, here, and here to put together a tutorial that walks you through how to install WordPress in CentOS7 while keeping SELinux turned on.

It took a lot of reading to understand SELinux, but once you understand it, it makes a whole lot more sense. Go figure.

Apache

Install required packages:

sudo yum -y install httpd
sudo systemctl enable httpd

Modify apache config to allow mod_rewrite:

sudo sed -i /etc/httpd/conf/httpd.conf -e 's/AllowOverride None/AllowOverride All/g'

Open necessary firewall ports:

sudo firewall-cmd --add-service=http --permanent
sudo systemctl restart firewalld

Start apache:

sudo systemctl start httpd

Navigate to your new site to make sure the testing page comes up.

Update 11/4/2016: If you are behind a reverse proxy such as varnish or a web application firewall, you will want to modify your apache configuration to log x-forwarded-for IPs to make the logs more meaningful:

sudo sed -i /etc/httpd/conf/httpd.conf -e 's/%h/%{X-Forwarded-For}i/g'

MariaDB

Install:

sudo yum -y install mariadb-server mariadb
sudo systemctl enable mariadb

Run initial mysql configuration to set database root password

sudo systemctl start mariadb
sudo mysql_secure_installation

Create a wordpress database and user:

mysql -u root -p 
#enter your mysql root password here
create user wordpress;
create database wordpress;
GRANT ALL PRIVILEGES ON wordpress.* To 'wordpress'@'localhost' IDENTIFIED BY 'password';
quit;

WordPress

Install PHP and restart apache

sudo yum -y install php php-mysql php-gd php-ldap php-odbc php-pear php-xml php-xmlrpc php-mbstring php-snmp php-soap curl
sudo systemctl restart httpd

Configure base wordpress directory

Download, extract, and set permissions for your wordpress installation:

wget https://wordpress.org/latest.zip
sudo unzip latest.zip -d /var/www/html
sudo chown apache:apache -R /var/www/html/wordpress

Optional: Change Apache document root so you don’t need to tack /wordpress at the end of the url:

sudo sed -i /etc/httpd/conf/httpd.conf -e 's/DocumentRoot \"\/var\/www\/html/&\/wordpress/g'
sudo systemctl restart httpd

Configure upload directory

If you want users to upload content, then you will want to assign the http_sys_rw_content_t selinux security context for the wp-uploads directory (create it if it doesn’t exist)

sudo mkdir /var/www/html/wordpress/wp-content/uploads
sudo chown apache:apache /var/www/html/wordpress/wp-content/uploads
sudo semanage fcontext -a -t httpd_sys_rw_content_t "/var/www/html/wordpress/wp-content/uploads(/.*)?"
sudo restorecon -Rv /var/www/html/wordpress/wp-content/uploads

Run the wizard

In order for the wizard to run properly we need to temporarily give the wordpress directory httpd_sys_rw_content_t selinux context

sudo chcon -t httpd_sys_rw_content_t /var/www/html/wordpress/

Now navigate to your new website in a browser and follow the wizard, which will create a wp-config.php file inside the wordpress directory. Once your site is properly set up, restore the original security context for the wordpress directory:

sudo restorecon -v /var/www/html/wordpress/

Success! Everything is working within the proper SELinux contexts.

Troubleshooting

Permission denied when accessing /wordpress

The obvious thing to check is to make sure the directory /var/www/html/wordpress has the ownership set to apache. That didn’t fix my issue, though. Thanks to serverfault I narrowed this down to a selinux permissions issue.  Changing the selinux context to httpd_sys_content_t for the wordpress folder fixed the issue.

sudo semanage fcontext -a -t httpd_sys_content_t /var/www/html/wordpress/
sudo restorecon -v /var/www/html/wordpress/

Sorry, but I can’t write the wp-config.php file.

“You can create the wp-config.php manually and paste the following text into it.”

I had a suspicion that writing files was also a selinux issue. This was confirmed when I decided to tail /var/log/audit/audit.log and found this when the wordpress installer tried to write wp-config.php:

type=AVC msg=audit(1475596102.558:16868): avc: denied { write } for pid=5751 comm="httpd" name="wordpress" dev="dm-0" ino=68494934 scontext=system_u:system_r:httpd_t:s0 tcontext=system_u:object_r:httpd_sys_content_t:s0 tclass=dir
type=SYSCALL msg=audit(1475596102.558:16868): arch=c000003e syscall=21 success=no exit=-13 a0=7f9f4b931478 a1=2 a2=0 a3=1 items=0 ppid=5740 pid=5751 auid=4294967295 uid=48 gid=48 euid=48 suid=48 fsuid=48 egid=48 sgid=48 fsgid=48 tty=(none) ses=4294967295 comm="httpd" exe="/usr/sbin/httpd" subj=system_u:system_r:httpd_t:s0 key=(null)

This led me to find this great explanation from Francis Pereira on how to get wordpress and selinux to peacefully coexist. Also thanks to the excellent Redhat Manual for more information on what to do, combined with this very helpful guide from serverlab.

First, we need to temporarily grant httpd_sys_rw_content_t to the wordpress directory. This is to allow the initial wizard to create the wp-config.php file.

sudo chcon -t httpd_sys_rw_content_t /var/www/html/wordpress/

Now you can run the wizard and it will work properly.

Once your site is set up, restore the context to http_sys_content_t

sudo restorecon -v /var/www/html/wordpress/

Refresh owncloud file cache

I came across an issue with owncloud where I had manually placed files in my user directory but the files were not showing up in owncloud. I found from here that you can access the owncloud console directly and trigger a re-scan of your files.

To trigger a re-scan, open up a terminal session to your owncloud server and run the following command:

php /path/of/owncloud/console.php files:scan --all

This will trigger a re-scan of all files for all users. You can replace –all with a userid if you just want to scan a specific user’s folder instead.

WordPress wp-admin links are incorrect after site move

I’ve been scouring the internet for months for this particular issue.  It must not be very common. Ever since I moved my site from one source (local IP address) to another (web facing URL) I have had issues with bad links (things pointing to the old address instead of the new one.)

I have mostly resolved them (using methods from this post) but one vexing issue remained: links in wp-admin.php remained bad; specifically, the  column headers and pagination links in the All Posts section of managing the site – they all still pointed to the backend IP address instead of the domain name of the site.

I found a few bug reports mentioning this but no clear resolution. After investigating ticket 18944 I was put on the right track. One link from that ticket pointed me in the right direction, but the comment that really drove me to the resolution was the last one:

Any proxy configuration is “supported” by WordPress, you just need to remap the server vars based on whatever that particular proxy configuration is using.

This is proxy 101.

That made me realize that when I changed from a local IP to a public facing IP, I also went from direct access to the blog to being behind a reverse proxy. The issue I’ve been having is a proxy issue, not a site move issue. Thanks to the comment above, I learned I need to add a single line to wp-config.php:

$_SERVER[ 'HTTP_HOST' ]   = "jeppson.org";

Replace jeppson.org with the base URL of your site. That’s it! all links are correct now. Brilliant.

WordPress directing to old URL after upgrade to 4.0

I encountered an odd issue after upgrading one of my wordpress sites to version 4.0: the login page suddenly kept trying to redirect to its old address (I had changed addresses some time ago.)

I still don’t know how or why this happened, but after some googling the way to fix it was to follow instructions as outlined here.

wp-login.php can be used to (re-)set the URIs. Find this line:

require( dirname(__FILE__) . '/wp-load.php' );

and insert the following lines below:

//FIXME: do comment/remove these hack lines. (once the database is updated)
update_option('siteurl', 'http://your.domain.name/the/path' );
update_option('home', 'http://your.domain.name/the/path' );

You’re done. Test your site to make sure that it works right. If the change involves a new address for your site, make sure you let people know the new address, and consider adding some redirection instructions in your .htaccess file to guide visitors to the new location.

This worked for me – I could now log in with the correct URL.


Configure WordPress to report true IP addresses when behind a reverse proxy

Placing WordPress behind a Web Application Firewall (reverse proxy) greatly enhances the security of your site; however, it can also be quite a pain.

My most recent experience with hosting WordPress behind a reverse proxy is that all traffic is reported as coming from that reverse proxy regardless of where it truly came from. This is a problem for site statistics, or for my specific example, seeing the source IP address of comment spam.

The fix, fortunately, is fairly simple. It requires tweaking the PHP code just a little bit to use the X_FORWARDED_FOR header, if it exists. Simply add the following to the top of your wp-config.php file (in the base install directory of your WordPress installation)

/** Reverse Proxy configuration
Configures WordPress to show correct source IP addresses when it's behind a reverse proxy
*/
if(isset($_SERVER['HTTP_X_FORWARDED_FOR'])) {
        $list = explode(',',$_SERVER['HTTP_X_FORWARDED_FOR']);
        $_SERVER['REMOTE_ADDR'] = $list[0];
  }

That’s all! Future traffic should properly report source IP addresses from that point on. Thanks to the WordPress support forum for helping me find this fix.