Get geolocation info in Splunk with iplocation

Splunk 6 has many awesome new features, one of which is built-in IP geolocation. No longer do you have to manually lookup up city, state, and country when investigating logs – Splunk will do that for you. This page has the details.

For example, if I want my x_forwarded_for IP addresses to have geolocation, I tack this at the end of my query:

| iplocation x_forwarded_for | stats count by x_forwarded_for City Region Country

The fields iplocation can produce are:

  • City
  • Continent
  • Country
  • lat
  • lon
  • MetroCode
  • Region
  • Timezone

You can combine this query with DNS lookups (as detailed here) for a more complete picture of your data.

<search query> | iplocation x_forwarded_for | lookup dnslookup clientip as x_forwarded_for OUTPUT clienthost as hostname | stats count by x_forwarded_for City Region Country hostname

Neat.

Extract multiple Active Directory fields in Splunk

I had posted here about how to extract account names with a specific modifier (exclude account names ending in a dollar sign.) That worked for one specific instance, but I found I needed something better. Active Directory logs have multiples of the same value (Account_Name, Group_Name, etc.) that all depend on context, namely the value of the line two lines above it.

For example,

Message=A member was added to a security-enabled universal group.

Subject:
 Security ID: <Random long SID>
 Account Name: Administrator
 Account Domain: ExampleDomain
 Logon ID: <random hex value>

Member:
 Security ID: <Another random long SID>
 Account Name: CN=George Clooney,OU=ExampleDomain,OU=Hollywood,OU=California,DC=USA,DC=NA,DC=Terra

Group:
 Security ID: <Yet another long SID>
 Account Name: Old Actors
 Account Domain: ExampleDomain

You can see that there are three different Security ID fields, three different Account Name fields, and two different Account Domain fields. The key is the context: Subject account name, member account name, or group account name.

I wrestled for some time to find a regex expression for Splunk that would continue matching things after a line has ended. After much searching I came across this post which explained the need for a regex modifier to do what I wanted.

In my case I needed to use the (?s) modifier to include newline characters in my extraction. My new and improved AD regex extraction is as follows:

(?s)(Group:.+Account Name:\s+)(?P<real_group_name>[^\n]+)
  • (?s)  Regex modifier indicating to include new lines
  • Group:  Section I am interested in. You can replace this with Member: if you’re interested in member account names instead
  • .+ match one or more of any character (including new line as indicated by modifier above)
  • Account Name:\s+ This is in conjuction with the previous two items to create a match that includes the section name and anything after that until the spaces after Account Name
  • [^\n]+ Match one or more characters that is not a new line (since you might have an account name with spaces.)

Finally! This is the regex I’ve been looking for.


Fix tiny text in Windows 8.1

I really enjoy my new Microsoft Surface Pro 3. It has a high DPI screen which makes things very clear and sharp. Unfortunately, when you plug it into an external monitor, many Windows applications don’t deal with the DPI setting properly and thus appear blurry and/or the text is very tiny.

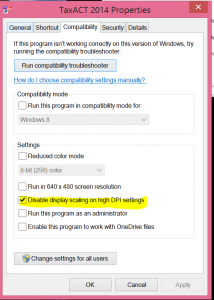
The workaround for this issue is a new compatibility mode setting in Windows 8 – Disable display scaling on high DPI settings. Simply right click on the shortcut of the problem application and go to properties, then go to the Compatibility tab, then check the box.

dpi

Success. Thanks to Microsoft for the information.

Use Sophos User portal and WAF on same port

The Sophos UTM firewall is a great piece of security software. It is designed with businesses in mind but is also free for home use. It has many features, two of which (User Portal and Web Application Firewall) compete for the same port – TCP 443 (https.) This is a shame if you want to run both services simultaneously but only have one IP address.

For some reason the folks at Astaro (Sophos) have not engineered a way to allow the WAF and User Portal to play nicely, saying on their forums to just configure them to use different ports. What if you have people who are behind firewalls that only allow ports 80 and 443? You are stuck.

I didn’t like that answer so I set out to research a way around this. The solution to this problem lies with Apache and its reverse proxy feature. A reverse proxy is a webserver that receives HTTP requests and forwards them to some other location, then returns the response.

My solution to the “I want both WAF and User Portal to use the same port” problem is to put the user portal on a different, internal-only port, spin up a small apache server, configure it to forward all requests to the user portal address:port combination, and add it as a real server in the sophos WAF.

Change user portal port

Easy enough: Go to Management / User Portal / Advanced tab, scroll down to the “Network Settings” section and pick a different port, then click apply.

Spin up a reverse proxy web server

I went with Ubuntu Server 14.04 so I could have newer software packages.

  1. Install apache
    sudo apt-get install apache2
  2. Enable needed modules
    sudo a2enmod ssl
    sudo a2enmod proxy
    sudo a2enmod proxy_http
  3. Configure apache to proxy all requests to your user portal
    #Add the following to default-ssl.conf
    sudo vim /etc/apache2/sites-enabled/default-ssl.conf
    SSLProxyEngine On
    #Enable the next 3 lines if you want to ignore certificate errors
    #SSLProxyVerify none
    #SSLProxyCheckPeerCN off
    #SSLProxyCheckPeerName off
    
    #Configure the reverse proxy to forward all requests
    ProxyPass / https://<your firewall IP>:<port you chose earlier>/
    ProxyPassReverse / https://<your firewall IP>:<port you chose earlier>/
    #Make sure slashes are at the end (important)
  4. Restart apache
    sudo service apache2 reload

 Add your reverse proxy to Sophos UTM

  1. Add your proxy server as a real webserver. Go to Webserver protection / Web Application Firewall / Real Webservers and add your proxy server address. Make sure the type is “Encrypted HTTPS” (important.)
  2. Add your desired URL as a virtual server and point to your proxy real server (Virtual Webservers tab.) You’ll have to have an SSL certificate generated, which is beyond the scope of this post.

Caveats

The above configuration will work with every function of the User Portal.. except for the HTML5 VPN gateway. For some inexplicable reason it has scripts hard coded to use the root directory, which Apache won’t proxy properly even if you have rewrite rules in place. I fiddled with this for hours before I finally gave up and looked elsewhere for an HTML5 VPN solution.

Guacamole

It’s more than just dip, it’s an excellent open source HTML5 RDP/VNC/SSH gateway. Unlinke Sophos’s option, guacamole properly handles being in a subdirectory. Unfortunately it is very frustrating and user un-friendly to configure. I decided just to use a pre-configured VM appliance from Green Reed Technology. It’s an excellent appliance and “just works” – a much better experience than wrestling with archaic configuration files. You can get it from here.


Fix sudo being slow after changing hostname

Recently I changed the hostname of one of my machines. Ever since I did this there has been a five second pause from when I enter a command and when it actually executes. I was perplexed about this until I came across this post explaining that the /etc/hosts file was probably still pointing to the old hostname. It turns out it was!

So, to recap, if you want to change the hostname of your machine you have to make sure you do these three things:

  • issue the hostname command to change the hostname while running
  • update /etc/hostname with your new hostname
  • update /etc/hosts to reflect your new hostname after 127.0.0.1 (get rid of the old hostname.)

Update 2/24/2015: If you happen to have a Splunk forwarder installed on the machine, make sure you update its config to reflect the new hostname. Thanks to Splunk Answers for the information.  To do this, update  $SPLUNK_HOME/etc/system/local/server.conf and change the serverName= field to your new hostname.


Extract Active Directory Account Names in Splunk

I don’t really understand Microsoft’s rationale when it comes to log verbosity. I suppose too much information is better than not enough information, but that comes at the cost of making it difficult if you have to try and actually read the information.

I’ve been trying to extract usernames from Active Directory controller logs and it turned out to be quite a pain. Why do the logs have more than one field with the same name? It confuses Splunk and seems to fly in the face of common sense and decency.. I will stop ranting now.

In my specific case, AD lockout logs have two Account Name fields, one for the controller and one for the user being locked out. I am interested only in the username and not the AD controller account name.  How do you tell Splunk to only include the second instance of Account Name?

The answer is to create a field extraction using negative lookahead (Thanks to this article which gave me the guidance I needed.) I had to tweak the regex to look for and exclude any matches ending in a dollar sign, as opposed to excluding dashes in the article’s example. My fine tuned regex statement is below:

Account Name:\s+(?!.+\$)(?P<FIELDNAME>\S+)

It looks for Account Name: followed by one or more spaces (there is excess spacing in the logs for some reason.) The real magic happens in the next bit – (?!.+\$)

  • Parenthesis group the expression together
  • ?! means negative lookahead – don’t include anything you find that matches the following regex
  • .+ – one or more characters
  • \$ – stop matching when you encounter a dollar sign

The second regex string is simply \S+ (one or more non-whitespace characters.)

Note this doesn’t satisfy all AD logs, just the ones I’m interested in (account lockouts – they all have a first Account Name ending in a dollar sign.)

The result of all this jargon and gnashing of teeth: clean Splunk logs revealing only what I want without excess information. Neat.


Update: I found an even better way to do this. The key is to use the regex modifier (?s) to include new lines. The better query is now this:

(?s)(<section name of the field you're interested in>:.+Account Name:\s+)(?P<real_group_name>[^\n]+)

A detailed explanation is located here.
Install Magic Lantern on Canon EOS 6D

My wife has a fancy new camera – the Canon EOS 6D. It’s an amazing camera with many features, but it is missing one important feature that her old Rebel T2i had – the ability to take multiple shots on a timer. Fortunately, there is a way to add that feature and many more to her camera with a custom firmware known as Magic Lantern.  Magic Lantern works alongside the camera firmware and boots from the SD card. It’s pretty neat.

To install Magic Lantern on my wife’s 6D I had to jump through a few minor hoops. Her camera came with a newer firmware than what Magic Lantern supports, so I had to downgrade it. Once that was done I had to wipe her SD card and install the necessary files, then reboot the camera.

Downgrade firmware

My wife’s camera shipped with firmware version 1.1.4, which is a revision too new. It was difficult to hunt down an old version of the firmware but I eventually found it here. In case that link breaks, I’ve uploaded it here.  The steps to downgrade are as follows:

  1. Copy the FIR file into the root directory of the card.
  2. Move the dial to set the camera into P mode
  3. Insert the SD card and turn the camera on
  4. Press the Multi-controller to select the “Firmware Ver.x.x.x” item at the bottom of the “Set-up 4 (Yellow)”, and then press the <SET> button.
  5. Select [OK] and press <set> and follow the instructions on the screen.
  6. Once it’s complete, power off and remove the battery for 2 seconds

Install Magic Lantern

  1. Copy the necessary magic lantern files to the root of the card. (alternate link)
  2. Go back to the firmware upload screen and initiate another update. This time magic lantern will load and tell you when it’s OK to restart the camera.
  3. Turn the camera off and pull the battery for two seconds.
  4. Tun the camera back on and press the trash can button to access additional features (thanks to this youtube video for helping me figure that last critical part out.)

Done! My wife’s amazing camera just got a lot more amazing.

Speaking of my wife, she’s using the camera I modded with Magic Lantern to take AMAZING pictures! Check out her work at https://emilyjeppson.com

Block bad networks from sites behind Sophos WAF

Recently I have noticed some odd traffic coming to one of my blogs. This particular blog is set to NOT be indexed by search engines b(robots.txt deny.) Every bot that’s touched that site has honored that file… until now.

Periodically I will get huge spikes of traffic (huge for my small site, anyway.) The culprit is always the same: Apple! Why are they crawling my site? I can’t find a definitive reason. A couple searches reveals articles like this one speculating that Apple is starting a search engine. The problem is the traffic I’m seeing from Apple shows just a safari user agent, nothing about being a bot. A discussion on Reddit talks about Apple crawling sites, but they also list a user agent I’m not seeing.

The user agent reported by the bot that’s been crawling me (ignoring robots.txt file) is:

Mozilla/5.0 (Windows NT 6.1; WOW64) AppleWebKit/537.36 (KHTML, like Gecko) Chrome/31.0.1623.0 Safari/537.36

The IPs rotate randomly from Apple’s IP space, with the biggest offender being 17.142.152.102.

x_forwarded_for count
17.142.152.102 1680
17.142.151.205 982
17.142.151.80 444
17.142.152.14 174
17.142.151.134 36
17.142.152.78 28
17.142.151.182 26
17.142.151.239 26
17.142.150.250 24
17.142.152.101 24
17.142.152.151 24
17.142.151.198 22
17.142.149.55 21
17.142.147.58 7
17.142.148.75 7
17.142.151.49 6
17.142.148.12 4
17.142.151.197 4
17.149.228.59 4
17.142.152.118 3
17.142.149.167 2
17.142.151.179 2
17.142.151.79 2
17.142.151.92 2
17.142.144.105 1


I e-mailed Apple at abuse@apple.com requesting they stop this action. I didn’t expect anything from it, and indeed nothing happened. I kept getting crawled.

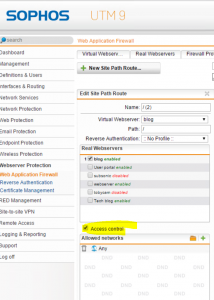
So, now to the title of this post. I had to tell my Web Application Firewall to block Apple’s address space. Sophos UTM 9.3 makes this easier, although the option is somewhat hidden for some reason. The option is in the “Site Path Routing” tab within the Web Application Firewall context. Once there, edit your site path and check the “Access Control” checkbox.

Capture

In my case I decided to block the entire subnet – 17.0.0.0/8. No more Apple crawling.. at least from the 17 network.

Add folders to libraries in Windows 8.1

I recently purchased a shiny new Microsoft Surface Pro 3. I must say so far I am quite impressed with it. I love the form factor. It’s a laptop or tablet depending on what I want to do with it.

When I’m in tablet mode using “Metro” apps I noticed that many of them require the use of Libraries. It took me longer than I care to admit to figure out how to add folders to libraries so I’m including that here.

In Windows 7 it was pretty easy – right click on the library and do properties, go to folders and add. The default explorer view in Windows 8.1 does not have a Libraries option.. so how do you do it?

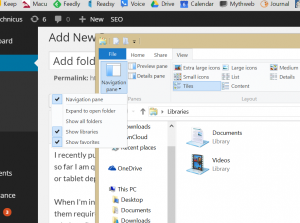
Thanks to this guide I discovered it’s a simple matter of telling Explorer to show Libraries again. Open Explorer, go to the View tab, then click on Navigation Pane (top left), then select Libraries.

libraries

Note: There is no Print Screen key on the surface, press Fn + Space instead.

Once that’s done you can the the Library in the Navigation pane just like you can in Windows 7, and you can add folders to those libraries to your heart’s content.

Two factor authentication in WordPress with Authy

With data breaches as rampant as they are I’ve decided to get more serious about security and implement two factor authentication. Authy is a great way to add this to WordPress, and it’s free (or at least most of its features are.) This information comes from their blog.

  1. Install the Authy plugin from here
  2. Create an account at https://dashboard.authy.com
  3. Add an application for your blog to the Authy dashboard and copy the API key given to you
  4. Activate the Authy wordpress plugin, go into settings and paste in the API key
  5. Activate two factor authentication for your user by mousing over the top right corner and selcting “Edit my profile”, scroll down to the bottom, and click “Enable/Disable Authy”

When I did this I had forgotten that I had a different login plugin running – Login Lockdown. With both these enabled I could no longer log in! There was some sort of conflict between the two plugins. I had to disable both plugins by following this guide.

  1. Navigate to your wordpress directory and go to wp-content/plugins
  2. Rename the offending plugin directory to something like pluginname-disabled
  3. Log into WordPress and go to your plugins page, it will generate an error
  4. Now that you’re logged in, you can rename those folders back to their original name to either re-activate or delete those plugins.

Now you are much more secure. Even if someone has your password they will not be able to log in unless they also have your phone.