Inspired by Lenovo’s bone headed move to install the superfish malware on its machines, I decided to wipe my mother’s Lenovo G50-S70 laptop and start anew. It was supposed to be easy but I ended up running into some issues with this new fangled hardware.
Microsoft has released a very easy tool to create boot ISO images and / or USB media to install Windows 8.1. For Windows 8.1 certified devices like the Lenovo G50 this is extra nice because the key is embedded in the UEFI BIOS – no need to write down or memorize a key.
After creating a USB drive, however, I was greeted with a lovely error message:
Select the driver to install.
It seemed that the install media didn’t see the G50’s hard drive. I could not get past this error message. All drivers on Lenovo’s website are .EXE files which don’t extract well – even when extracted, the installer didn’t like them.
The solution is to boot into a Windows PE environment and run the Windows installer from there. I chose this PE image, which worked quite nicely. Once booted from this PE disk, I was able to mount the install media and run setup.exe manually. This time the installer saw the hard drives and installed Windows 8.1 as you would expect. Success.
I recently underwent an exercise in frustration – taking a stock Lenovo G50 laptop and trying to get it into a workable state. Like many lower end laptops it came with a lot of bloatware, not the least of which was Mcafee Antivirus-premium-whatever garbage.
When I removed Mcafee and rebooted, I got a notice that Windows Defender was not enabled. When I clicked to enable it… nothing happened. I tried several times to no avail. I tried manually starting the service and it failed. I tried hard core things like running sfc /scannow and even editing the registry per here, but the issue remained.
Finally I came across this article which showed me how to fix it – simply launch windows defender by hitting start and searching for Windows Defender. Click the big red “Turn On” button. That’s all it takes! Why you can’t do that through the action center or by manually starting services is beyond me. Amazing.
Note: it’s possible that the combination of editing the registry, rebooting, and then launching the Windows Defender program fixed the issue. Whatever – it works now 🙂
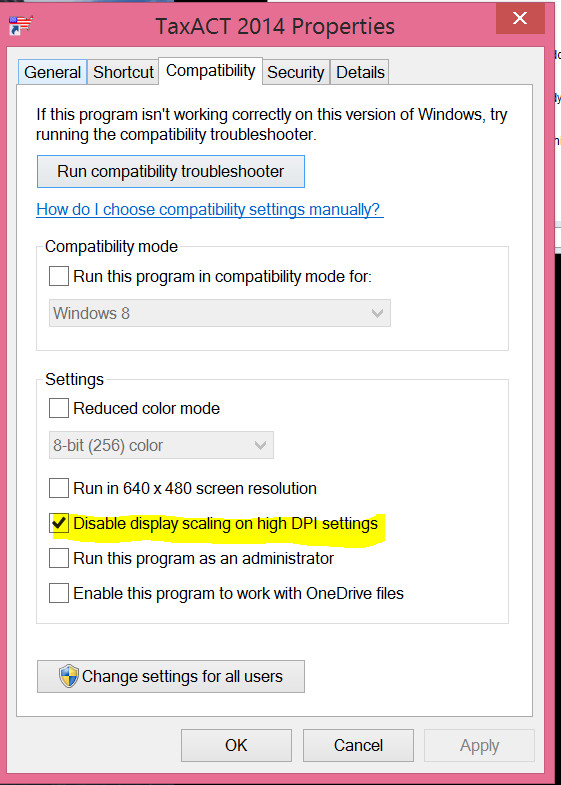
I really enjoy my new Microsoft Surface Pro 3. It has a high DPI screen which makes things very clear and sharp. Unfortunately, when you plug it into an external monitor, many Windows applications don’t deal with the DPI setting properly and thus appear blurry and/or the text is very tiny.
The workaround for this issue is a new compatibility mode setting in Windows 8 – Disable display scaling on high DPI settings. Simply right click on the shortcut of the problem application and go to properties, then go to the Compatibility tab, then check the box.
I recently purchased a shiny new Microsoft Surface Pro 3. I must say so far I am quite impressed with it. I love the form factor. It’s a laptop or tablet depending on what I want to do with it.
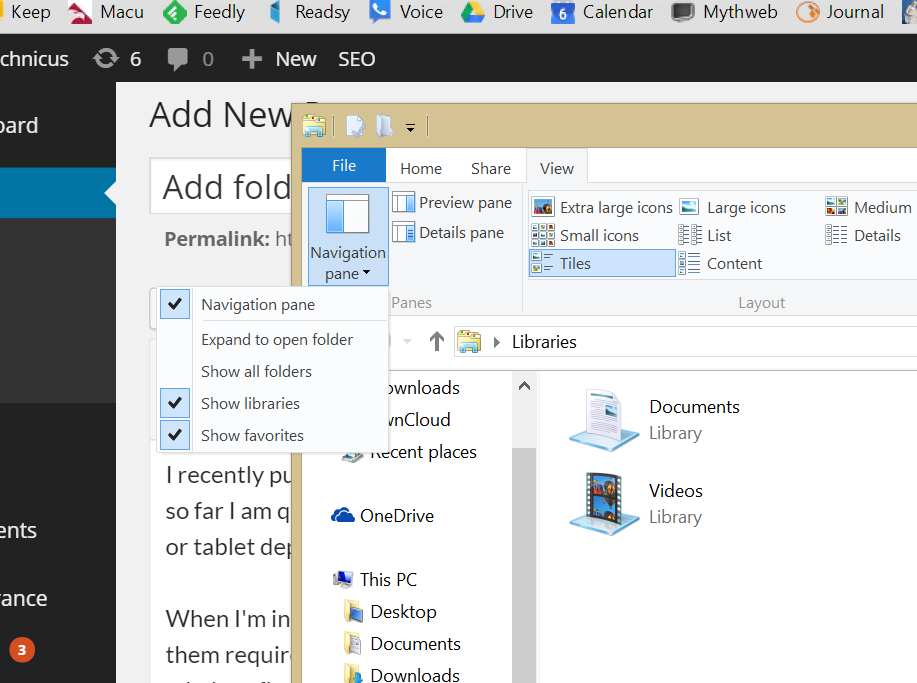
When I’m in tablet mode using “Metro” apps I noticed that many of them require the use of Libraries. It took me longer than I care to admit to figure out how to add folders to libraries so I’m including that here.
In Windows 7 it was pretty easy – right click on the library and do properties, go to folders and add. The default explorer view in Windows 8.1 does not have a Libraries option.. so how do you do it?
Thanks to this guide I discovered it’s a simple matter of telling Explorer to show Libraries again. Open Explorer, go to the View tab, then click on Navigation Pane (top left), then select Libraries.
Note: There is no Print Screen key on the surface, press Fn + Space instead.
Once that’s done you can the the Library in the Navigation pane just like you can in Windows 7, and you can add folders to those libraries to your heart’s content.
Since Citrix recently released the entire Xenserver product to the world as free, open source software I thought I might give it a try. I have been pleased with the results and wanted to migrate my desktop VM over to it.
I’ve had a devil of a time getting my Windows 8.1 Professional virtual machine to migrate from plain Xen to Citrix Xenserver 6.2. My first mistake was not doing research before migrating hypervisor environments. While it is true that Citrix uses Xen as the underlying hypervisor, it turns out that there are still plenty of differences between the two environments.
I thought I would take the easy route by installing Citrix Xenconvert and converting my Xen Win8.1 VM to a format Xenserver likes. Although Xenconvert was designed for Physical to Virtual migration, I’ve found in the past that it works just as well for virtual to virtual migration.
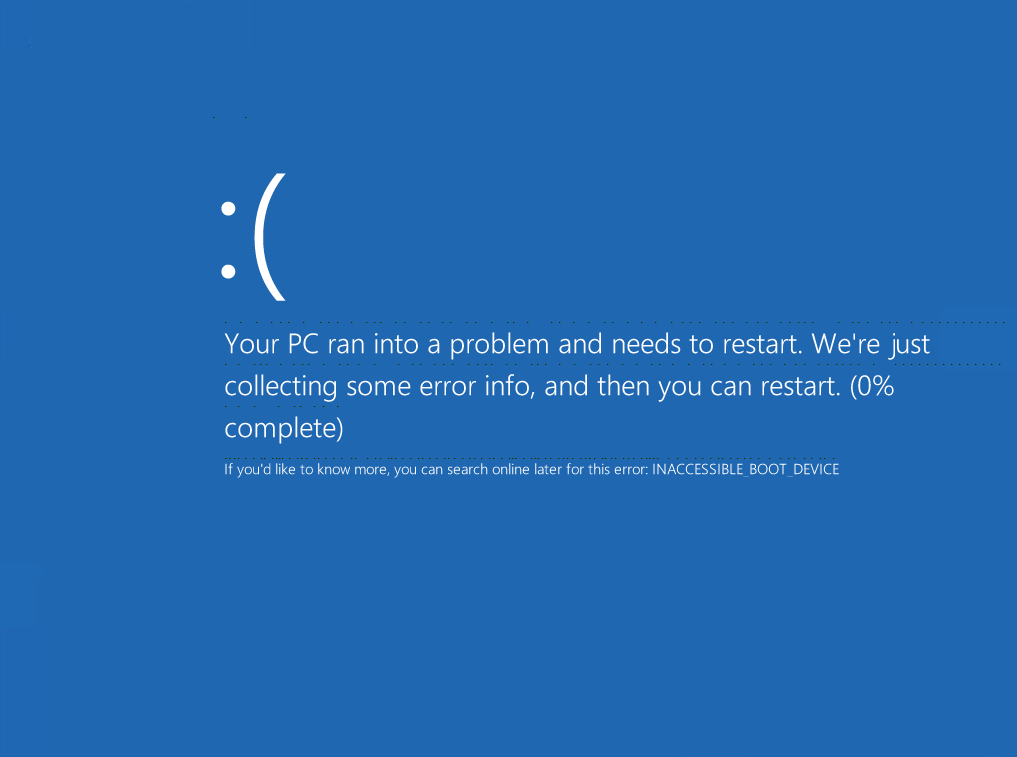
After migrating to Xenserver I was greeted with the following friendly message:
lovely
As far as I can tell it was the Xen GPLPV drivers that were the culprit. This leads me to my second mistake: not having a proper backup of the VM. I didn’t keep a backup of this VM in the Xen-friendly format after I migrated it to xenserver. This was mainly due to laziness – a classic example of “one ounce of laziness now produces one ton of hard work later.”
Instead of simply just booting the VM and removing the GPLPV drivers I had to attempt to do it via the Windows PE on the Windows 8.1 disc. I first tried running the GPLPV uninstall script from here, modifying it to point to the c:\ drive for both files and registry settings. Alas, that didn’t appear to do anything.
I then tried to go through the registry via the Windows PE and remove any references to Xen-anything. Success! Or so I thought. It turns out that blindly plowing through the Windows registry without an idea of exactly what you were doing has consequences. The VM would boot but I could not for the life of me get network drivers to work. As far as I can tell I corrupted something in the registry and despite my best efforts I couldn’t fix it.
At this point I had learned to back things up so I kept restoring from backups and messing with removing various registry keys. I continued this trial and error process for some time. After much weeping, wailing, and gnashing of teeth, I finally found the right combination of keys you must remove in order to boot again.
I took what I learned and updated the script from above to make it work with the WinPE environment . Download it here.
Boot into your PE environment of choice and run the script. When it’s finished, your VM will now be able to boot successfully.
The last step is to go into device manager and delete all xen-related drivers, then re-install them. After all that is said and done, your migration from xen to xenserver is complete. Repeat the exact same process to migrate from xenserver back to xen.