Tag Archives: freeBSD

Mount LVM partitions in FreeBSD

I’ve been playing around with helloSystem, an up and coming FreeBSD desktop environment that mirrors the MacOS experience quite well. Since it’s based in FreeBSD I’ve had to brush up on a few FreeBSD-isms that are distinctly different from Linux.

Since I’m dual booting this helloSystem BSD system alongside my Arch Linux install, I want to be able to access files on my Arch system from the BSD system. My Arch system uses LVM, which posed a challenge as LVM is a distinctly Linux thing.

To get it to work I needed to load a couple modules (thanks to the FreeBSD forums for help)

  • fuse
  • geom_linux_lvm

You can do this at runtime by using the kldload command

kldload fuse
kldload /boot/kernel/geom_linux_lvm.ko

To make the kernel module loading survive a reboot, add them to /boot/loader.conf

geom_linux_lvm_load="YES"
fuse_load="YES"

You can now scan your BSD system for LVM partitions:

geom linux_lvm list

The LVM partitions are listed under /dev/linux_lvm. The last step is to mount them with FUSE:

fuse-ext2 -o rw+ /dev/linux_lvm/NAME_OF_LVM_PARTITION /mnt/DESIRED_MOUNT_FOLDER

rw+ indicates a read/write mount.

ZFS delete oldest n snapshots

I came across a need to trim old ZFS snapshots. These are my quick and dirty notes on how I accomplished it.

Basic syntax taken from here:

 zfs list -H -t snapshot -o name -S creation -r <dataset name> | tail -10

You can omit the -r <dataset name> if you want to query snapshots over all your datasets. Change the tail number for the desired number of oldest snapshots.

You can pass this over to actually delete snapshots using the xargs command:

zfs list -H -t snapshot -o name -S creation -r <dataset name> | tail -10 | xargs -n 1 zfs  destroy

I came across an odd error message when trying to delete some old snapshots:

Can't delete snapshot: dataset busy

I discovered here that that means the snapshots have a hold on them. I read ZFS documentation to learn how to release the holds:

zfs release -r <tag name> <snapshot name>

After massaging these commands for a bit I was able to free up some needed space by removing ancient snapshots.

Hot swapped disk missing in FreeNAS fix

I hot removed a malfunctioning drive in my FreeNAS unit recently. The problem is its replacement would not show up in available drives. Camcontrol devlist wouldn’t reveal the device, even after camcontrol rescan all.

I found from this site that another command exists – camcontrol reset. I found out which bus to reset (instead of resetting all of them) by looking at logs and noticing the scbus number. Once obtained, I ran the following commands (the last number refers to the bus my drive was on)

sudo camcontrol reset 10
sudo camcontrol rescan 10

That did the trick! The drive was suddenly visible by the FreeNAS system once more.

FreeBSD: allow non-root processes to bind port 80

In experimenting with FreeNAS jails I wanted to allow a web service to use port 80. Normally 80 is a high order port reserved for root-level processes for security reasons. Since this is a FreeBSD jail and not a full on system I’m not worried about this.

The command to do so is fairly simple (thanks to this page for information)

sysctl net.inet.ip.portrange.reservedhigh=0

The above command is not permanent; to make it so add it to /etc/sysctl.conf:

echo "net.inet.ip.portrange.reservedhigh=0" >> /etc/sysctl.conf

FreeNAS unable to create jails fix

I recently got a shiny new FreeNAS Mini appliance. It’s the bee’s knees. Previously I was using a virtualized instance of FreeNAS that has served me admirably for two years now. During the migration I decided to start fresh with the jails configuration I had and deleted the entire jails dataset. This turned out to be a mistake. I suddenly found out that I couldn’t create any jails or plugins. The plugin download would hang for a long time and flash a brief message “Failed to download plugin.” Not helpful.

I tried changing the location of my jails in configuration to no avail. I even tried nuking my FreeNAS config entirely and starting from scratch. The error still happened! Somehow that configuration survived a factory restore.

I finally found this freenas forum entry that pointed me in the right direction. It suggested I use the warden command to delete the plugin jail template completely and re-install it. When I tried to I got this error:


[nicholas@freenas ~]$ sudo warden template delete pluginjail
ERROR: Not a ZFS volume: /mnt/storage/jails/.warden-template-pluginjail

It was still trying to install the plugin template in my non-existent dataset. I decided to try re-creating the missing dataset and then running the warden delete command again. Success!

[nicholas@freenas ~]$ sudo zfs create storage/jails/.warden-template-pluginjail
[nicholas@freenas ~]$ sudo warden template delete pluginjail

Once you delete the template jail via warden, you can re-create it in the right place after configuring the correct path in Jails / Configuration. Once you have the right place configured, issue the following:

warden template create -nick pluginjail -tar http://download.freenas.org/jails/9.3/x64/freenas-pluginjail-9.3-RELEASE.tgz

Plugins and jails work again! Success.

Avoid prompts when installing FreeBSD ports

The FreeBSD ports tree is wonderful for installing software but sometimes it can be a real pain. Recently I was trying to install Emby in FreeBSD because why not? The instructions were easy enough except for when I ran

make install clean

I was constantly barraged with choices for things. I want to assume the default on all of these and not be barraged with questions.

Thanks to stack exchange I learned it’s relatively easy to bypass all these questions. Simply add:

BATCH=yes

to the end of your make install clean statement to assume the defaults to all the questions for the package. The Emby guide is pretty comprehensive, but I would add this command at the bottom:

make install clean BATCH=yes

Handy.

Fix NAT not working with pfSense in Xenserver

After a few very frustrating experiences I’ve decided I want to migrate away from Sophos UTM for my home firewall. I enjoy Sophos’ features but do not enjoy the sporadic issues it’s been giving me.

My colleagues all rave about pfSense and how awesome it is so I thought I would give it a try. I have a completely virtualized setup using Citrix Xenserver 6.5 which has prevented me from trying pfSense in the past. The latest release, version 2.2.2, is based on FreeBSD 10.1, which includes native Xen device support. Now we’re talking.

Installation was quick and painless. After some configuration, the basic internet connection function was working swimmingly. As soon as I tried to forward some ports from my WAN interface to hosts on my network, though, things did not go well at all. I began to doubt my ability to configure basic NAT.

It looks simple enough – go to Firewall / NAT, specify the necessary source and destination IPs and Ports, and click apply. Firewall rules were added automatically. Except it didn’t work. I enabled logging on everything and there were no dropped packets to be found, but they were clearly being dropped. I thought it might be something weird with Sophos being upstream so I built my own private VM network but the issue was the same. NAT simply didn’t work. Silently dropped packets. I am not a fan of them.

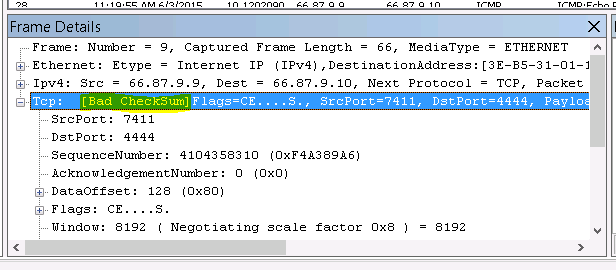
I was about to give up on pfSense but something told me it had to be a problem with my virtualization setup. I ran a packet capture via Diagnostics / Packet capture and after much sifting I found this gem:

checksumAll of my packets sent to the WAN interface returned [Bad CheckSum] that I was only able to discover via packet capture – they weren’t in the logs anywhere.

Armed with this information I stumbled on this forum post and discovered I am not alone in this. There apparently is a bug with FreeBSD 10.1 and the virtIO network drivers used by Xen, KVM, and others that causes it to miscalculate checksums, resulting in either dropped or very slow packets (I experienced both.)

The solution is to disable tx checksum offloading on both the PFsense side and the hypervisor side. In pfSense this is done by going to System / Advanced / Networking and checking “Disable hardware checksum offload”

To accomplish this on the xenserver side, follow tdslot’s instructions from the forum post linked above, replacing vm-name-label with the name of your pfSense VM:

Find your PFsense VM network VIF UUID’s:

[root@xen ~]# xe vif-list vm-name-label="RT-OPN-01"
uuid ( RO)            : 08fa59ac-14e5-f087-39bc-5cc2888cd5f8
...
...
...
uuid ( RO)            : 799fa8f4-561d-1b66-4359-18000c1c179f

Then modify those VIF UUID’s captured above with the following settings (discovered thanks to this post)

  • other-config:ethtool-gso=”off”
  • other-config:ethtool-ufo=”off”
  • other-config:ethtool-tso=”off”
  • other-config:ethtool-sg=”off”
  • other-config:ethtool-tx=”off”
  • other-config:ethtool-rx=”off”
xe vif-param-set uuid=08fa59ac-14e5-f087-39bc-5cc2888cd5f8 other-config:ethtool-tx="off"
xe vif-param-set uuid=799fa8f4-561d-1b66-4359-18000c1c179f other-config:ethtool-tx="off"

Lastly, shutdown the VM and start it again (not reboot, must be a full shutdown and power on.)

It worked! NAT worked as expected and a little bit of my sanity was restored. I can now make the switch to pfSense.

FreeNAS PCI Passthrough dev_taste error message

After getting my xenified FreeNAS up and running I noticed an oddity with disk reporting. When I pulled up the reports tab I noticed ada0 never showed any activity, despite my knowing that disk is doing plenty.

The mystery became greater when I noticed these error messages in my logs:

g_dev_taste: make_dev_p() failed (gp->name=ada0, error=17)

After some research I discovered here that disks passed through to a VM via Xen’s PCI Passthrough function present themselves to FreeBSD in a peculiar manner. In particular, the first disk in the passthrough array presents itself as ada0, despite the boot disk also having the name of ada0. With two disks named ada0 it’s a tossup on which one shows up in reporting, not to mention the strange errors above.

The fix is to add BSD parameter to not start disk numbering at ada0. For FreeNAS, you do this via the tunables section (System / Tunables / Add Tunable.) Add the following tunable:

variable: hint.ada.0.at
Value: scbus100
Comment: ada0 PCI passthrough fix
Enabled: true

Once that is configured, reboot FreeNAS. You will now have proper reporting of all your passthrough disks and the strange dev_taste errors will be gone.

Watch a zpool resilver in freeNAS

In my experiments with freeNAS and RaidZ I have come to miss some functionality I enjoyed with Linux and mdadm. One such function was being able to watch an array rebuild, or in ZFS parlance, a pool resilvering.

My inability to watch the resilvering stems from the difference between what the watch command in Linux does and what it does in FreeBSD. Watch in BSD snoops on a tty line whereas watch in Linux executes a command repeatedly.

One option is to install a watch utility for BSD that behaves as the Linux watch command; however, freeNAS is a small read only image so installing things isn’t an option.

The way to do it in freeNAS is to use a while loop in the command line. After 20 minutes of googling I realized that there is no easy way to do this in one line like you can in bash (something about things requiring to be on a new line), so I had to settle for a quick script like one outlined here.

My familiarity with scripts comes from BASH, but I quickly found out freeNAS doesn’t ship with BASH.

echo $shell
/bin/csh

edit: It turns out freeNAS does indeed ship with bash! It’s just not the default shell. Simply execute “bash” in the shell and use your familiar bash shell syntax to your heart’s content. The BASH equivalent of the script below is:

while [ true ]; do clear; zpool status; sleep 1; done

I’ll leave the rest in for reference sake.


I did some digging on how to write CSH scripts and thanks to this website was able to write a simple CSH script to execute a given command at a given interval indefinitely.

Here is my C style watch script:

#!/bin/csh

#A simple script to replace the Linux watch functionality. The first input it takes is how many seconds to refresh; the second, the command to run. If the command has arguments (spaces), it must be passed in quotes.

set INTERVAL = "$1"
set COMMAND = "$2"

while ( 1 )
        clear
        $COMMAND
        sleep $INTERVAL
end

I placed this script in the /tmp directory, made it executable by running chmod +x, and then executing it by running ,/script.sh 1 “command”

Creating a ZFS RaidZ volume with different sized disks

While I hear that “ZFS likes to use the whole disk” I wanted to experiment with creating a RaidZ pool with disks of different sizes. This requires partitioning the larger disks. The GUI in FreeNAS does not allow you to do this, so we must venture toward the command line. While these commands were run in FreeNAS they will work in any FreeBSD based system.

The commands below assume you are using the first four disks in the system for the RaidZ pool. I realize you can make these commands more efficient by using shell-fu but I will put them all here for completeness.

Partition the disks

Create GPT table for each disk

  • gpart create -s gpt ada1
  • gpart create -s gpt ada2
  • gpart create -s gpt ada3
  • gpart create -s gpt ada4

If gpart complains (probably due to the disk already having a GPT table) you can nuke the GPT setup and start over via the following commands, replacing ada2 with the stubborn drive:

  •  gpart destroy -F ada2
  • gpart create -s gpt ada2

Create partition for each disk

  • gpart add -s 232G -t freebsd-zfs -l test0 ada1
  • gpart add -s 232G -t freebsd-zfs -l test0 ada2
  • gpart add -s 232G -t freebsd-zfs -l test0 ada3
  • gpart add -s 232G -t freebsd-zfs -l test0 ada4

Create the pool

  • zpool create storage raidz ada1p1 ada2p1 ada3p1 ada4p1

Why does everyone call their pool “tank”? It must be in some documentation somewhere that everyone copies.

If you want to replace a failed disk in a pool after the faulty disk has been removed, issue the following command:

  • zpool replace storage <old/failed device name> ada2p1

Sometimes even though you’ve nuked the gpt data of the disk zpool will complain about the disk already being a member of a pool, e.g. “/dev/ada2p1 is part of active pool ‘storage'” Another scenario is if you have properly replaced the failed drive but the pool still shows degraded with a hash referring to the old drive showing in zpool status. To fix these issues use the zpool detach command

zpool detach storage ada2p1

 Check pool status

  • zpool status

If it comes out healthy you are good to go.

Import the raidZ into FreeNAS

With the pool manually created you can now import it into FreeNAS so it can be monitored / managed.

  • Click on Storage / Volumes / Auto Import Volume
  • Click No, skip to import
  • Wait a minute for it to scan, then click OK

Done.