Tag Archives: Windows

Installing Gears of War 4 in Windows 10

Installing Gears of War 4 on Windows can only be described as a hellish nightmare. Here are my notes on how I finally got it to install and run.

  • Download file with fiddler and a download accelerator, as outlined here:

[GUIDE v2.0] How to download install package for Windows Store games (bypass Store download issues or for install on another PC)
byu/ShadowStealer7 inpcgaming

  • Once you have the file, begin installing / downloading the game from the Windows store. Get several hundred MB / a few GB, then pause download.
  • Open powershell (no need to be an admin) and run the following:
    • Add-AppxPackage -path "<PATH TO GEARS FILE>"

After finish, close windows store and re-open, launch from there.

You may need to repeat removal and installation process many times, but now that you have the EAPPX file, it should be much less painful.

Powershell equivalent of “find -exec”

I recently found myself on a Windows 10 system needing to do the equivalent of “find . -name *.mdi -exec mdiconvert -source {} -log log.txt \;” I knew what to do instantly on a Unix system, not so on a Windows system

I finally figured it out and am now writing it down because I know I’ll forget! Thanks to these several sites for pointing me in the right direction.

  • Get-ChildItem is the find equivalent
    • -Filter is the -name equivalent
    • -Recurse must be specified otherwise it only looks in the one directory
  • % is an alias for “ForEach-Object
  • Put the command you want run in brackets {}
  • Put an ampersand in front of the command you wish to run so you can properly pass arguments containing dashes
  • $_.FullName turns the powershell object into a text string (which my command required.) FullName is the full path of the item found with Get-ChildItem
    • $_ is the rough equivalent of find’s {} (the item that was found)

The command I ended up using is below (find any .mdi files and use Microsoft’s mdi2tif utility to convert the result to .tif files)

Get-ChildItem "C:\Users" -Recurse -Filter *.mdi | % { & 'C:\Program
Files (x86)\modiconv\MDI2TIF.EXE' -source $_.FullName -log log.txt }

Clone AD Group Memberships with Powershell

I needed to do windoze administration today.  I dug my way into a hole and finally found my way out. Thanks to answers on Technet for the information I found a way to clone AD group membership from one group to another via powershell.

The command I settled on was the following (after creating the new group first)

Get-ADGroup -Identity "name_of_existing_group" -Properties MemberOf | foreach {$_.MemberOf} | foreach {add-ADGroupMember -Identity $_ -members "new_group_to_copy_memberOf_to" }

It grabs everything the group is a member of and transforms the output to a string array. It then takes that array and uses each item of it to add your new group as a member to everything the old group is a member of.

Managing Windows hosts with Ansible

I spun my wheels for a while trying to get Ansible to manage windows hosts. Here are my notes on how I finally successfully got ansible (on a Linux host) to use an HTTPS WinRM connection to connect to a windows host using Kerberos for authentication. This article was of great help.

Ansible Hosts file

[all:vars]
ansible_user=<user>
ansible_password=<password>
ansible_connection=winrm
ansible_winrm_transport=kerberos

Packages to install (CentOS 7)

sudo yum install gcc python2-pip
sudo pip install kerberos requests_kerberos pywinrm certifi

Playbook syntax

Modules involving Windows hosts have a win_ prefix.

Troubleshooting

Code 500

WinRMTransportError: (u'http', u'Bad
HTTP response returned from server. Code 500')

I was using -m ping for testing instead of -m win_ping. Make sure you’re using win_ping and not regular ping module.

Certificate validation failed

"msg": "kerberos: [SSL: CERTIFICATE_VERIFY_FAILED] certificate verify failed (_ssl.c:579)"

I had a self signed CA certificate on the box ansible was trying to connect to. Python doesn’t appear to trust the system’s certificate trust chain by default. Ansible has a configuration directive

ansible_winrm_ca_trust_path

but even with that pointing to my system trust it wouldn’t work. I then found this gem on the winrm page for ansible:

The CA chain can contain a single or multiple issuer certificates and each entry is contained on a new line. To then use the custom CA chain as part of the validation process, set ansible_winrm_ca_trust_path to the path of the file. If this variable is not set, the default CA chain is used instead which is located in the install path of the Python package certifi.

Challenge #1: I didn’t have certifi installed.

sudo pip install certifi

Challenge #2: I needed to know where certifi’s default trust store was located, which I discovered after reading the project github page

python
import certifi
certifi.where()

In my case the location was ‘/usr/lib/python2.7/site-packages/certifi/cacert.pem’. I then symlinked my system trust to that location (backing up existing trust first)

sudo mv /usr/lib/python2.7/site-packages/certifi/cacert.pem /usr/lib/python2.7/site-packages/certifi/cacert.pem.old
sudo ln -s /etc/pki/tls/cert.pem /usr/lib/python2.7/site-packages/certifi/cacert.pem

Et voila! No more trust issues.

Ansible Tower

Note: If you’re running Ansible Tower, you have to work with their own bundled version of python instead of the system version. For version 3.2 it was located here:

/var/lib/awx/venv/ansible/lib/python2.7/site-packages/requests/cacert.pem

I fixed it by doing this:

sudo mv /var/lib/awx/venv/ansible/lib/python2.7/site-packages/requests/cacert.pem /var/lib/awx/venv/ansible/lib/python2.7/site-packages/requests/cacert.pem.old
sudo ln -s /etc/pki/tls/cert.pem /var/lib/awx/venv/ansible/lib/python2.7/site-packages/requests/cacert.pem

This resolved the trust issues.

Reboot a windows system remotely

I recently came across the need to reboot my Windows 10 workstation remotely. I couldn’t RDP into the box  – it would stay stuck on the disclaimer splash screen. There was an OK button but it did nothing when clicked.

My solution was to initiate a reboot command from another Windows PC on the same network as my Windows 10 workstation. I figured out how to do so thanks to this article.

To remotely reboot yourself, log onto another Windows box and open up a command shell with an account that has administrative permissions on the machine you want to reboot. Then, issue this command:

shutdown -r -f -m \\<remote machine name> -t 30 -c "<message>"

The above command forces a reboot command (shutdown -r -f) on the remote machine (-m \\machine name), causes a countdown timer for the number of seconds specified (-t 30) and displays a message on the screen (-c “message”).

It solved my issue and was pretty easy to do. Handy.

Battle.net won’t update after copying from network folder

I ran into an issue recently where I tried to copy a battle.net game (Heroes of the Storm) from a backup folder on my NAS onto a new computer. Once the copy was completed I couldn’t get battle.net to update the game. It kept failing with error code:

BLZBNTAGT00000840

file update failed for an unknown reason.

After much digging I found this post which mentions it’s due to the fact that the updater apparertly can’t update files with the hidden attribute. The hidden file attribute gets applied by the NAS because the file in question has a dot in front of it in the filename. For some reason the updater can’t touch it.

The fix is to change all files in the game folder to not have the hidden attribute. The easiest way to do this is via the command line. Navigate to the folder of the game you copied over and execute the following:

attrib -H .* /S

Finally, I can copy Blizzard game backups without agonizing over why they won’t patch.

Batch convert Global security groups to Universal

Recently I came across a need to batch convert global security groups into universal security groups in my work’s Active Directory domain. The reason for this is so I could then turn them into Mail Enabled security groups, which would enable mail to be delivered to members of these groups. Unfortunately all security groups at this organization are Global in scope.

Seeing as this is a one domain organization there is no harm in changing the scope to Universal. Doing this via mouse is very tedious; fortunately we can use a few basic command line tools to automate the task. Thanks to Jeff Guillet for outlining how to do this.

The three magic commands are: dsquery, dsget, and dsmod.

First I wanted to test out a single security group to make sure everything would work. I couldn’t convert it because it was a member of several global security groups. This rabbit hole went several levels deep. Piping together dsquery, dsget, and dsmod all together solved this problem instantly:

dsquery group -limit 0 -name "<Group Name>" | dsget group -memberof | dsmod group -c -q -scope u

The above command first gets the full name of the group specified by the -name command. The output is sent to the dsget command to query what groups that group is a member of. The output of that command is sent to the dsmod command, which does the work of actually changing each of those groups into a security group:

  • -c tells it to continue on error
  • -q tells it to not print successful changes.
  • -scope u instructs it to change the group’s scope to Universal.

Any errors will be printed to the console. Depending on how many levels of global groups there are you may have to run this command several times in order to convert the problematic groups to Universal scope.

Once that command finishes without error you can modify the group itself to be a universal group by simply omitting the middle dsget command:

dsquery group -limit 0 -name "<Group Name>" | dsmod group -c -q -scope u

After testing we are now ready to expand this to convert ALL Global security groups to be Universal in scope. If you would like a report of how many groups would be affected, run this command. It will output all groups from the query to the text file Groups.txt:

dsquery group -limit 0 | dsget group -samid -scope -secgrp > Groups.txt

To modify every group simply omit the “-name” parameter from the group command used above with our test group. This will iterate through every group in the directory and pass it on to dsmod which will modify the scope to be universal:

dsquery group -limit 0 | dsmod group -c -q -scope u

Some built-in groups can’t be converted due to their nature, so you will have to work around those (Domain Users being one example.) You will probably need to run the command a few times until no errors appear.

Profit.


Persistent SSH tunnel for Windows

Over the years I’ve needed to access family members’ machines for remote support. The problem with parents and grandparents is walking them through certain prompts for services like join.me is quite problematic. To that end I’ve devised an open source way for me to automatically remote into their machine regardless of firewalls or machine location. This is possible thanks to cygwin, autoSSH, and NSSM. As long as the machine has internet access, I can get to it.

To pull this off you’ll need to install a few cygwin packages, copy over a private key file, create a batch script, and invoke NSSM to create a service to invoke the batch script on startup.

Cygwin

Obtain cygwin from here. You’ll need to use the graphical installer for the initial setup. Install the following packages:

  • ssh
  • autossh
  • wget (not necessary, but handy to have)

If cygwin is already installed, install it again. I wasted an hour once trying to figure out why it wasn’t working when the culprit turned out to be a buggy old version of cygwin itself.

Private key

For this to work you’ll need an SSH server configured for key authentication (no password.) On your SSH server:

  • Create new user for the Windows machine
  • Execute ssh-keygen as that user
  • Copy the contents of the .pub file into ~/.ssh/authorized_keys
  • Copy the private key (the one with no extension) to the Windows computer
  • Make sure permissions for the .ssh folder and everything inside of it is 600

GatewayPorts

One option that I really enjoy on my SSH server is the GatewayPorts option. This turns your SSH server into a gateway for any port forwards. Simply edit /etc/ssh/sshd_config and add

GatewayPorts yes

Save the file and restart the SSH service. Now if you create SSH tunnels your SSH server opens those ports for you to connect from other machines.

Create batch file

On the windows machine a simple command gets us up and running. Create a one-liner .cmd file on the Windows machine in a location of your choosing with the following:

c:\cygwin\bin\autossh.exe -M <random_port_number> -i <keyfile location>  -l <user> -R<remote_port:localhost:<local_port> -o StrictHostKeyChecking=no -o UserKnownHostsFile=/dev/null <remote address>

Update it to reflect the path of your cygwin installation if you installed somewhere other than the default location.

I add the reverse port forward option ( -R ) so that I can simply connect to my ssh server on the specified port and the connection will tunnel through to the Windows computer. In my case, I do -R5700:localhost:5900 which instructs my ssh server to listen on port 5700, then forward that connection to the Windows machine on port 5900 for VNC.

Create service

The Non-suciking service manager is a nifty little program that lets us turn anything into a windows service. Once it’s a service it can be started automatically on startup, even if nobody has logged in yet.

Obtain NSSM from here and extract it to a location you can remember. Then, open an administrator command prompt, cd to the directory containing nssm.exe, and enter the following:

nssm.exe install autossh

A GUI will open up. Specify the location of your batch file in the Path: section, then click Install service.

Once this is done, start the service by running services.msc, looking for your service, right click and select start. Make sure the startup type is set to automatic.

That’s it! If your keys are in the right place and the permissions are correct, the computer will automatically (and silently) log into your SSH server and create a tunnel for you. Autossh will continually try to re-connect in the event of connection loss. Awesome.

Reverse SSH

You can also configure cygwin to be an SSH server for your windows host. This will allow you to SSH into the machine if you specify -R<random_port:localhost:22 in your batch file. Here are a few notes for getting ssh working

  • Open up a cygwin terminal and execute the command:
    ssh-host-config
  • Once the SSH server is configured, tweak the SSH configuration to allow logging in with blank passwords (many of my family do not use a password to log into the machine.) Simply un-comment the line “PermitEmptyPasswords no” and change no to yes. Then, restart the ssh service. (thanks to this blog for the insight)
Make Notepad++ open files in separate windows

I love Notepad++. When working in Windows it’s my go-to text editor. One thing I don’t like about it, though, is that it seems to only work in one window by default.

It turns out there is a way to change Notepad++ to work more like Notepad – that is, each file you open opens up in a new window instead of a tab in the same window. There doesn’t appear to be a menu option to enable this functionality; however it is still possible to get Notepad++ to behave more like Notepad that way, thanks to this post.

The trick is to create an empty file named asNotepad.xml and to place that file in the directory where Notepad++ is installed (C:\Program Files (x86)\Notepad++ in my case.)

That’s it! once the empty asNotepad.xml file is in the Notepad++ program directory, it acts more like notepad in the sense that each file is opened in a new window. Handy.

Delete windows.old folder

Some time ago I upgraded my Windows Server 2012 machine to Windows Server 2012 R2. The upgrade was seamless and the server has hummed along just fine until recently, when it began running out of space.

Windirstat, a great little disk space usage reporting program, reported that the largest hog of space was the windows.old folder. Upon upgrade of the OS, the old Windows folder was renamed to Windows.old to make room for the new OS files and has sat there, untouched, ever since.

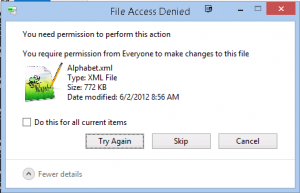
I tried to remove this folder with hilarious results. The folder is owned by TrustedInstaller. Easy enough, I’ll just replace the owner with my own user account, right? Wrong. Even after becoming the owner of the folder and everything inside it, I was prompted that I needed permission from… myself.. to delete the folder. I then tried changing the owner to “Everyone” and receive a rother comical message that I needed permission from Everyone to remove the folder. That would take some time!

everyone
You need permission from everyone.

That’s when I decided to throw in the towel and google. The solution to this problem involves the command line (thanks to here for the information.) Open an administrator command prompt and issue the following commands:

takeown /F c:\Windows.old\* /R /A /D Y
cacls c:\Windows.old\*.* /T /grant administrators:F
rmdir /S /Q c:\Windows.old

That did the trick! No more full disk.