Tag Archives: Sophos UTM

CentOS7, nginx, reverse proxy, & let’s encrypt

With the loss of trust of Startcom certs I found myself needing a new way to obtain free SSL certificates. Let’s Encrypt is perfect for this. Unfortunately SophosUTM does not support Let’s Encrypt. It became time to replace Sophos as my reverse proxy. Enter nginx.

The majority of the information I used to get this up and running came from digitalocean with help from howtoforge. My solution involves CentOS7, nginx, and the let’s encrypt software.

Install necessary packages

sudo yum install nginx letsencrypt
sudo firewall-cmd --add-service=http --permanent
sudo firewall-cmd --add-service=https --permanent
sudo systemctl enable nginx

Inform selinux to allow nginx to make http network connections:

sudo setsebool -P httpd_can_network_connect 1

Generate certificates

Generate your SSL certificates with the letsencrypt command. This command relies on being able to reach your site over the internet using port 80 and public DNS. Replace arguments below to reflect your setup

sudo letsencrypt certonly -a webroot --webroot-path=/usr/share/nginx/html -d example.com -d www.example.com

The above command places the certs in /etc/letsencrypt/live/<domain_name>

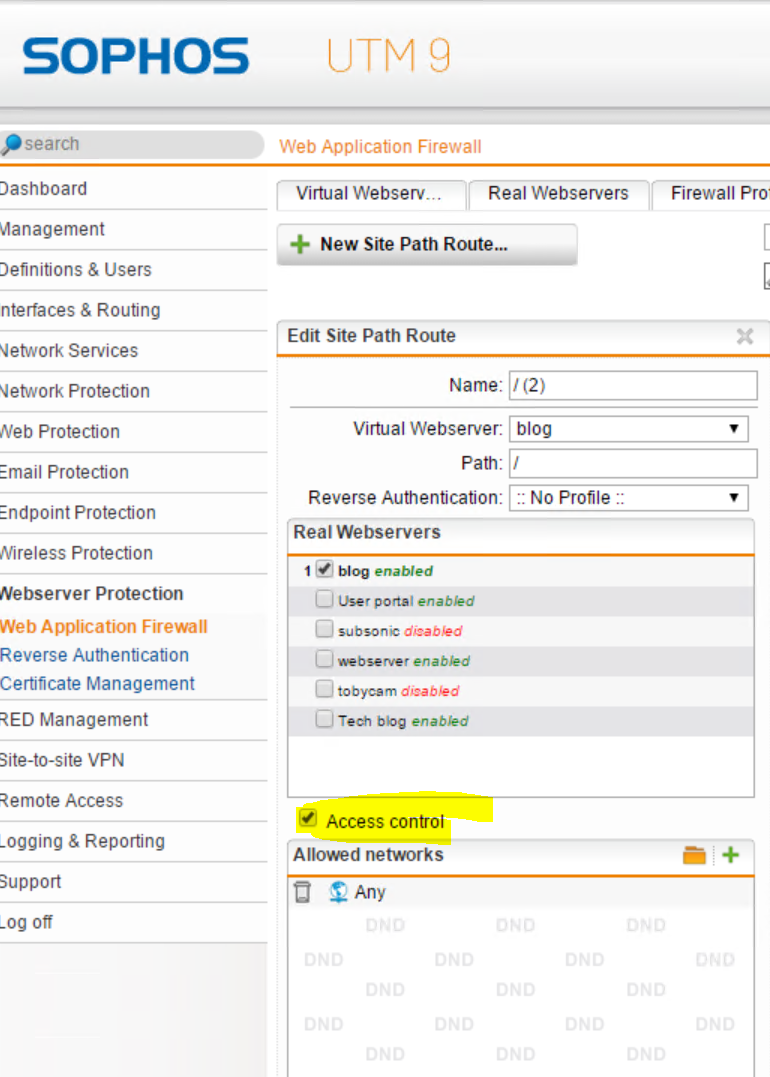
Sophos UTM certificates

In my case I had a few paid SSL certificates I wanted to copy over from Sophos UTM to nginx. In order to do this I had to massage them a little bit as outlined here.

Download p12 from Sophos, also download certificate authority file, then use openssl to convert the p12 to a key bundle nginx will take.

openssl pkcs12 -nokeys -in server-cert-key-bundle.p12 -out server.pem
openssl pkcs12 -nocerts -nodes -in server-cert-key-bundle.p12 -out server.key
cat server.pem Downloaded_CA_file.pem > server-ca-bundle.pem

Once you have your keyfiles you can copy them wherever you like and use them in your site-specific SSL configuration file.

Auto renewal

First make sure that the renew command works successfully:

sudo letsencrypt renew

If the output is a success (a message saying not up for renewal) then add this to a cron job to check monthly for renewal:

sudo crontab -e
30 2 1 * * /usr/bin/letsencrypt renew >> /var/log/le-renew.log
35 2 1 * * /bin/systemctl reload nginx

Configure nginx

Uncomment the https settings block in /etc/nginx/nginx.conf to allow for HTTPS connections.

Generate a strong DH group:

sudo openssl dhparam -out /etc/ssl/certs/dhparam.pem 2048

Create SSL conf snippets in /etc/nginx/conf.d/ssl-<sitename>.conf. Make sure to include the proper location of your SSL certificate files as generated with the letsencrypt command.

ssl_certificate /etc/letsencrypt/live/example.com/fullchain.pem;
ssl_certificate_key /etc/letsencrypt/live/example.com/privkey.pem;
ssl_dhparam /etc/ssl/certs/dhparam.pem;

Here is a sample ssl.conf file:

server {
        listen 443;

        ssl_certificate /etc/letsencrypt/live/<HOSTNAME>/fullchain.pem;
        ssl_certificate_key /etc/letsencrypt/live/<HOSTNAME>/privkey.pem;
        ssl_dhparam /etc/ssl/certs/dhparam.pem;

        access_log /var/log/<HOSTNAME.log>;

        server_name <HOSTNAME>;

        location / {
                proxy_set_header Host $host;
                proxy_set_header X-Real-IP $remote_addr;
                proxy_set_header X-Forwarded-For $proxy_add_x_forwarded_for;
                proxy_set_header X-Forwarded-Proto $scheme;

                proxy_pass http://<BACKEND_HOSTNAME>/;
        }
}


Redirect http to https by creating a redirect configuration file (optional)

sudo vim /etc/nginx/conf.d/redirect.conf
server {
	server_name
		<DOMAIN_1>
                ...
		<DOMAIN_N>;

        location /.well-known {
              alias /usr/share/nginx/html/.well-known;
              allow all;
	}
	location / {
               return 301 https://$host$request_uri; 
	}
}


Restart nginx:

sudo systemctl restart nginx

Troubleshooting

HTTPS redirects always go to the host at the top of the list

Solution found here:  use the $host variable instead of the $server_name variable in your configuration.

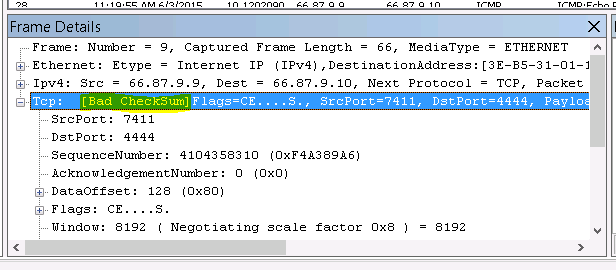
Websockets HTTP 400 error

Websockets require a bit more massaging in the configuration file as outlined here. Modify your site-specific configuration to add these lines:

# we're in the http context here
map $http_upgrade $connection_upgrade {
  default upgrade;
  ''      close;
}

server {     proxy_set_header Upgrade $http_upgrade;
    proxy_set_header Connection $connection_upgrade;
}


Fix POP/SMTP not working in Sophos UTM

It all started with an innocent enough e-mail:

Data Disk is filling up - please check. Current usage: 100%

I couldn’t find any clear information about what to do about this on Sophos’ forums. My data disk was full. What to do?

I can tell you what not to do – delete random files. I thought my solution would be to log into the UTM’s console and run a du -hsx /* to see where the space was. I found a large folder inside /var/storage – /var/storage/cores/httpd.16438. I removed it, because why not?

It turns out that did some weird things to my UTM. After removing that folder I kept getting spammed with these e-mails, once every hour:

Pop3 proxy not running - restarted

It took me a while to realize, but this also meant all e-mails relayed to the UTM were not being delivered. The entire POP/SMTP subsystem of the Sophos UTM was hosed. I could not find anything on the Sophos forums. After scratching my head I decided to have a deeper look at the logs. From the command line I issued

ls -ltr /var/log

and began reading the most recent logs.

pop3.log let me know what the problem was:

pop3proxy[9270]: Can't connect to database, retrying in 10 seconds: could not connect to server: Connection refused

I could not find any useful fixes for this error. I kept digging.

selfmon.log wasn’t much help other than to confirm that pop3 was having some serious issues. It was an endless abyss of repeated error messages:

selfmonng[3818]: W NOTIFYEVENT Name=pop3proxy_running Level=INFO Id=117 suppressed
...
selfmonng[3818]: W actionCmd(+): '/var/mdw/scripts/pop3 restart'

system.log put me on the right track:

ulogd[5107]: pg1: connect: could not connect to server: No such file or directory


Finally, we’re getting somewhere! After some searching I learned that pg1 is the postgresql database Sophos uses. I found a way to rebuild from this forum post.

One simple command did the trick:

/etc/init.d/postgresql92 rebuild

This rebuilt the postgresql database that I apparently corrupted when I removed files with reckless abandon. My e-mails work again!

Migrate from Sophos UTM to pfSense part 1

I’ve been using a Sophos UTM virtual appliance as my main firewall / threat manager appliance for about two years now. I’ve had some strange issues with this solution off and on but for the most part it worked. The number of odd issues has begun to build, though.

Recently it decided to randomly drop some connections even though logs showed no dropped packets. The partial connections spanned across various networks and devices. I never did figure out what was wrong. After two days of furiously investigating (including disconnecting all devices from the network), the problem went away completely on its own with no action on my part. It was maddening – enough to drive me to pfSense.

As of version 2.2 pfSense can be fully virtualized in Xen, thanks to FreeBSD 10.1. This allowed me the option to migrate. Below are the initial steps I’ve taken to move to pfSense.

Features checklist

I am currently using the following functions in Sophos UTM. My goal is to move these functions to equivalents in pfSense:

  • Network firewall
  • Web Application Firewall, also known as a reverse proxy.
  • NTP server
  • PPPOE client
  • DHCP server
  • DNS server
  • Transparent proxy for content filtering and reporting
  • E-mail server / SPAM protection
  • Intrusion Detection system
  • Anti-virus
  • SOCKS proxy
  • Remote access portal (for downloading VPN configurations, etc)
  • Citrix Xenserver support (for live migration etc)
  • Log all events to a syslog server
  • VPN server
  • Daily / weekly / monthly e-mail reports on bandwidth usage, CPU, most visited sites, etc.

I haven’t migrated all of these function over to pfSense which is why this article is only Part 1. Here is what I have done so far.

Xenserver support

Installing xen tools is fairly straightforward thanks to this article. It’s simply a matter of dropping to a shell on your pfSense VM to install and enable xen tools

pkg install xe-guest-utilities
echo "xenguest_enable=\"YES\"" >> /etc/rc.conf.local
ln -s /usr/local/etc/rc.d/xenguest /usr/local/etc/rc.d/xenguest.sh 
service xenguest start

PPPoE client

The wizard works fine for configuring PPPOE, however I experienced some very strange issues with internet speed. Downstream would be fine but upstream would be incredibly slow. Another symptom was NAT / port forwarding appearing not to work at all.

It turns out the issue was pfSense’s virtualized status. There is a bug in the virtio driver that handles virtualized networking. You have to disable all hardware offloading on both the xenserver hypervisor and the pfSense VM to work around the bug. Details on how to do this can be found here. After that fix was implemented, speed and performance went back to normal.

DNS server

To get this working like it did in Sophos you have to disable the default DNS resolver service and enable the DNS forwarder service instead. Once DNS forwarder is enabled, check the box “register DHCP leases in DNS” so that DHCP hostnames come through to clients.

Syslog

Navigate to Status / system logs / settings tab and  tick “Send log messages to remote syslog server” and fill out the appropriate settings.

Note for Splunk users: the Technology Add-on for parsing pfsense logs expects the sourcetype to equal pfsense (not syslog). Create a manual input for logs coming from pfsense so it’s tagged as pfsense and not syslog (thanks to this post for the solution on how to get the TA to work properly.)

VPN

OpenVPN – wizard ran fine. Install OpenVPN Client Export utility package for easy exporting to clients. Once package is installed go to VPN / OpenVPN and you will see a new tab – Client Export.

Note you will need to create a user and check the “create certificate” checkbox or add a user certificate to existing user by going to System / User manager, Editing the user and clicking the plus next to User Certificates. The export utility will only show users that have valid certificates attached to them. If no users have valid certificates the Client Export tab will be blank.

Firewall

One useful setting to note is to enable NAT reflection. This allows you to access NATed resources as if you were outside the network, even though you are inside it. Do this by going to System / Advanced and clicking on the Firewall / NAT tab. Scroll halfway down to find the Network Address Translation section. Change NAT reflection mode for port forwards to Enable (Pure NAT)

It’s also very helpful to configure host and port aliases by going to Firewall / Aliases. This is roughly equivalent to creating Network and Host definitions in Sophos. When you write firewall rules you can simply use the alias instead of writing out hosts IPs and ports.

So far so good

This is the end of part 1. I’ve successfully moved the following services from Sophos UTM to pfSense:

  • Network firewall
  • PPPOE client
  • Log all events to a syslog server
  • VPN server
  • NTP server
  • DHCP server
  • DNS server
  • Xenserver support

I’m still working on moving the other services over. I’ve yet to find a viable alternative to the web application firewall but I haven’t given up yet.

Fix NAT not working with pfSense in Xenserver

After a few very frustrating experiences I’ve decided I want to migrate away from Sophos UTM for my home firewall. I enjoy Sophos’ features but do not enjoy the sporadic issues it’s been giving me.

My colleagues all rave about pfSense and how awesome it is so I thought I would give it a try. I have a completely virtualized setup using Citrix Xenserver 6.5 which has prevented me from trying pfSense in the past. The latest release, version 2.2.2, is based on FreeBSD 10.1, which includes native Xen device support. Now we’re talking.

Installation was quick and painless. After some configuration, the basic internet connection function was working swimmingly. As soon as I tried to forward some ports from my WAN interface to hosts on my network, though, things did not go well at all. I began to doubt my ability to configure basic NAT.

It looks simple enough – go to Firewall / NAT, specify the necessary source and destination IPs and Ports, and click apply. Firewall rules were added automatically. Except it didn’t work. I enabled logging on everything and there were no dropped packets to be found, but they were clearly being dropped. I thought it might be something weird with Sophos being upstream so I built my own private VM network but the issue was the same. NAT simply didn’t work. Silently dropped packets. I am not a fan of them.

I was about to give up on pfSense but something told me it had to be a problem with my virtualization setup. I ran a packet capture via Diagnostics / Packet capture and after much sifting I found this gem:

checksumAll of my packets sent to the WAN interface returned [Bad CheckSum] that I was only able to discover via packet capture – they weren’t in the logs anywhere.

Armed with this information I stumbled on this forum post and discovered I am not alone in this. There apparently is a bug with FreeBSD 10.1 and the virtIO network drivers used by Xen, KVM, and others that causes it to miscalculate checksums, resulting in either dropped or very slow packets (I experienced both.)

The solution is to disable tx checksum offloading on both the PFsense side and the hypervisor side. In pfSense this is done by going to System / Advanced / Networking and checking “Disable hardware checksum offload”

To accomplish this on the xenserver side, follow tdslot’s instructions from the forum post linked above, replacing vm-name-label with the name of your pfSense VM:

Find your PFsense VM network VIF UUID’s:

[root@xen ~]# xe vif-list vm-name-label="RT-OPN-01"
uuid ( RO)            : 08fa59ac-14e5-f087-39bc-5cc2888cd5f8
...
...
...
uuid ( RO)            : 799fa8f4-561d-1b66-4359-18000c1c179f

Then modify those VIF UUID’s captured above with the following settings (discovered thanks to this post)

  • other-config:ethtool-gso=”off”
  • other-config:ethtool-ufo=”off”
  • other-config:ethtool-tso=”off”
  • other-config:ethtool-sg=”off”
  • other-config:ethtool-tx=”off”
  • other-config:ethtool-rx=”off”
xe vif-param-set uuid=08fa59ac-14e5-f087-39bc-5cc2888cd5f8 other-config:ethtool-tx="off"
xe vif-param-set uuid=799fa8f4-561d-1b66-4359-18000c1c179f other-config:ethtool-tx="off"

Lastly, shutdown the VM and start it again (not reboot, must be a full shutdown and power on.)

It worked! NAT worked as expected and a little bit of my sanity was restored. I can now make the switch to pfSense.

Configure full VPN tunnel in Sophos UTM

For years now I have had a successful split tunnel VPN with my Sophos UTM. Recently I’ve wanted to have a full tunnel option for greater security in remote areas (hotel wi-fi, etc.) Unfortunately setting up such a thing in Sophos is NOT straightforward.

The biggest problem I had was that no websites would work after the VPN was initiated. NSlookup was fine, connection was fine, even internal sites would load properly, but no external internet.

Thanks to this post I finally found the culprit: the pesky allowed networks feature for each UTM function. In my case, the VPN was allowing all the necessary traffic through but my transparent proxy was denying web access. I had to add my VPN pool to the list of allowed networks to my proxy.

To summarize, this is what you must do to have a full VPN tunnel:

  • Configure the desired method in the Remote Access section. Take note of whatever IP pool you use for your VPN. In my case I used VPN Pool (SSL)
  • Ensure that internet access is in the list of allowed networks for the user you’ve configured for VPN (Any, or Internet IPv4/6)
  • Add your VPN pool to the list of allowed networks for each service you use.
    • Network services / DNS
    • Web Protection / Web Filtering
  • Profit

Generate SSL certificate for use with Sophos UTM

HTTPS certificate handling in Sophos UTM is a bit different than other systems. I do this often enough but never remember exactly how to do it.

Here are the “cliff notes” of getting an SSL certificate loaded into Sophos UTM. This can be done on any linux / unix system with openssl installed. The full guide was taken from here.

Generate a private key

When creating your key, make sure you use a passphrase.

openssl genrsa -aes256 -out <keyname>.key 2048

Create a certificate signing request (CSR)

openssl req -new -key keyname.key -out csrname.csr

Upload CSR to your certificate company

Sophos UTM uses Openssl so select that option if prompted by your certificate company Specify Apache CSR if asked. Validate your domain ownership, then wait for e-mail with response.

Download output from certificate company

If they give you a zip file, unzip it first

unzip file_from_authority.zip

Combine all files provided into one

You only have to do this if your CA provides more than one CRT file

cat CA1.crt CA2.crt ...   >  combined.crt

Generate p12 file for use with UTM

Generate a pkcs12 file by supplying all files generated above. Be sure to specify an export password (Sophos requires one.)

openssl pkcs12 -export -in combined.crt -inkey <keyname>.key -out desired_p12_file_name.p12

Upload into Sophos UTM

Navigate to certificate management and specify upload key. Upload the file. Be sure to enter the password you used when creating the key earlier.

That’s it!

Use Sophos User portal and WAF on same port

The Sophos UTM firewall is a great piece of security software. It is designed with businesses in mind but is also free for home use. It has many features, two of which (User Portal and Web Application Firewall) compete for the same port – TCP 443 (https.) This is a shame if you want to run both services simultaneously but only have one IP address.

For some reason the folks at Astaro (Sophos) have not engineered a way to allow the WAF and User Portal to play nicely, saying on their forums to just configure them to use different ports. What if you have people who are behind firewalls that only allow ports 80 and 443? You are stuck.

I didn’t like that answer so I set out to research a way around this. The solution to this problem lies with Apache and its reverse proxy feature. A reverse proxy is a webserver that receives HTTP requests and forwards them to some other location, then returns the response.

My solution to the “I want both WAF and User Portal to use the same port” problem is to put the user portal on a different, internal-only port, spin up a small apache server, configure it to forward all requests to the user portal address:port combination, and add it as a real server in the sophos WAF.

Change user portal port

Easy enough: Go to Management / User Portal / Advanced tab, scroll down to the “Network Settings” section and pick a different port, then click apply.

Spin up a reverse proxy web server

I went with Ubuntu Server 14.04 so I could have newer software packages.

  1. Install apache
    sudo apt-get install apache2
  2. Enable needed modules
    sudo a2enmod ssl
    sudo a2enmod proxy
    sudo a2enmod proxy_http
  3. Configure apache to proxy all requests to your user portal
    #Add the following to default-ssl.conf
    sudo vim /etc/apache2/sites-enabled/default-ssl.conf
    SSLProxyEngine On
    #Enable the next 3 lines if you want to ignore certificate errors
    #SSLProxyVerify none
    #SSLProxyCheckPeerCN off
    #SSLProxyCheckPeerName off
    
    #Configure the reverse proxy to forward all requests
    ProxyPass / https://<your firewall IP>:<port you chose earlier>/
    ProxyPassReverse / https://<your firewall IP>:<port you chose earlier>/
    #Make sure slashes are at the end (important)
  4. Restart apache
    sudo service apache2 reload

 Add your reverse proxy to Sophos UTM

  1. Add your proxy server as a real webserver. Go to Webserver protection / Web Application Firewall / Real Webservers and add your proxy server address. Make sure the type is “Encrypted HTTPS” (important.)
  2. Add your desired URL as a virtual server and point to your proxy real server (Virtual Webservers tab.) You’ll have to have an SSL certificate generated, which is beyond the scope of this post.

Caveats

The above configuration will work with every function of the User Portal.. except for the HTML5 VPN gateway. For some inexplicable reason it has scripts hard coded to use the root directory, which Apache won’t proxy properly even if you have rewrite rules in place. I fiddled with this for hours before I finally gave up and looked elsewhere for an HTML5 VPN solution.

Guacamole

It’s more than just dip, it’s an excellent open source HTML5 RDP/VNC/SSH gateway. Unlinke Sophos’s option, guacamole properly handles being in a subdirectory. Unfortunately it is very frustrating and user un-friendly to configure. I decided just to use a pre-configured VM appliance from Green Reed Technology. It’s an excellent appliance and “just works” – a much better experience than wrestling with archaic configuration files. You can get it from here.


Block bad networks from sites behind Sophos WAF

Recently I have noticed some odd traffic coming to one of my blogs. This particular blog is set to NOT be indexed by search engines b(robots.txt deny.) Every bot that’s touched that site has honored that file… until now.

Periodically I will get huge spikes of traffic (huge for my small site, anyway.) The culprit is always the same: Apple! Why are they crawling my site? I can’t find a definitive reason. A couple searches reveals articles like this one speculating that Apple is starting a search engine. The problem is the traffic I’m seeing from Apple shows just a safari user agent, nothing about being a bot. A discussion on Reddit talks about Apple crawling sites, but they also list a user agent I’m not seeing.

The user agent reported by the bot that’s been crawling me (ignoring robots.txt file) is:

Mozilla/5.0 (Windows NT 6.1; WOW64) AppleWebKit/537.36 (KHTML, like Gecko) Chrome/31.0.1623.0 Safari/537.36

The IPs rotate randomly from Apple’s IP space, with the biggest offender being 17.142.152.102.

x_forwarded_for count
17.142.152.102 1680
17.142.151.205 982
17.142.151.80 444
17.142.152.14 174
17.142.151.134 36
17.142.152.78 28
17.142.151.182 26
17.142.151.239 26
17.142.150.250 24
17.142.152.101 24
17.142.152.151 24
17.142.151.198 22
17.142.149.55 21
17.142.147.58 7
17.142.148.75 7
17.142.151.49 6
17.142.148.12 4
17.142.151.197 4
17.149.228.59 4
17.142.152.118 3
17.142.149.167 2
17.142.151.179 2
17.142.151.79 2
17.142.151.92 2
17.142.144.105 1


I e-mailed Apple at abuse@apple.com requesting they stop this action. I didn’t expect anything from it, and indeed nothing happened. I kept getting crawled.

So, now to the title of this post. I had to tell my Web Application Firewall to block Apple’s address space. Sophos UTM 9.3 makes this easier, although the option is somewhat hidden for some reason. The option is in the “Site Path Routing” tab within the Web Application Firewall context. Once there, edit your site path and check the “Access Control” checkbox.

Capture

In my case I decided to block the entire subnet – 17.0.0.0/8. No more Apple crawling.. at least from the 17 network.

Fix battle.net 2600 error

Recently I tried to install the latest patch for Heroes of the Storm when I got a nasty error code 2600, Whoops! something broke.

wrong

Re-installing battle.net didn’t fix the issue. After much frustration I came across this post, which describes situations when you’re behind a caching proxy (which I am.)

I did as it directed, which is to disable the caching function of my proxy and delete anything Blizzard-related from my %temp% folder.

That did the trick. All is well now!

Update: I decided that rather than disabling caching / virus checkings completely I would create an exception in Sophos UTM web access policy. Thanks to the guidance from here I added the following exception:

blizzard
Skipping: Authentication / Caching / Block by download size / Antivirus / Extension blocking / MIME type blocking / URL Filter / Content Removal / SSL scanning / Certificate Trust Check / Certificate Date Check
Matching these URLs: ^https?://([A-Za-z0-9.-]*\.)?blizzard\.com/
^https?://([A-Za-z0-9.-]*\.)?blizzard\.vo\.llnwd\.net/
^https?://([A-Za-z0-9.-]*\.)?blizzard.com\.edgesuite\.net/
^https?://([A-Za-z0-9.-]*\.)?battle\.net/

Sophos UTM returns NXDOMAIN for valid domain names

This issue took me a while to figure out. It’s actually been an issue for a while but I didn’t notice it until XBMC became Kodi. XBMC moved their domain name to kodi.tv and suddenly I was unable to access their site at all.

An nslookup returns NXDOMAIN immediately; however, querying a different server, say Google’s DNS, would return a valid address.

After scratching my head for weeks I came across this post which outlines the exact same problem – any .tv domains are instantly not resolved. I didn’t notice it until XBMC moved to kodi.tv because I don’t visit .tv domains.

The culprit: static DNS entries without a fully qualified domain name. I have plenty of these, and in this case, I have a computer named simply “tv” which Sophos translates into an internal DNS zone; Consequently it doesn’t even bother querying other DNS servers for anything ending in .tv.

The fix: make sure you have fully qualified domain names for all of your static DNS entries. This best practice will save you headaches in the long run.