I’ve had my Arch Linux desktop system for several years now. Over that time, cruft has built up. It bit me today when I tried to install makemkv. No matter what I tried I could not get it to compile. Configure constantly failed an this step:
checking whether LIBAVCODEC_VERSION_MAJOR is declared... yes
checking LIBAVCODEC_VERSION_MAJOR... 52
...
configure: error: The libavcodec library is too old. Please get a recent one from http://www.ffmpeg.org
I had to systematically delete anything containing ffmpeg, then re-install ffmpeg, in order to finally get it to work.
Get a list of installed packages containing ffmpeg:
My cable internet has been horrid lately. I wanted to be able to hotspot to my phone while maintaining LAN connections to my servers while the cable company takes its sweet time to fix things. Even though I connected to wifi on my phone, my desktop still prioritized the broken connection and wouldn’t use my phone to get to the internet. I verified this by looking at the routing table and running traceroute
sudo ip route
...
default via 10.137.1.1 dev br0 proto dhcp src 10.10.1.124 metric 425
default via 172.10.10.1 dev wlp69s0 proto dhcp src 172.10.10.4 metric 600
...

traceroute google.com --max-hops=1
 1  _gateway (10.10.50.1)  0.409 ms  0.449 ms  0.483 ms
The LAN connection’s default gateway had a lower metric than the mobile hotspot connection (lower takes precedence.) To fix this I ran this networkmanager command (thanks to this post for the inspiration)
I then noticed I couldn’t get to certain LAN subnets. I then realized I needed to add some static routes so they don’t try to go over my hotspot connection (which I learned about here)
Note you may need to refresh your connection once you’ve made changes. You can either disconnect and reconnect to force a refresh, or run this command (as outlined here.)
sudo nmcli con up bridge-br0 #or whatever your LAN interface name is
Once I refreshed my settings, I was able to get internet via my phone while maintaining all my local network settings.
piKVM is amazing. I had one controlling an old desktop of mine for over 18 months with no issues. I decided to update its software and ran into some problems.
The first problem was pacman was returning a 404 when trying to update. I guess in the last year and a half the repository URL had changed. I had to edit /etc/pacman.conf and update the URL:
[pikvm]
Server = https://files.pikvm.org/repos/arch/rpi4
SigLevel = Required DatabaseOptional
After fixing that, running pacman -Syu and answering yes, I rebooted, but found that kvmd would not start. The first symptom: HTTP 500 from nginx. Digging in I found that two services were failing to start: kvmd-tc358743.service and kvm-otg.service.
v4l2-ctl[429]: Cannot open device /dev/kvmd-video, exiting kvmd-otg[398]: RuntimeError: Can't find any UDC
With these two services bailing the web UI wouldn’t start. I checked the kernel log and the tc358743 device was not detected at all. I was about to give up and just reflash the device when I noticed two files in /boot: cmdline.txt.pacsave and config.txt.pacsave. I know from my experience in arch that it means I had some configurations get clobbered. Running a diff between the two I found some very important lines omitted:
I’ve recently moved and needed to connect to my (still existing) home network from my desktop. I’ve never had to VPN from my desktop before, so here my notes for getting it working.
Configuration
Install necessary lt2p, pptp, and libreswan packages (I’m using yay as my package manager) yay -Sy community/networkmanager-l2tp community/networkmanager-pptp aur/networkmanager-libreswan aur/libreswan
Configure VPN in GNOME settings (close settings window first if it was already open)
If something isn’t working the popup is not very descriptive. Network manager logs are stored in journald, so the best way to troubleshoot is to follow the logs: (-f for follow, -u for unit name)
sudo journalctl -f -u NetworkManager
In my case following the networkmanager logs I could see I didn’t have libreswan fully installed, and installing the libreswan package fixed it.
I’ve once again switched from Proxmox to Arch Linux for my desktop machine. Both use KVM so it’s really just a matter of using the different VM manager syntax (virt-manager vs qm.) I used my notes from my previous stint with Arch, my article on GPU Passthrough in Proxmox as well as a thorough reading of the Arch wiki’s PCI Passthrough article.
Enable IOMMU
Configure GRUB to load the necessary iommu modules at boot. Append amd_iommu=on iommu=pt to the end of GRUB_CMDLINE_LINUX_DEFAULT (change accordingly if you have Intel instead of AMD)
sudo vim /etc/default/grub
...
GRUB_CMDLINE_LINUX_DEFAULT="loglevel=3 amd_iommu=on iommu=pt"
Run update-grub
sudo update-grub
Reserve GPU for VFIO
Reserve the GPU you wish to pass through to a VM for use with the vfio kernel driver (so the host OS doesn’t interfere with it)
Determine the PCI address of your GPU
Run lspci -v and look for your card. Mine was 01:00.0 & 01:00.1. You can omit the part after the decimal to include them both in one go – so in that case it would be 01:00
Run lspci -n -s <PCI address from above> to obtain vendor IDs. Example : lspci -n -s 01:00 01:00.0 0300: 10de:1b81 (rev a1) 01:00.1 0403: 10de:10f0 (rev a1)
Assign your GPU to vfio driver using the IDs obtained above. Example using above IDs: echo "options vfio-pci ids=10de:1b81,10de:10f0" >> /etc/modprobe.d/vfio.conf
Reboot the host to put the kernel / drivers into effect.
Assuming you’re using network manager for your connections, create a bridge (thanks to ciberciti.biz & the arch wiki for information on how to do so.) Replace interface names with ones corresponding to your machine:
sudo nmcli connection add type bridge ifname br0 stp no
sudo nmcli connection add type bridge-slave ifname enp4s0 master br0
sudo nmcli connection show
#Make note of the active connection name
sudo nmcli connection down "Wired connection 2" #from above
sudo nmcli connection up bridge-br0
Create a second bridge bound to lo0 for host-only communication. Change IP as desired:
sudo nmcli connection add type bridge ifname br99 stp no ip4 192.168.2.1/24
sudo nmcli connection add type bridge-slave ifname lo master br99
sudo nmcli connection up bridge-br99
Configure VM
Initial configuration
When creating the passthrough VM, make sure chipset is Q35.
Set the CPU model to host-passthrough (type it in, there is no dropdown for it.)
When adding disks / other devices, set the device model to virtio
Add your GPU by going to Add Hardware and finding it under PCI Host Device.
Windows 10 specific tweaks
If your passthrough VM is going to be windows based, some tweaks are required to get the GPU to work properly within the VM.
Ignore MSRs (blue screen fix)
Later versions of Windows 10 instantly bluescreen with kmode_exception_not_handled unless you pass an option to ignore MSRs. Add the kvm ignore_msrs=1 option in /etc/modprobe.d/kvm.conf to do so. Optionally add the report_ignored_msrs=0 option to squelch massive amounts of kernel messages every time an MSR was ignored.
Use the virsh edit command to make some tweaks to the VM configuration. We need to hide the fact that this is a VM otherwise the GPU drivers will not load and will throw Error 43. We need to add a vendor_id in the hyperv section, and create a kvm section enabling hidden state, which hides certain CPU flags that the drivers use to detect if they’re in a VM or not.
If you operate on a multi-core system such as my AMD Ryzen Threadripper the you will want to optimize your CPU core configuration in the VM per the CPU Pinning section in the Arch Wiki
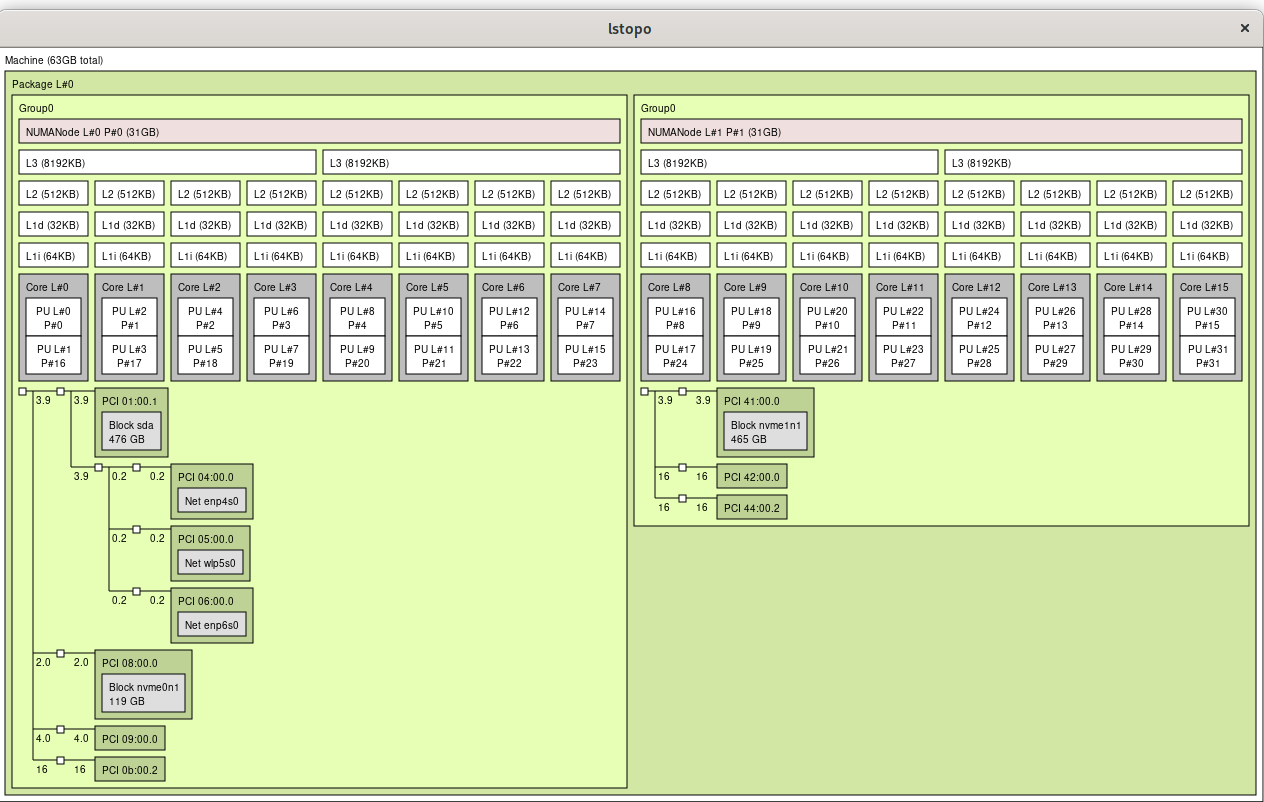
Determine your CPU topology by running lscpu -e and lstopo The important things to look for are the CPU number and core number. On my box, it looks like this:
From the above output I see my CPU core 0 is shared by CPUs 0 & 16, meaning CPU 0 and CPU 16 (as seen by the Linux kernel) are hyperthreaded to the same physical CPU core.
Especially for gaming, you want to keep all threads on the same CPU cores (for multithreading) and the same CPU die (on my threadripper, CPUs 0-7 reside on one physical die, and CPUs 8-15 reside on the other, within the same socket.)
In my case I want to dedicate one CPU die to my VM with its accompanying hyperthreads (CPUs 0-7 & hyperthreads 16-23) You can accomplish this using the virsh edit command and creating a cputune section (make sure you have a matching vcpu count for the number of cores you’re configuring.) Also edit CPU mode with the proper topology of 1 socket, 1 die, 8 cores with 2 threads. Lastly, configure memory to only be from the proper NUMA node the CPU cores your VM is using (Read here for more info.)
Non-uniform memory access is essential for 1st and 2nd gen Ryzen chips. It turns out that by default my motherboard hid the real NUMA configuration from the operating system. Remedy this by changing the BIOS setting to set Memory Interleaving = Channel (for my ASRock X399 motherboard it’s in CBS / DF options.) See here: https://www.reddit.com/r/Amd/comments/6vrcq0/psa_threadripper_umanuma_setting_in_bios/
After changing BIOS setting, lstopo now shows proper configuration:
CPU frequency
Change CPU frequency setting to use performance mode:
Append default_hugepagesz=1G hugepagesz=1G hugepages=16 to the kernel line in /etc/default/grub and re-run sudo grub-mkconfig -o /boot/grub/grub.cfg
Configure FIFO CPU scheduling
The Arch Wiki mentions to run qemu-system-x86_64 with taskset and chrt but doesn’t mention how to do so if you’re using virt-manager. Fortunately this reddit thread outlined how to accomplish it: libvirt hooks. Create the following script and place it in /etc/libvirt/hooks/qemu , change the VM variable to match the name of your VM, mark that new file as executable (chmod +x /etc/libvirt/hooks/qemu ) and restart libvirtd
#!/bin/bash
#Hook to change VM to FIFO scheduling to decrease latency
#Place this file in /etc/libvirt/hooks/qemu and mark it executable

#Change the VM variable to match the name of your VM
VM="win10"

if [ "$1" == "$VM" ] && [ "$2" == "started" ]; then
  if pid=$(pidof qemu-system-x86_64); then
     chrt -f -p 1 $pid
    echo $(date) changing CPU scheduling to FIFO for VM $1 pid $pid >> /var/log/libvirthook.log
  else
    echo $(date) Unable to acquire PID of $1 >> /var/log/libvirthook.log
  fi
fi
#Additional debug
#echo $(date) libvirt hook arg1=$1 arg2=$2 arg3=$3 arg4=$4 pid=$pid >> /var/log/libvirthook.log
Isolate CPUs
Update 7/28/20: I no longer do this in favor of the qemu hook script above, which prioritizes to p1 the qemu process for the cores it needs. I’m leaving this section here for historical/additional tweaking purposes.
Update 6/28/20: Additional tuning since I was having some stuttering and framerate issues. Also read here about the emulatorpin option
Dedicate CPUs to the VM (host will not use them) – append isolcups, nohz_full & rcu_nocbs kernel parameters into /etc/default/grub
Update 7/8/2020: I found this article and this reddit thread (and this one) on how to use pulseaudio for your guest VM to get low latency guest VM audio piped to the host machine.
Update qemu config
edit /etc/libvirt/qemu.conf: uncomment the line #user = "root" and replace “root” with your username
Update pulseaudio config
Edit /etc/pulse/daemon.conf and uncomment the following lines (remove semicolon)
Make mirrorlist use only xmission sed -i 's/^Server/#Server/g;s/#Server\(.*xmission.*\)/Server\1/g' /etc/pacman.d/mirrorlist
Install base system plus extra packages: pacstrap /mnt base linux linux-firmware lvm2 efibootmgr samba vim htop networkmanager inetutils man-db man-pages texinfo openssh grub
Generate fstab genfstab -U /mnt >> /mnt/etc/fstab
Enter new environment chroot arch-chroot /mnt
Set timezone ln -sf /usr/share/zoneinfo/America/Boise /etc/localtime
Configure en_US locales sed -i 's/^#en_US\(.*\)/en_US\1/g' /etc/locale.gen locale-gen
Make dvorak layout permanent echo "KEYMAP=dvorak" > /etc/vconsole.conf
At one point I had KVM with GPU passthrough running in Arch Linux. I have since moved away from it back to ProxMox. Here are my notes I jotted down when I did this in Arch. Sorry these are just rough notes, I didn’t end up using Arch for long enough to turn this into a polished article.
pacman -Sy qemu netctl ovmf virt-manager
When creating VM, make sure chipset is Q35
CPU model host-passthrough (write it in)
Create VirtIO SCSI controller and attach drives to it
Copy /etc/netctl/examples/bridge to /etc/netctl/bridge
/etc/netctl/bridge
Description="Example Bridge connection"
Interface=br0
Connection=bridge
BindsToInterfaces=(enp4s0)
IP=dhcp

#Optional - give your system another IP for host-only networking
ExecUpPost="ip addr add 192.168.2.1/24 dev br0"
I had a very odd issue where all sound disappeared in my Windows VM if the microphone was used. Even simply opening up audio properties and going to the Recording tab triggered this issue. Disabling / re-enabled Special Effects for the playback device brought it back until the microphone was accessed again.
I’m using USB sound card passed through to the VM for audio. It stems from the VM’s USB controller. When I had it set to USB3 the issue would occur. When set to USB2 the issue went away. Bizarre.
Lately I’ve been doing 100% of my gaming in Linux. The latest versions of wine in Arch Linux have been fantastic (for the most part.) I recently installed a game called Gauntlet (a windows-only steam game.) For some reason I had no sound. Sound worked fine in other Wine games, just not this one.
After much digging I found this post on the Arch Linux forums which fixed my issue. The issue was not having the proper 32bit sound libraries installed. The fix was as simple as:
I’ve been wanting to get some of my games to play properly in Linux with Wine. Recently I’ve been able to get Heroes of the Storm working pretty well in Arch Linux. This is what I did to get it working with my NVIDIA GeForce GTX 1070.
Update 4/22/2017: Even more changes with wine 2.4-staging. This site is very helpful:
For Wine Staging release 2.3 and later
Change Windows Version to Windows XP
Open Wine configuration (winecfg) and change setting at the bottom
Install Visual C++ 2015 libraries (needed to update games)
winetricks vcrun2015
If you get errors about not being able to connect / login:
Install lib32-libldap and lib32-gnutls
Installer login Workaround:
 - Create a clean 32-bit wineprefix
 - Run the Battle.net installer with default options
  * It crashes at the very end when it tries to launch, but installation still finishes and succeeds.
 - Overwrite the default Battle.net config file:
  cd "$WINEPREFIX/users/$(whoami)/Application\ Data/Battle.net/"
  echo "{\"Client\": {\"HardwareAcceleration\": \"false\"}}" > "Battle.net.config"
 - Set the default mimicked windows version to Windows XP
 - Run Battle.net:
  wine "$WINEPREFIX/drive_c/Program\ Files/Battle.net/Battle.net\ Launcher.exe"
Update 3/31/2017: A few things have changed since I wrote this article. I’ll keep the old information for historical purposes, but the process has updated
(Dvorak keymap users only) Set keymap to US to allow for hotkeys to work
setxkbmap us
It’s not perfect. Battle.net splash screens don’t load (no news, patch info) and the first few moments in the game stutter (but it’s fine after that.) Without DX11 the game doesn’t quite look as shiny but is still quite playable. I hope future versions of WINE will help with this problem, but this is what I’m using for now.