I upgraded to a shiny new AMD Ryzen 3rd gen processer (Threadripper 3960x.) After doing so I could not boot up my Windows 10 gaming VM (it uses VFIO / PCI Passthrough for the video card.) The message I kept getting as it tried to boot was:
The problem comes with a new speculative execution protection hardware feature in the Ryzen Gen 3 chipsets – stibp. Qemu doesn’t know how to handle it properly, thus the bluescreens.
There are two ways to fix it
Change host-model from host-passthrough to epyc
Add CPU parameters to your Virtual Machine’s XML file instructing it to not use the stibp CPU feature.
Since I have some software that checks CPU model and refuses to work if it’s not in the desktop class (Geforce Experience) I opted for route #2.
First, check the qemu logs to see which CPU parameters your VM was using (pick a time where it worked.) Replace ‘win10’ with the name of your VM.
in my case, it was -cpu host,migratable=on,topoext=on,kvmclock=on,hv-time,hv-relaxed,hv-vapic,hv-spinlocks=0x1fff,hv-vendor-id=1234567890ab,kvm=off \
Copy everything after -cpu and before the last backslash. Then edit your VM’s XML file (change last argument to the name of your VM)
sudo virsh edit win10
Scroll down to the bottom qemu:commandline section (if it doesn’t exist, create it right above the last line – </domain>. Paste the following information obtained from the above log (ignoring the qemu:commandline lines if they already exist.) In my case it looked like this:
What you’re doing is copying the CPU arguments you found in the log and adding them to the qemu:commandline section, with a twist – adding -amd-stibp which instructs qemu to remove that CPU flag.
I’ve once again switched from Proxmox to Arch Linux for my desktop machine. Both use KVM so it’s really just a matter of using the different VM manager syntax (virt-manager vs qm.) I used my notes from my previous stint with Arch, my article on GPU Passthrough in Proxmox as well as a thorough reading of the Arch wiki’s PCI Passthrough article.
Enable IOMMU
Configure GRUB to load the necessary iommu modules at boot. Append amd_iommu=on iommu=pt to the end of GRUB_CMDLINE_LINUX_DEFAULT (change accordingly if you have Intel instead of AMD)
sudo vim /etc/default/grub
...
GRUB_CMDLINE_LINUX_DEFAULT="loglevel=3 amd_iommu=on iommu=pt"
Run update-grub
sudo update-grub
Reserve GPU for VFIO
Reserve the GPU you wish to pass through to a VM for use with the vfio kernel driver (so the host OS doesn’t interfere with it)
Determine the PCI address of your GPU
Run lspci -v and look for your card. Mine was 01:00.0 & 01:00.1. You can omit the part after the decimal to include them both in one go – so in that case it would be 01:00
Run lspci -n -s <PCI address from above> to obtain vendor IDs. Example : lspci -n -s 01:00 01:00.0 0300: 10de:1b81 (rev a1) 01:00.1 0403: 10de:10f0 (rev a1)
Assign your GPU to vfio driver using the IDs obtained above. Example using above IDs: echo "options vfio-pci ids=10de:1b81,10de:10f0" >> /etc/modprobe.d/vfio.conf
Reboot the host to put the kernel / drivers into effect.
Assuming you’re using network manager for your connections, create a bridge (thanks to ciberciti.biz & the arch wiki for information on how to do so.) Replace interface names with ones corresponding to your machine:
sudo nmcli connection add type bridge ifname br0 stp no
sudo nmcli connection add type bridge-slave ifname enp4s0 master br0
sudo nmcli connection show
#Make note of the active connection name
sudo nmcli connection down "Wired connection 2" #from above
sudo nmcli connection up bridge-br0
Create a second bridge bound to lo0 for host-only communication. Change IP as desired:
sudo nmcli connection add type bridge ifname br99 stp no ip4 192.168.2.1/24
sudo nmcli connection add type bridge-slave ifname lo master br99
sudo nmcli connection up bridge-br99
Configure VM
Initial configuration
When creating the passthrough VM, make sure chipset is Q35.
Set the CPU model to host-passthrough (type it in, there is no dropdown for it.)
When adding disks / other devices, set the device model to virtio
Add your GPU by going to Add Hardware and finding it under PCI Host Device.
Windows 10 specific tweaks
If your passthrough VM is going to be windows based, some tweaks are required to get the GPU to work properly within the VM.
Ignore MSRs (blue screen fix)
Later versions of Windows 10 instantly bluescreen with kmode_exception_not_handled unless you pass an option to ignore MSRs. Add the kvm ignore_msrs=1 option in /etc/modprobe.d/kvm.conf to do so. Optionally add the report_ignored_msrs=0 option to squelch massive amounts of kernel messages every time an MSR was ignored.
Use the virsh edit command to make some tweaks to the VM configuration. We need to hide the fact that this is a VM otherwise the GPU drivers will not load and will throw Error 43. We need to add a vendor_id in the hyperv section, and create a kvm section enabling hidden state, which hides certain CPU flags that the drivers use to detect if they’re in a VM or not.
If you operate on a multi-core system such as my AMD Ryzen Threadripper the you will want to optimize your CPU core configuration in the VM per the CPU Pinning section in the Arch Wiki
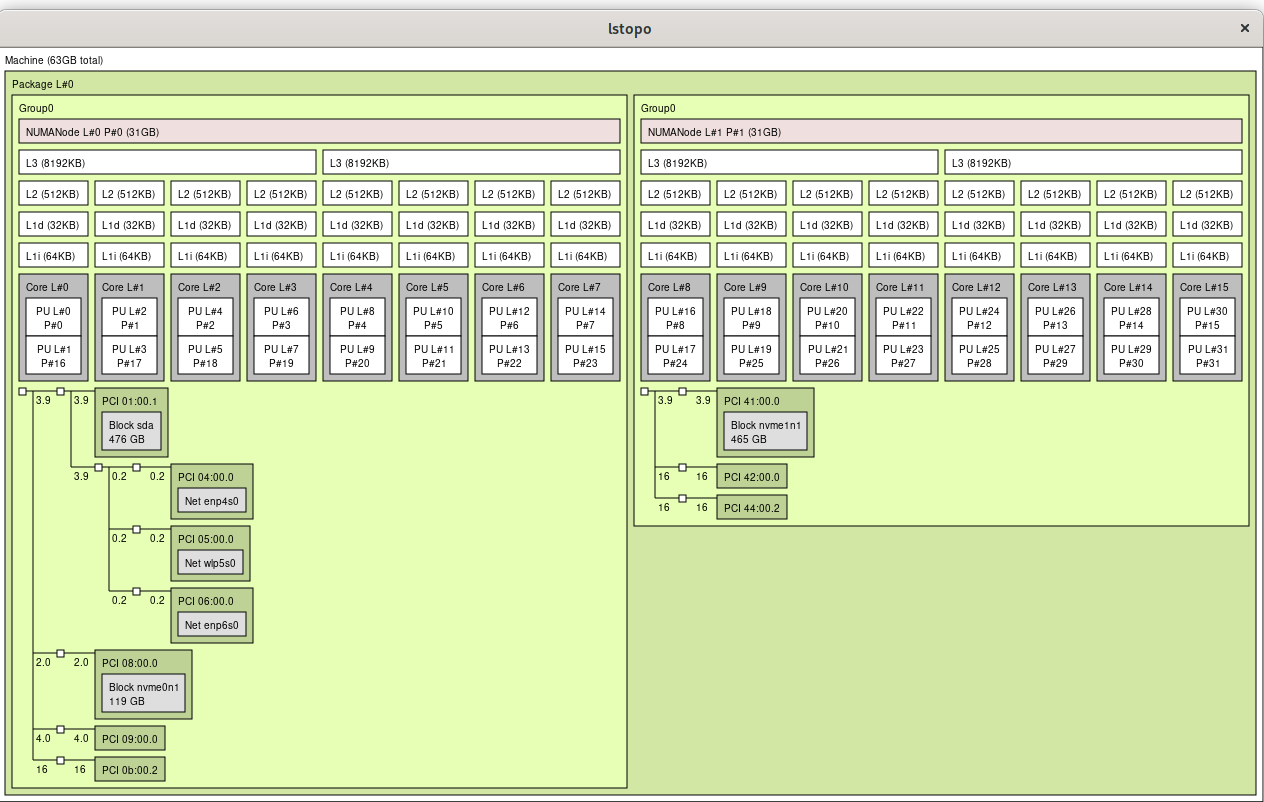
Determine your CPU topology by running lscpu -e and lstopo The important things to look for are the CPU number and core number. On my box, it looks like this:
From the above output I see my CPU core 0 is shared by CPUs 0 & 16, meaning CPU 0 and CPU 16 (as seen by the Linux kernel) are hyperthreaded to the same physical CPU core.
Especially for gaming, you want to keep all threads on the same CPU cores (for multithreading) and the same CPU die (on my threadripper, CPUs 0-7 reside on one physical die, and CPUs 8-15 reside on the other, within the same socket.)
In my case I want to dedicate one CPU die to my VM with its accompanying hyperthreads (CPUs 0-7 & hyperthreads 16-23) You can accomplish this using the virsh edit command and creating a cputune section (make sure you have a matching vcpu count for the number of cores you’re configuring.) Also edit CPU mode with the proper topology of 1 socket, 1 die, 8 cores with 2 threads. Lastly, configure memory to only be from the proper NUMA node the CPU cores your VM is using (Read here for more info.)
Non-uniform memory access is essential for 1st and 2nd gen Ryzen chips. It turns out that by default my motherboard hid the real NUMA configuration from the operating system. Remedy this by changing the BIOS setting to set Memory Interleaving = Channel (for my ASRock X399 motherboard it’s in CBS / DF options.) See here: https://www.reddit.com/r/Amd/comments/6vrcq0/psa_threadripper_umanuma_setting_in_bios/
After changing BIOS setting, lstopo now shows proper configuration:
CPU frequency
Change CPU frequency setting to use performance mode:
Append default_hugepagesz=1G hugepagesz=1G hugepages=16 to the kernel line in /etc/default/grub and re-run sudo grub-mkconfig -o /boot/grub/grub.cfg
Configure FIFO CPU scheduling
The Arch Wiki mentions to run qemu-system-x86_64 with taskset and chrt but doesn’t mention how to do so if you’re using virt-manager. Fortunately this reddit thread outlined how to accomplish it: libvirt hooks. Create the following script and place it in /etc/libvirt/hooks/qemu , change the VM variable to match the name of your VM, mark that new file as executable (chmod +x /etc/libvirt/hooks/qemu ) and restart libvirtd
#!/bin/bash
#Hook to change VM to FIFO scheduling to decrease latency
#Place this file in /etc/libvirt/hooks/qemu and mark it executable

#Change the VM variable to match the name of your VM
VM="win10"

if [ "$1" == "$VM" ] && [ "$2" == "started" ]; then
  if pid=$(pidof qemu-system-x86_64); then
     chrt -f -p 1 $pid
    echo $(date) changing CPU scheduling to FIFO for VM $1 pid $pid >> /var/log/libvirthook.log
  else
    echo $(date) Unable to acquire PID of $1 >> /var/log/libvirthook.log
  fi
fi
#Additional debug
#echo $(date) libvirt hook arg1=$1 arg2=$2 arg3=$3 arg4=$4 pid=$pid >> /var/log/libvirthook.log
Isolate CPUs
Update 7/28/20: I no longer do this in favor of the qemu hook script above, which prioritizes to p1 the qemu process for the cores it needs. I’m leaving this section here for historical/additional tweaking purposes.
Update 6/28/20: Additional tuning since I was having some stuttering and framerate issues. Also read here about the emulatorpin option
Dedicate CPUs to the VM (host will not use them) – append isolcups, nohz_full & rcu_nocbs kernel parameters into /etc/default/grub
Update 7/8/2020: I found this article and this reddit thread (and this one) on how to use pulseaudio for your guest VM to get low latency guest VM audio piped to the host machine.
Update qemu config
edit /etc/libvirt/qemu.conf: uncomment the line #user = "root" and replace “root” with your username
Update pulseaudio config
Edit /etc/pulse/daemon.conf and uncomment the following lines (remove semicolon)
Proxmox uses qemu which doesn’t implement CPU pinning by itself. If you want to limit a guest VM’s operations to specific CPU cores on the host you need to use taskset. It was a bit confusing to figure out but fortunately I found this gist by ayufan which handles it beautifully.
Save the following into taskset.sh and edit VMID to the ID of the VM you wish to pin CPUs to. Make sure you have the “expect” package installed.
#!/bin/bash

set -eo pipefail

VMID=200

cpu_tasks() {
	expect <<EOF | sed -n 's/^.* CPU .*thread_id=\(.*\)$/\1/p' | tr -d '\r' || true
spawn qm monitor $VMID
expect ">"
send "info cpus\r"
expect ">"
EOF
}

VCPUS=($(cpu_tasks))
VCPU_COUNT="${#VCPUS[@]}"

if [[ $VCPU_COUNT -eq 0 ]]; then
	echo "* No VCPUS for VM$VMID"
	exit 1
fi

echo "* Detected ${#VCPUS[@]} assigned to VM$VMID..."
echo "* Resetting cpu shield..."

for CPU_INDEX in "${!VCPUS[@]}"
do
	CPU_TASK="${VCPUS[$CPU_INDEX]}"
	echo "* Assigning $CPU_INDEX to $CPU_TASK..."
	taskset -pc "$CPU_INDEX" "$CPU_TASK"
done
Update 9/29/18: Fixed missing done at the end. Also if you want to offset which cores this script uses, you can do so by modifying the $CPU_INDEX variable to do a bit of math, like so:
taskset -pc "$[CPU_INDEX+16]"
The above adds 16 to each process ID, so instead of staring on thread 0 it starts on thread 16.
My mother’s laptop has been behaving very strangely lately. CPU usage suddenly would spike to 100% usage inexplicably. It seemed to happen more often when Firefox / Thunderbird were launched, but that wasn’t necessarily the case. The issue would often persist across reboots.
My first thought, of course, was malware. An extensive scan via rootkit scanner, malware scanner, spyware scanner, and anti-virus revealed nothing. Observing running processes with process explorer and startup programs with autoruns revealed nothing suspicious. I installed all Windows updates, updated all typical applications with the help of ninite, and even ran sfc /scannow for good measure. The issue remained!
Even more confusing is that when running task manager, process explorer, or performance monitor they all reported 100% CPU usage and with a single process hogging the CPU – themselves! It seemed that whatever was the last process to execute was taking all CPU. It was truly baffling.
A suggestion on superuser.com was to remove the laptop battery and try again. They reported that as the magic bullet for their problem. I had my father remove and re-seat the battery (I was doing all of this remotely.) Magic! Everything worked normally again. Perhaps there was some sort of static electricity buildup causing problems. Truly bizarre.