I’ve once again switched from Proxmox to Arch Linux for my desktop machine. Both use KVM so it’s really just a matter of using the different VM manager syntax (virt-manager vs qm.) I used my notes from my previous stint with Arch, my article on GPU Passthrough in Proxmox as well as a thorough reading of the Arch wiki’s PCI Passthrough article.
Enable IOMMU
Configure GRUB to load the necessary iommu modules at boot. Append amd_iommu=on iommu=pt to the end of GRUB_CMDLINE_LINUX_DEFAULT (change accordingly if you have Intel instead of AMD)
sudo vim /etc/default/grub
...
GRUB_CMDLINE_LINUX_DEFAULT="loglevel=3 amd_iommu=on iommu=pt"
Run update-grub
sudo update-grubReserve GPU for VFIO
Reserve the GPU you wish to pass through to a VM for use with the vfio kernel driver (so the host OS doesn’t interfere with it)
- Determine the PCI address of your GPU
- Run
lspci -vand look for your card. Mine was01:00.0&01:00.1. You can omit the part after the decimal to include them both in one go – so in that case it would be01:00 - Run
lspci -n -s <PCI address from above>to obtain vendor IDs.
Example :lspci -n -s 01:0001:00.0 0300: 10de:1b81 (rev a1)
01:00.1 0403: 10de:10f0 (rev a1)
- Run
- Assign your GPU to vfio driver using the IDs obtained above.
Example using above IDs:echo "options vfio-pci ids=10de:1b81,10de:10f0" >> /etc/modprobe.d/vfio.conf
Reboot the host to put the kernel / drivers into effect.
Configure virt-manager
Install virt-manager, dnsmasq & libvirtd:
pacman -Sy libvirtd virt-manager dnsmasq
sudo systemctl enable libvirtd
sudo systemctl start libvirtd
Configure Networking
Assuming you’re using network manager for your connections, create a bridge (thanks to ciberciti.biz & the arch wiki for information on how to do so.) Replace interface names with ones corresponding to your machine:
sudo nmcli connection add type bridge ifname br0 stp no
sudo nmcli connection add type bridge-slave ifname enp4s0 master br0
sudo nmcli connection show
#Make note of the active connection name
sudo nmcli connection down "Wired connection 2" #from above
sudo nmcli connection up bridge-br0
Create a second bridge bound to lo0 for host-only communication. Change IP as desired:
sudo nmcli connection add type bridge ifname br99 stp no ip4 192.168.2.1/24
sudo nmcli connection add type bridge-slave ifname lo master br99
sudo nmcli connection up bridge-br99
Configure VM
Initial configuration
When creating the passthrough VM, make sure chipset is Q35.
Set the CPU model to host-passthrough (type it in, there is no dropdown for it.)
When adding disks / other devices, set the device model to virtio
Add your GPU by going to Add Hardware and finding it under PCI Host Device.
Windows 10 specific tweaks
If your passthrough VM is going to be windows based, some tweaks are required to get the GPU to work properly within the VM.
Ignore MSRs (blue screen fix)
Later versions of Windows 10 instantly bluescreen with kmode_exception_not_handled unless you pass an option to ignore MSRs. Add the kvm ignore_msrs=1 option in /etc/modprobe.d/kvm.conf to do so. Optionally add the report_ignored_msrs=0 option to squelch massive amounts of kernel messages every time an MSR was ignored.
echo "options kvm ignore_msrs=1" >> /etc/modprobe.d/kvm.conf
#Optional - ignore kernel messages from ignored MSRs
echo "options kvm report_ignored_msrs=0" >> /etc/modprobe.d/kvm.conf
Reboot to make those changes take effect.
NVIDIA Code 43 workaround
Use the virsh edit command to make some tweaks to the VM configuration. We need to hide the fact that this is a VM otherwise the GPU drivers will not load and will throw Error 43. We need to add a vendor_id in the hyperv section, and create a kvm section enabling hidden state, which hides certain CPU flags that the drivers use to detect if they’re in a VM or not.
sudo virsh edit <VM_NAME>
<features>
	<hyperv>
		...
		<vendor_id state='on' value='1234567890ab'/>
		...
	</hyperv>
	...
	<kvm>
	<hidden state='on'/>
	</kvm>
</features>
Optimize CPU
Determine architecture
If you operate on a multi-core system such as my AMD Ryzen Threadripper the you will want to optimize your CPU core configuration in the VM per the CPU Pinning section in the Arch Wiki
Determine your CPU topology by running lscpu -e and lstopo The important things to look for are the CPU number and core number. On my box, it looks like this:
CPU NODE SOCKET CORE L1d:L1i:L2:L3 ONLINE MAXMHZ MINMHZ
0 0 0 0 0:0:0:0 yes 3400.0000 2200.0000
1 0 0 1 1:1:1:0 yes 3400.0000 2200.0000
2 0 0 2 2:2:2:0 yes 3400.0000 2200.0000
3 0 0 3 3:3:3:0 yes 3400.0000 2200.0000
4 0 0 4 4:4:4:1 yes 3400.0000 2200.0000
5 0 0 5 5:5:5:1 yes 3400.0000 2200.0000
6 0 0 6 6:6:6:1 yes 3400.0000 2200.0000
7 0 0 7 7:7:7:1 yes 3400.0000 2200.0000
8 0 0 8 8:8:8:2 yes 3400.0000 2200.0000
9 0 0 9 9:9:9:2 yes 3400.0000 2200.0000
10 0 0 10 10:10:10:2 yes 3400.0000 2200.0000
11 0 0 11 11:11:11:2 yes 3400.0000 2200.0000
12 0 0 12 12:12:12:3 yes 3400.0000 2200.0000
13 0 0 13 13:13:13:3 yes 3400.0000 2200.0000
14 0 0 14 14:14:14:3 yes 3400.0000 2200.0000
15 0 0 15 15:15:15:3 yes 3400.0000 2200.0000
16 0 0 0 0:0:0:0 yes 3400.0000 2200.0000
17 0 0 1 1:1:1:0 yes 3400.0000 2200.0000
18 0 0 2 2:2:2:0 yes 3400.0000 2200.0000
19 0 0 3 3:3:3:0 yes 3400.0000 2200.0000
20 0 0 4 4:4:4:1 yes 3400.0000 2200.0000
21 0 0 5 5:5:5:1 yes 3400.0000 2200.0000
22 0 0 6 6:6:6:1 yes 3400.0000 2200.0000
23 0 0 7 7:7:7:1 yes 3400.0000 2200.0000
24 0 0 8 8:8:8:2 yes 3400.0000 2200.0000
25 0 0 9 9:9:9:2 yes 3400.0000 2200.0000
26 0 0 10 10:10:10:2 yes 3400.0000 2200.0000
27 0 0 11 11:11:11:2 yes 3400.0000 2200.0000
28 0 0 12 12:12:12:3 yes 3400.0000 2200.0000
29 0 0 13 13:13:13:3 yes 3400.0000 2200.0000
30 0 0 14 14:14:14:3 yes 3400.0000 2200.0000
31 0 0 15 15:15:15:3 yes 3400.0000 2200.0000
From the above output I see my CPU core 0 is shared by CPUs 0 & 16, meaning CPU 0 and CPU 16 (as seen by the Linux kernel) are hyperthreaded to the same physical CPU core.
Especially for gaming, you want to keep all threads on the same CPU cores (for multithreading) and the same CPU die (on my threadripper, CPUs 0-7 reside on one physical die, and CPUs 8-15 reside on the other, within the same socket.)
In my case I want to dedicate one CPU die to my VM with its accompanying hyperthreads (CPUs 0-7 & hyperthreads 16-23) You can accomplish this using the virsh edit command and creating a cputune section (make sure you have a matching vcpu count for the number of cores you’re configuring.) Also edit CPU mode with the proper topology of 1 socket, 1 die, 8 cores with 2 threads. Lastly, configure memory to only be from the proper NUMA node the CPU cores your VM is using (Read here for more info.)
sudo virsh edit <VM_NAME>

<domain type='kvm'>
  ...
  <vcpu placement='static' cpuset='0-7,16-23'>16</vcpu>
  <cputune>
    <vcpupin vcpu='0' cpuset='0'/>
    <vcpupin vcpu='1' cpuset='16'/>
    <vcpupin vcpu='2' cpuset='1'/>
    <vcpupin vcpu='3' cpuset='17'/>
    <vcpupin vcpu='4' cpuset='2'/>
    <vcpupin vcpu='5' cpuset='18'/>
    <vcpupin vcpu='6' cpuset='3'/>
    <vcpupin vcpu='7' cpuset='19'/>
    <vcpupin vcpu='8' cpuset='4'/>
    <vcpupin vcpu='9' cpuset='20'/>
    <vcpupin vcpu='10' cpuset='5'/>
    <vcpupin vcpu='11' cpuset='21'/>
    <vcpupin vcpu='12' cpuset='6'/>
    <vcpupin vcpu='13' cpuset='22'/>
    <vcpupin vcpu='14' cpuset='7'/>
    <vcpupin vcpu='15' cpuset='23'/>
    <emulatorpin cpuset='0-7','26-23'/>
  </cputune>
  ...
  <cpu mode='host-passthrough' check='none'>
    <topology sockets='1' dies='1' cores='8' threads='2'/>
    <feature policy='require' name='topoext'/>
    <numa>
      <cell id='0' cpus='0-15' memory='16777216' unit='KiB'/>
    </numa>
  </cpu>
  ...
</domain>
Configure NUMA
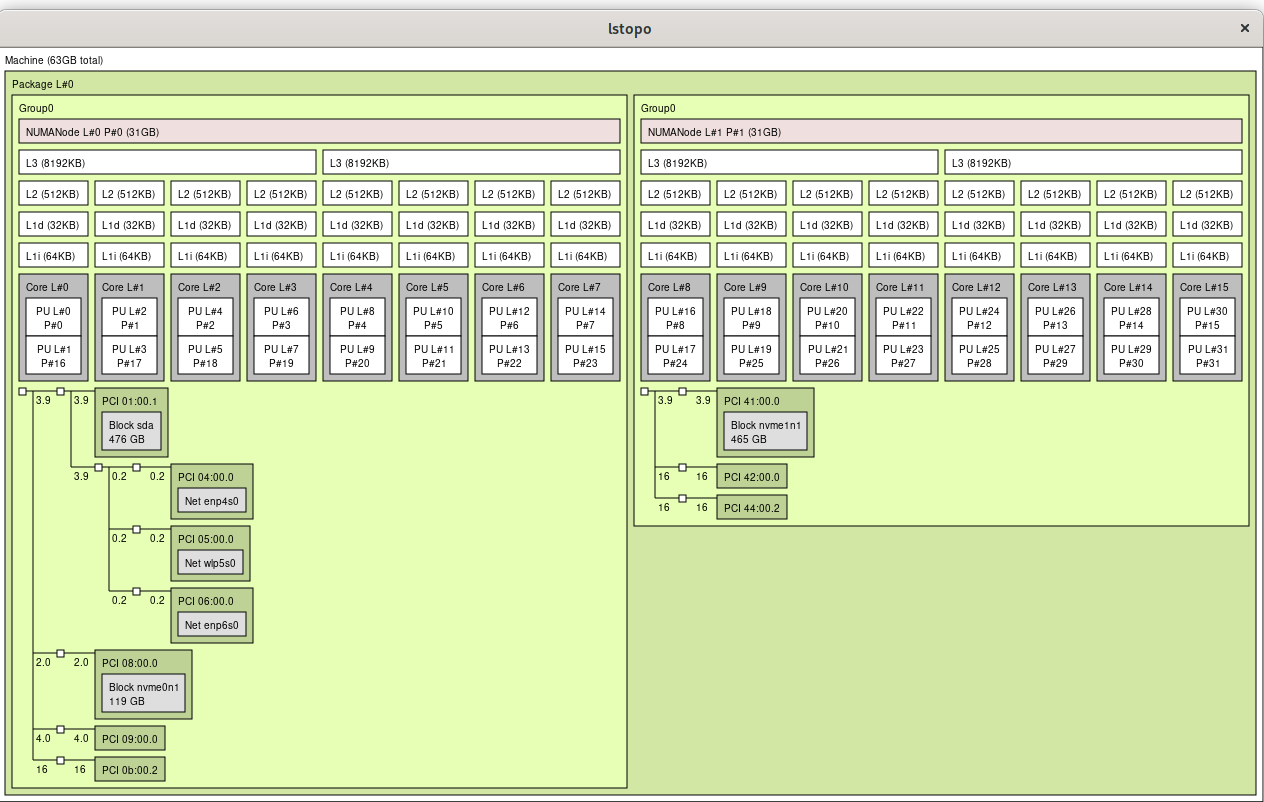
Non-uniform memory access is essential for 1st and 2nd gen Ryzen chips. It turns out that by default my motherboard hid the real NUMA configuration from the operating system. Remedy this by changing the BIOS setting to set Memory Interleaving = Channel (for my ASRock X399 motherboard it’s in CBS / DF options.) See here: https://www.reddit.com/r/Amd/comments/6vrcq0/psa_threadripper_umanuma_setting_in_bios/
After changing BIOS setting, lstopo now shows proper configuration:
CPU frequency
Change CPU frequency setting to use performance mode:
sudo pacman -S cpupower
sudo cpupower frequency-set -g performance
Enable Hugepages
Append default_hugepagesz=1G hugepagesz=1G hugepages=16 to the kernel line in /etc/default/grub and re-run sudo grub-mkconfig -o /boot/grub/grub.cfg
Configure FIFO CPU scheduling
The Arch Wiki mentions to run qemu-system-x86_64 with taskset and chrt but doesn’t mention how to do so if you’re using virt-manager. Fortunately this reddit thread outlined how to accomplish it: libvirt hooks. Create the following script and place it in /etc/libvirt/hooks/qemu , change the VM variable to match the name of your VM, mark that new file as executable (chmod +x /etc/libvirt/hooks/qemu ) and restart libvirtd
#!/bin/bash
#Hook to change VM to FIFO scheduling to decrease latency
#Place this file in /etc/libvirt/hooks/qemu and mark it executable

#Change the VM variable to match the name of your VM
VM="win10"

if [ "$1" == "$VM" ] && [ "$2" == "started" ]; then
  if pid=$(pidof qemu-system-x86_64); then
     chrt -f -p 1 $pid
    echo $(date) changing CPU scheduling to FIFO for VM $1 pid $pid >> /var/log/libvirthook.log
  else
    echo $(date) Unable to acquire PID of $1 >> /var/log/libvirthook.log
  fi
fi
#Additional debug
#echo $(date) libvirt hook arg1=$1 arg2=$2 arg3=$3 arg4=$4 pid=$pid >> /var/log/libvirthook.log
Isolate CPUs
Update 7/28/20: I no longer do this in favor of the qemu hook script above, which prioritizes to p1 the qemu process for the cores it needs. I’m leaving this section here for historical/additional tweaking purposes.
Update 6/28/20: Additional tuning since I was having some stuttering and framerate issues. Also read here about the emulatorpin option
Dedicate CPUs to the VM (host will not use them) – append isolcups, nohz_full & rcu_nocbs kernel parameters into /etc/default/grub
...
GRUB_CMDLINE_LINUX_DEFAULT=... isolcpus=0-7,16-23 nohz_full=0-7,16-23 rcu_nocbs=0-7,16-23
...
Update grub:
sudo grub-mkconfig -o /boot/grub/grub.cfgReboot, then check if it worked:
cat /proc/cmdline
BOOT_IMAGE=/boot/vmlinuz-linux root=/dev/mapper/arch-root rw loglevel=3 amd_iommu=on iommu=pt isolcpus=0-7,16-23 nohz_full=0-7,16-23 rcu_nocbs=0-7,16-23
taskset -cp 1
pid 1's current affinity list: 8-15,24-31You can still tell programs to use the CPUs the VM has manually with the taskset command:
chrt -r 1 taskset -c <cores to use> <name of program/process>
Low Latency Audio
Update 9/3/2025: Still useful! I found this guide for getting pulse audio to work in Ubuntu 24:04
virsh edit <VM_NAME>
    <sound model='ich9'>
      <codec type='micro'/>
      <audio id='1'/>
    </sound>
    <audio id='1' type='pulseaudio' serverName='/run/user/1000/pulse/native'/>
Update 7/8/2020: I found this article and this reddit thread (and this one) on how to use pulseaudio for your guest VM to get low latency guest VM audio piped to the host machine.
Update qemu config
edit /etc/libvirt/qemu.conf: uncomment the line #user = "root" and replace “root” with your username
Update pulseaudio config
Edit /etc/pulse/daemon.conf and uncomment the following lines (remove semicolon)
;default-sample-rate = 44100
;alternate-sample-rate = 48000
Note: Change VM audio settings to match 44100 sample rate
Edit /etc/pulse/default.pa and append auth-anonymous=1 to load-module module-native-protocol-unix
load-module module-native-protocol-unix auth-anonymous=1The restart pulseaudio:
pulseaudio -kUpdate VM XML
remove all audio devices from the virtual hardware details bar (left side in VM info view).
Edit XML via virsh edit <VM_NAME>
Make sure top line reads
<domain type='kvm' xmlns:qemu='http://libvirt.org/schemas/domain/qemu/1.0'>
Add the following after </devices> (bottom of file)
<qemu:commandline>
    <qemu:arg value='-device'/>
    <qemu:arg value='ich9-intel-hda,bus=pcie.0,addr=0x1b'/>
    <qemu:arg value='-device'/>
    <qemu:arg value='hda-micro,audiodev=hda'/>
    <qemu:arg value='-audiodev'/>
    <qemu:arg value='pa,id=hda,server=unix:/run/user/1000/pulse/native'/>
</qemu:commandline>
Replace /user/1000 with the UID of your user (output of id command)
Final Win10 XML tweaks for 1950x threadripper
<domain type='kvm' id='1' xmlns:qemu='http://libvirt.org/schemas/domain/qemu/1.0'>
 ...
  <memory unit='KiB'>16777216</memory>
  <currentMemory unit='KiB'>16777216</currentMemory>
  <memoryBacking>
    <hugepages/>
  </memoryBacking>
  <vcpu placement='static'>16</vcpu>
  <cputune>
    <vcpupin vcpu='0' cpuset='0'/>
    <vcpupin vcpu='1' cpuset='16'/>
    <vcpupin vcpu='2' cpuset='1'/>
    <vcpupin vcpu='3' cpuset='17'/>
    <vcpupin vcpu='4' cpuset='2'/>
    <vcpupin vcpu='5' cpuset='18'/>
    <vcpupin vcpu='6' cpuset='3'/>
    <vcpupin vcpu='7' cpuset='19'/>
    <vcpupin vcpu='8' cpuset='4'/>
    <vcpupin vcpu='9' cpuset='20'/>
    <vcpupin vcpu='10' cpuset='5'/>
    <vcpupin vcpu='11' cpuset='21'/>
    <vcpupin vcpu='12' cpuset='6'/>
    <vcpupin vcpu='13' cpuset='22'/>
    <vcpupin vcpu='14' cpuset='7'/>
    <vcpupin vcpu='15' cpuset='23'/>
    <emulatorpin cpuset='8-15,24-31'/>
  </cputune>
  <numatune>
    <memory mode='strict' nodeset='0'/>
  </numatune>
  ...
  <features>
     ...
    <hyperv>
     ...
      <vendor_id state='on' value='1234567890ab'/>
    </hyperv>
    <kvm>
      <hidden state='on'/>
    </kvm>
    ...
  </features>
  <cpu mode='host-passthrough' check='none'>
    <topology sockets='1' dies='1' cores='8' threads='2'/>
    <feature policy='require' name='topoext'/>
    <numa>
      <cell id='0' cpus='0-15' memory='16777216' unit='KiB'/>
    </numa>
  </cpu>
   ...
  <qemu:commandline>
    <qemu:arg value='-device'/>
    <qemu:arg value='ich9-intel-hda,bus=pcie.0,addr=0x1b'/>
    <qemu:arg value='-device'/>
    <qemu:arg value='hda-micro,audiodev=hda'/>
    <qemu:arg value='-audiodev'/>
    <qemu:arg value='pa,id=hda,server=unix:/run/user/1000/pulse/native'/>
  </qemu:commandline>
</domain>
Profit
I’m very pleased with my current setup. It works well!
Curious – what are you reasons for switching from proxmox to arch. I’m in process from switching from ESXi virtualized FreeNAS to Proxmox now, so I’d be curious what you like/don’t like about it. I’m using this as a ESXi replacement, so not a desktop, so might be a different use case.
My main reason was indeed because it’s a desktop machine that I take to LAN parties sometimes. I was running ProxMox before, and it was a bit of a pain to manage from a desktop usability standpoint. I had a desktop linux VM and a Windows VM running on it, passing graphics and USB hardware through to both. While it worked, I got tired of having it set up that way and the issues that would arise, especially if I transported the desktop somewhere else.
In your case, I am doing that also and highly recommend it – I’m using ProxMox for my server cluster (I switched over from Citrix Xenserver back in the day.) I like ProxMox due to its ease of use and good documentation. At the end of the day it’s just a wrapper for KVM, but ProxMox bundles everything so nicely. It makes configuration easy and natively supports ZFS (I’m a big fan of ZFS.)