Tag Archives: xen

PCI Passthrough in Xenserver 7 “Dundee”

I’ve recently upgraded to the latest version of Citrix Xenserver 7 (codenamed “Dundee”.) 7 is based on CentOS 7 and has a massive amount of changes under the hood. One such change was how they handle PCI Passthrough.

It took some time to figure PCI Passthrough out. 7 uses grub instead of extlinux for the bootloader. It appears to be grub2 but they don’t use the standard update-grub tool, rather you simply edit the config file and do nothing else.

After much searching I found this post which led me in the right direction. In Xenserver 7, for pci passthrough support you must do the following:

  • Prepare the VM for PCI passthrough (this part hasn’t changed)
    xe vm-param-set other-config:pci=0/0000:B:D.f uuid=<vm uuid>
  • Modify /boot/grub/grub.cfg and append the following to the end of the module2 line (if you boot from EFI the file to modify is /boot/efi/EFI/xenserver/grub.cfg)
     xen-pciback.hide=(B:D.f)
    
  • Reboot

You will now be able to pass through hardware to your virtual machines in Xenserver 7. Hooray.

Fix Xen VGA Passthrough in Linux Mint 17.1

I wrote in my last post about how I upgraded from Linux Mint 16 to 17.1. I thought everything went smoothly, but it turns out one feature did break: VGA passthrough via Xen. For the past year or so I’ve had a Windows 8.1 gaming VM with direct access to my video card. It’s worked out nicely in Linux Mint 16 but broke completely in 17.1.

I followed the advice of powerhouse on the Linux Mint forums on how to get things up and running, but it wasn’t quite enough. After much banging of my head against the wall I read on the Xen mailing list that there was a regression in VGA passthrough functionality with Xen 4.4.1, which is the version of Xen Mint 17.1 uses.

I finally came to a solution to my problem today – upgrade to Xen 4.5. I couldn’t find any pre-built packages for Ubuntu 14.04 (the base of Mint 17.1) so I ended up compiling Xen 4.5 from source. Below is what I did to make it all work.

Fix broken symlink for /usr/lib/xen-default

sudo rm /usr/lib/xen-default
sudo ln -s /usr/lib/xen-4.4/ /usr/lib/xen-default

Update the DomU CFG file

A couple things needed tweaking. Here is my working cfg:

builder='hvm'
memory = '8192'
name = 'win8.1'
vcpus=6
cpus="2-7"
pae=1
acpi=1
apic=1
vif = [ 'mac=3a:82:47:2a:51:20,bridge=xenbr0,model=virtio' ]
disk = [ 'phy:/dev/mapper/desktop--xen-Win8.1,xvda,w' ]
device_model_version = 'qemu-xen-traditional'
boot='c'
sdl=0
vnc=1
vncpasswd=''
stdvga=0
serial='pty'
tsc_mode=0
viridian=1
usb=1
usbdevice='tablet'
gfx_passthru=0
pci=[ '01:00.0', '01:00.1' , '00:1d.0' ]
localtime=1
pci_power_mgmt=1
on_xend_stop = "shutdown"
xen_platform_pci=1
pci_power_mgmt=1

For some, that’s all they had to do. For me, I had to do a few more things.

Compile Xen 4.5

This step was thanks to two different sites, this one and this one.

Install necessary packages

sudo apt-get install build-essential bcc bin86 gawk bridge-utils iproute libcurl3 libcurl4-openssl-dev bzip2 module-init-tools transfig tgif texinfo texlive-latex-base texlive-latex-recommended texlive-fonts-extra texlive-fonts-recommended pciutils-dev mercurial libjpeg-dev make gcc libc6-dev-i386 zlib1g-dev python python-dev python-twisted libncurses5-dev patch libvncserver-dev libsdl-dev libpixman-1-dev iasl libbz2-dev e2fslibs-dev git-core uuid-dev ocaml ocaml-findlib libx11-dev bison flex xz-utils libyajl-dev gettext markdown libaio-dev pandoc

Checkout Xen source

git clone git://xenbits.xen.org/xen.git xen-4.5.0
cd xen-4.5.0
git checkout RELEASE-4.5.0

Build from source

./configure --libdir=/usr/lib
 make world -j8

When I tried this the make failed with this error:

/usr/include/linux/errno.h:1:23: fatal error: asm/errno.h: No such file or directory
 #include <asm/errno.h>

The fix (thanks to askubuntu)  was to install linux-libc-dev and make a symlink for it:

sudo apt-get install linux-libc-dev
sudo ln -s /usr/include/asm-generic /usr/include/asm

It then compiled successfully.

Install freshly compiled Xen 4.5

sudo make install
sudo update-rc.d xencommons defaults
sudo update-rc.d xendomains defaults
sudo ldconifg

Set grub to boot from new Xen kernel

sudo update-grub
sudo vim /etc/default/grub

Edit GRUB_DEFAULT to match wherever update-grub put your new Xen kernel (in my case it was the second entry, so my GRUB_DEFAULT=1), then run update-grub again

sudo update-grub

Reboot

Success at last. Enjoy your VM gaming once more with Xen 4.5.

FreeNAS PCI Passthrough dev_taste error message

After getting my xenified FreeNAS up and running I noticed an oddity with disk reporting. When I pulled up the reports tab I noticed ada0 never showed any activity, despite my knowing that disk is doing plenty.

The mystery became greater when I noticed these error messages in my logs:

g_dev_taste: make_dev_p() failed (gp->name=ada0, error=17)

After some research I discovered here that disks passed through to a VM via Xen’s PCI Passthrough function present themselves to FreeBSD in a peculiar manner. In particular, the first disk in the passthrough array presents itself as ada0, despite the boot disk also having the name of ada0. With two disks named ada0 it’s a tossup on which one shows up in reporting, not to mention the strange errors above.

The fix is to add BSD parameter to not start disk numbering at ada0. For FreeNAS, you do this via the tunables section (System / Tunables / Add Tunable.) Add the following tunable:

variable: hint.ada.0.at
Value: scbus100
Comment: ada0 PCI passthrough fix
Enabled: true

Once that is configured, reboot FreeNAS. You will now have proper reporting of all your passthrough disks and the strange dev_taste errors will be gone.

Convert xenserver .xva file to raw disk image

What if you want to migrate a VM that’s been living on Citrix Xenserver to a different linux machine running vanilla Xen? The process isn’t as straightforward as you might think. Fortunately thanks to Eriklax over at github there is a fairly easy way to convert xenserver’s .xva virtual machines to other formats, via xva-img.

The first step is to download and install xva-img from github.

wget https://github.com/eriklax/xva-img/archive/master.zip
unzip master.zip
cd xva-img-master
cmake .
sudo make install

When trying to compile this on my Linux Mint Cinnamon machine I ran into the following errors:

CMake Error: your CXX compiler: "/usr/bin/c++" was not found.   Please set CMAKE_CXX_COMPILER to a valid compiler path or name.
xva-img-master/src/sha1.cpp:20:25: fatal error: openssl/sha.h: No such file or directory
 #include <openssl/sha.h>

I had to install the build-essential and libssl-dev packages in order to successfully compile and install xva-img.

Now that it’s installed, create a directory and extract your .xva file into it.

mkdir my-virtual-machine 
tar -xf <.xva file> -C my-virtual-machine 
chmod -R 755 my-virtual-machine

Once that’s finished (it might take a while – it took over an hour for me) the last step is to convert the extracted directories into a raw disk file.

Note:  when you extract your VM tar creates subfolders for each hard disk attached to the VM. You will have to run this command for each Ref folder that was generated as part of the image extraction process.

xva-img -p disk-export my-virtual-machine/Ref\:1/ disk.raw

It took a while for some reason, but it did eventually generate the desired image.

Now that I have a raw disk image I can transfer it to an LVM partition for use with xen:

sudo dd if=win8.1.img of=/dev/desktop-xen/Win8.1 bs=64M

Success.

Xen HVM domU doesn’t synchronize with dom0 clock

After much research I’ve discovered that Xen does not synchronize the clock between dom0 and its HVM domUs. This poses a problem when you implement S3 sleep. Upon resume,  dom0 realizes how much time has passed but none of the domUs do. I realized this after a few days of successfully putting my Xen machine to sleep with running DomU virtual machines

The DomU in my case is a Windows 8.1 virtual machine. At first I thought that the standard Windows time service would take care of any clock discrepancies – it doesn’t. If your clock gets too far behind it simply refuses to update. My solution to this problem is two fold:

  1. Configure Windows to use my NTP server for clock updates
  2. Force Windows to check with the NTP server every minute and update its clock accordingly.

Fortunately the later Windows versions have an NTP client built in. Simply open an administrator command prompt and issue two commands:

w32tm /config /syncfromflags:manual /manualpeerlist:<hostname>

schtasks /create /sc minute /mo 1 /tn "NTP clock update" /tr "%WINDIR%\system32\w32tm.exe /resync /force" /RU SYSTEM

The first command configures your system with your NTP server of choice. Replace <hostname> with your desired hostname or IP address, minus the brackets. The second command creates a task which executes a command to force an NTP check every minute as the SYSTEM user (non-privileged users get an access denied message.) You can do it all with a GUI but the command line is so much more efficient 🙂

It works perfectly. My DomU now automatically checks if it has the correct time – very important if you ever put your dom0 to sleep while DomUs are running.

Put Xen dom0 to sleep with active pci passthrough VMs

Thanks to Xen 4.3, it is now possible to suspend / resume dom0 while domUs are running. Unfortunately, if you have a VM actively using pci passthrough, the whole machine completely locks up about 10 seconds after resuming from S3 sleep.

As Xen is a lot more geared to servers I realize I might be an edge case; However, I would really like to be able to suspend my entire machine to S3 with VMs actively using PCI passthrough (in my case, a video card and USB controller). For quite some time I thought I was out of luck. After learning about the hot swapping capabilities of Xen 4.2+ and its pciback driver, I thought I would take another whack at it.

My solution is to create a custom script which detaches all PCI passthrough devices on the VM before going to sleep. That same script would re-attach those devices to my VM on resume.

My dom0 is currently Linux Mint 16 so I placed the resulting script in the /etc/pm/sleep.d/ directory and named it 20_win8.1 . It works like a charm! I can suspend and resume to my heart’s content without having to worry about if I remembered to shut down my VM first.

My script is below. Be sure to modify it for the BDF of your devices and the name of your VM(s) if you decide to use it.

#!/bin/bash
#Sleep / hibernate script for Xen with active DomUs using PCI Passthrough
#This script is necessary to avoid freezing of dom0 on resume for Xen 4.3
#Modified 08/19/2014

#Name of the VM we're passing PCI things to
VM="win8.1"

#B:D.F of PCI devices passed through to VM
VIDCARD="01:00.0"
VIDCARDAUDIO="01:00.1"
FRONTUSB="00:1d.0"

#xen attach/detach commands. Replace with xm if you're using that toolstack instead
ATTACH="xl pci-attach"
DETACH="xl pci-detach"

case "$1" in
    hibernate|suspend)
        $DETACH $VM $VIDCARD
        $DETACH $VM $VIDCARDAUDIO
        $DETACH $VM $FRONTUSB
        ;;
    thaw|resume)
        $ATTACH $VM $VIDCARD
        $ATTACH $VM $VIDCARDAUDIO
        $ATTACH $VM $FRONTUSB
        ;;
    *)
        ;;
esac
exit $?

Hotplug devices between Xen dom0, domU, and back again

In my experiments with Xen to make dual booting obsolete,  I’ve come across a need to hotplug PCI devices between dom0 and domU; Specifically, the SATA controller that my DVD-RW drive is connected to.

My DVD drive supports Lightscribe, which unfortunately is not nearly as strong in Linux as it is in Windows. You can get it to work but the label maker program is extremely basic. If I want to burn a lightscribe disc and have it look at all pretty it requires Windows.

The way I was doing PCI passthrough before was pretty inconvenient. It involved editing /etc/xen/pciback.conf and adding the bus:device.function (BDF) of the device I want to pass. This causes that device to be claimed by the pciback driver at boot time.

That’s all and well and good for the virtual machine, but what if you want your dom0 to use that device? You would have to remove the device from pciback.conf and reboot the machine.

As of Xen 4.2 there is now a better way.  You can have the pciback driver claim a device and return it to its original driver at any time without having to reboot.  The four magic commands are:

xl pci-assignable-add <BDF>
xl pci-attach <domain id / name> <BDF>
xl pci-detach <domain id / name> <BDF>
xl pci-assignable-remove -r <BDF>

The -r in pci-assignable-remove is necessary – it instructs xen to load the original driver that was loaded before we invoked pci-assignable-add. If you are using the xm toolstack instead, simply replace xl with xm.

Detaching from Dom0 and attaching to DomU

In my case I enter the following into a console whenever I want my Windows 8.1 virtual machine to have physical control of my DVD drive:


sudo xl pci-assignable-add 03:00.0
sudo xl pci-attach win8.1 03:00.0


Windows specific issues

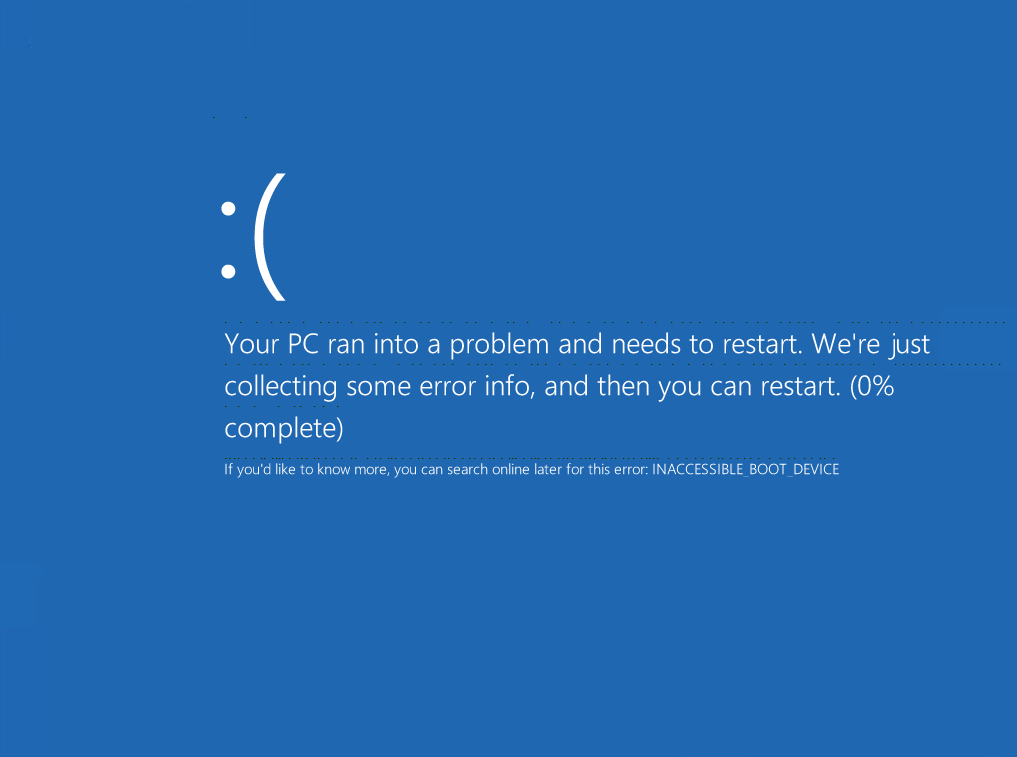
It should have been as simple as that; Unfortunately, I ran into a road block. For some reason on the first try, Windows detected the drive but wouldn’t load any drivers for it (it thought none were necessary)

Screenshot from 2014-08-17 15:08:08
(this screenshot was taken when I was using a hard drive for troubleshooting, but the issue was the same with the DVD drive)

I tried ejecting the SATA controller and scanning for new devices as described on various forums, but that didn’t seem to work. The fix for me was to reboot the VM. Rebooting caused the PCI device to detach, so after the VM finished rebooting I had to re-issue “sudo xl pci-attach win8.1 03:00.0” to attach it again.  Triumph!

Screenshot from 2014-08-17 15:20:17

I tried to make the second pci-attach command unnecessary by adding pci=03:00.0 to my virtual machine’s configuration file, but since I was passing a storage controller it kept trying to boot from drives attached to that controller instead of the virtual machine’s hard drive. I tinkered around with the config file for a while to try and get it to boot from the VMs hard drive again but couldn’t get it to work.

Since everything works by simply issuing pci-attach twice I gave up and just moved on. In one final bout of tinkering I discovered that if you issue pci-attach right after you boot the VM but before the OS finishes loading, it works on the first try. So the moral of the story here is Microsoft weirdness requires you to jump through some minor hoops to get this to work.

Returning to Dom0

When I want my dom0 to have the drive back I issue the following:


sudo xl pci-detach win8.1 03:00.0
sudo xl pci-assignable-remove -r 03:00.0


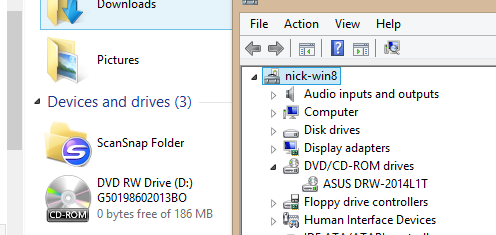
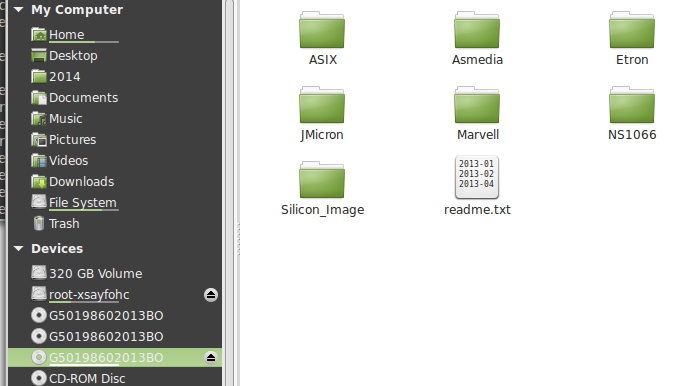
No complications here, although there is a funny bug. The file manager used in Linux Mint 16 gets confused and keeps adding CD ROM entries each time I pass the drive back and forth, but everything still works – it’s just a visual bug.

The drive is now accessible by dom0 once again. Success!

Screenshot from 2014-08-17 15:47:31


Migrating a Windows 8.1 VM from Xen to Xenserver

Since Citrix recently released the entire Xenserver product to the world as free, open source software I thought I might give it a try. I have been pleased with the results and wanted to migrate my desktop VM over to it.

I’ve had a devil of a time getting my Windows 8.1 Professional virtual machine to migrate from plain Xen to Citrix Xenserver 6.2. My first mistake was not doing research before migrating hypervisor environments. While it is true that Citrix uses Xen as the underlying hypervisor, it turns out that there are still plenty of differences between the two environments.

I thought I would take the easy route by installing Citrix Xenconvert and converting my Xen Win8.1 VM to a format Xenserver likes. Although Xenconvert was designed for Physical to Virtual migration, I’ve found in the past that it works just as well for virtual to virtual migration.

After migrating to Xenserver I was greeted with the following friendly message:

INACCESSIBLE_BOOT_DEVICE windows 8.1 bluescreen
lovely

As far as I can tell it was the Xen GPLPV drivers that were the culprit. This leads me to my second mistake: not having a proper backup of the VM. I didn’t keep a backup of this VM in the Xen-friendly format after I migrated it to xenserver. This was mainly due to laziness – a classic example of “one ounce of laziness now produces one ton of hard work later.”

Instead of simply just booting the VM and removing the GPLPV drivers I had to attempt to do it via the Windows PE on the Windows 8.1 disc. I first tried running the GPLPV uninstall script from here, modifying it to point to the c:\ drive for both files and registry settings. Alas, that didn’t appear to do anything.

I then tried to go through the registry via the Windows PE and remove any references to Xen-anything. Success! Or so I thought. It turns out that blindly plowing through the Windows registry without an idea of exactly what you were doing has consequences. The VM would boot but I could not for the life of me get network drivers to work. As far as I can tell I corrupted something in the registry and despite my best efforts I couldn’t fix it.

At this point I had learned to back things up so I kept restoring from backups and messing with removing various registry keys. I continued this trial and error process for some time. After much weeping, wailing, and gnashing of teeth, I finally found the right combination of keys you must remove in order to boot again.

I took what I learned and updated the script from above to make it work with the WinPE environment . Download it here.

Boot into your PE environment of choice and run the script. When it’s finished, your VM will now be able to boot successfully.

The last step is to go into device manager and delete all xen-related drivers, then re-install them. After all that is said and done, your migration from xen to xenserver is complete. Repeat the exact same process to migrate from xenserver back to xen.