Tag Archives: hardware

Digitize old photos and videos

Here is a list of hardware and software that I use to digitize old home movies, tapes, and family pictures:

Hardware

35mm film scanner: Pacific Image PowerFilm Plus 35mm Film Scanner

Document / picture scanner: Brother ADS-2700W

Flatbed scanner: Epson DS-50000 Large-Format Document Scanner

Audiocasette player with a 3.5mm output jack

Laptop / computer with 3.5mm input jack (headphone/microphone)

VHS player

USB VHS to Digital Converter

Soft tip silicone air blower

Software

Video capture: OBS Studio

Photo editing: GIMP

Audio capture: Audacity

Digitizing these precious memories makes them available for future generations. They are much more useful to everyone online than they ever were sitting in a box.

Revive an old Samsung Galaxy S3

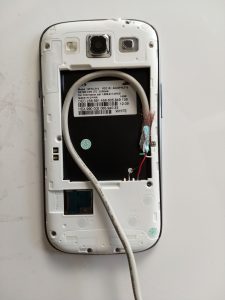
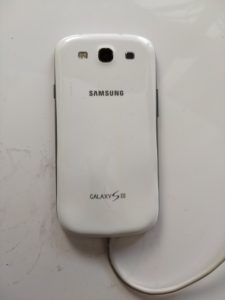
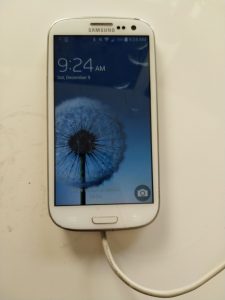
I have an old Samsung Galaxy SIII (S3) that has been collecting dust in my closet. Its batter has swollen to alarming size and as a result it won’t ever turn on (even when plugged in.) I wondered if I could bypass the battery completely and it turns out you can! Thanks to xda forums I was able to hack this old phone to get it to work again.

Here’s the trick:

  • Look on the battery for + and – signs. These correspond to the positive and negative terminals on the battery prongs on the phone.
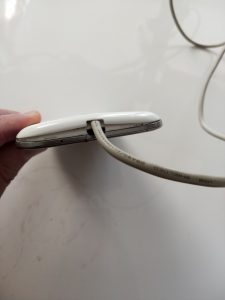
  • Grab any USB cable and cut the micro-usb end off of it. Strip away the shielding until you get the four smaller wires: red, green, white, black. Ignore white and green, we’re interesting in black and red (power)
  • Carefully strip the plastic sheath around red & black wires, and solder them to the battery terminal to the phone (be careful to line up the red wire with + and the black wire with – )
  • Profit! Once you’ve soldered red & black into their appropriate terminals you can plug the other end of the USB cable into a power source and turn the phone on!

Caution: Plugging something that provides power into the MicroUSB port will cause the phone to attempt to charge your “battery.” In my case this was pretty disastrous as the usb cable  got REALLY hot very fast. Not recommended.

Fix FreeNAS multipath error with USB drives

I have a Mediasonic 4 bay USB drive enclosure plugged into a FreeNAS system as a backup. This enclosure randomizes hardware ID information which  confuses FreeNAS. The main symptom of this is the error message about multipath not being optimal.

The way to fix this is to drop to a command line and destroy the mistaken multipath configuration (thanks to this site for the information)

For Freenas 9.x:

gmultipath destroy disk1 disk2 disk3
reboot

For FreeNAS Corral it’s a bit different. You have to brute force remove the kernel module for multipath (thanks to this site for the explanation)

mv /boot/kernel/geom_multipath.ko /boot/kernel/geom_multipath.ko.old

Keep in mind that you may have to do this after each update.

An additional problem is that for some reason GUI doesn’t see the drives but the OS does. If you want smart checking on those other drives you have to do a bit of hackery by creating a SMART job for the visible drives, then manually dropping into a shell to add the invisible ones. Below are my notes for when I did this (I’m not sure these changes survive a reboot)

sudo vi /etc/local/smartd.conf
/dev/da2 -a -n never -W 0,0,0 -m root -M exec /usr/local/www/freenasUI/tools/sma
 rt_alert.py -s S/(01|02|03|04|05|06|07|08|09|10|11|12)/../(1|2|3|4|5|6|7)/(00)

ps aux|grep smartd

kill -9 (pidof smartd)
sudo /usr/local/sbin/smartd -i 1800 -c /usr/local/etc/smartd.conf -p /var/run/smartd.pid

Convert xenserver 6.5 to software RAID 1

I have written previously about how to convert Citrix Xenserver 6.2 to a software RAID 1. When I upgraded to Xenserver 6.5 I found I had to re-install the xenserver instance because the upgrade didn’t recognize the software RAID. When trying to follow my own guide I found that I couldn’t create the array – it gave the following error message:

mdadm: unexpected failure opening /dev/md0

It turns out 6.5 handles RAID differently. You have to manually load the RAID kernel modules before you can create arrays. I was able to get this running successfully thanks to guidance from this site, specifically comments on it by Olli.

The majority of this can simply be copy/pasted into the command window, once drive paths have been updated for your specific setup.

# Prepare /dev/sdd
sgdisk --zap-all /dev/sdd
sgdisk --mbrtogpt --clear /dev/sdd
sgdisk -R/dev/sdd /dev/sdc # Replicate partion table from /dev/sdc to /dev/sdd with unique identifier
sleep 5 # Sleep 5 seconds here if you script this…
sgdisk --typecode=1:fd00 /dev/sdd
sgdisk --typecode=2:fd00 /dev/sdd
sgdisk --typecode=3:fd00 /dev/sdd
sleep 5 # Sleep 5 seconds here if you script this…
modprobe md_mod # load raid, because it isn't load by default (XS6.5 only)
yes|mdadm --create /dev/md0 --level=1 --raid-devices=2 --metadata=0.90 /dev/sdd1 missing # Create md0 (root)
yes|mdadm --create /dev/md1 --level=1 --raid-devices=2 --metadata=0.90 /dev/sdd2 missing # Create md0 (swap)
yes|mdadm --create /dev/md2 --level=1 --raid-devices=2 --metadata=0.90 /dev/sdd3 missing # Create md0 (storage)
sleep 5 # Sleep 5 seconds here if you script this…
mkfs.ext3 /dev/md0 # Create root FS
mount /dev/md0 /mnt # Mount root FS
cp -xR --preserve=all / /mnt # Replicate root files
mdadm --detail --scan > /mnt/etc/mdadm.conf #generate RAID configuration
sed -i 's/LABEL=[a-zA-Z\-]*/\/dev\/md0/' /mnt/etc/fstab # Update fstab for new RAID device
mount --bind /dev /mnt/dev
mount -t sysfs none /mnt/sys
mount -t proc none /mnt/proc
chroot /mnt /sbin/extlinux --install /boot
dd if=/mnt/usr/share/syslinux/gptmbr.bin of=/dev/sdd
chroot /mnt
mkinitrd -v -f --theme=/usr/share/splash --without-multipath /boot/initrd-`uname -r`.img `uname -r`
exit
sed -i 's/LABEL=[a-zA-Z\-]*/\/dev\/md0/' /mnt/boot/extlinux.conf # Update extlinux for new RAID device
cd /mnt && extlinux --raid -i boot/
sgdisk /dev/sdd --attributes=1:set:2

#Unmount filesystems and reboot
cd
umount /mnt/dev
umount /mnt/sys
umount /mnt/proc
umount /mnt
sync
reboot

Tell BIOS to use disk B
After reboot to disk B…

sgdisk -R/dev/sdc /dev/sdd # Replicate partition table from /dev/sdd to /dev/sdc with unique identifier
sgdisk /dev/sdc --attributes=1:set:2
sleep 5 # Sleep 5 seconds here if you script this…
mdadm -a /dev/md0 /dev/sdc1
mdadm -a /dev/md1 /dev/sdc2
mdadm -a /dev/md2 /dev/sdc3 # If this command gives error, you need to forget/destroy an active SR first
#This next command is the only command you have to manually update before pasting in. Find the UUID of your xenserver host and paste it between the <> below
xe sr-create content-type=user device-config:device=/dev/md2 host-uuid=<UUID of xenserver host> name-label="RAID 1" shared=false type=lvm
# Watch rebuild progress and wait until no arrays are rebuilding before proceeding with any reboot
watch “mdadm --detail /dev/md* | grep rebuild”

Done!

Troubleshooting high CPU usage in Windows 7

My mother’s laptop has been behaving very strangely lately. CPU usage suddenly would spike to 100% usage inexplicably. It seemed to happen more often when Firefox / Thunderbird were launched, but that wasn’t necessarily the case. The issue would often persist across reboots.

My first thought, of course, was malware. An extensive scan via rootkit scanner, malware scanner, spyware scanner, and anti-virus revealed nothing. Observing running processes with process explorer and startup programs with autoruns revealed nothing suspicious. I installed all Windows updates, updated all typical applications with the help of ninite, and even ran sfc /scannow for good measure. The issue remained!

Even more confusing is that when running task manager, process explorer, or performance monitor they all reported 100% CPU usage and with a single process hogging the CPU – themselves! It seemed that whatever was the last process to execute was taking all CPU. It was truly baffling.

A suggestion on superuser.com was to remove the laptop battery and try again. They reported that as the magic bullet for their problem. I had my father remove and re-seat the battery (I was doing all of this remotely.) Magic! Everything worked normally again. Perhaps there was some sort of static electricity buildup causing problems. Truly bizarre.


PCI passthrough with Xenserver 6.2

PCI passthrough is a great way to mix virtualization with bare metal hardware. It allows you to pass physical hardware to virtual machines. In order to do PCI passthrough you will need compatible hardware (a CPU and chipset that support it.) Intel’s nomenclature for this is VT-d; AMD’s is IOMMU. It’s difficult (although not impossible) to get consumer level hardware that supports this. It’s much easier to obtain with server grade hardware.

Why would you want to pass physical hardware to virtual machines? In my case, it’s to turn a single system into a super server. Instead of having separate physical systems for NAS, gaming, and TV recording (my three uses) you can have one physical system do all three. While this is possible with one single OS, it’s much easier to manage these functions if they are in their own separate OS (especially if you’re using appliance VMs such as FreeNAS.) PCI Passthrough allows you to get the best of both worlds – better security by isolating functions, easier backup/restore, and physical hardware access.

Citrix Xenserver 6.2 supports PCI passthrough beautifully. A great comprehensive guide on how to configure PCI passthrough can be found here.

Xenserver 6.2 no longer requires any configuration beforehand to get PCI passthrough to work. To pass a device to a VM all you need to do is obtain its the bus, device, function (B:D.F) via lspci, then pass that through to the VM.

lspci
<several lines deleted>
06:00.0 Ethernet controller: Atheros Communications AR8131 Gigabit Ethernet (rev c0)

The B:D.F of the above device (a network adapter) is 06:00.0. To then pass this device to a virtual machine we use the xe vm-param-set command with the other-config:pci= parameter, adding 0/0000: to the beginning of the B:D.F, then specifying the UUID of the VM in question.

xe vm-param-set other-config:pci=0/0000:06:00.0 uuid=db4c64e1-44ce-f9f3-3236-0d86df260249

If the VM is running when you issue that command, make sure to shut down (not reboot) the VM, then start it up again.

To add multiple devices to the same VM, simply separate each B:D.F with a comma, like so:

xe vm-param-set other-config:pci=0/0000:06:00.0, 0/0000:07:00.0 uuid=db4c64e1-44ce-f9f3-3236-0d86df260249

Sometimes if you pass multiple PCI devices to a single VM only one of those devices is recognized by the VM. If that is the case, try passing the B:D.F of each piece of hardware in a different order

If you ever want to remove a hardware mapping to a VM, issue the following:

xe vm-param-clear param-name=other-config uuid=<UUID of VM>

There is still a case where you want to modify Xenserver’s configuration with regard to PCI passthrough. On occasion you will have hardware that you do not want the hypervisor to ever know about (in the above example, the hypervisor can use the hardware until you power on a VM that has passthrough enabled for it.)

In my case, I don’t want the hypervisor to ever see the storage controller I’m passing to my NAS VM. I found this out the hard way. If you don’t modify your xenserver configuration to ignore storage controllers that you then pass through to a VM, the entire hypervisor will completely lock up if you happen to reboot that VM. Why? Because when that VM reboots it releases the storage controller back to the hypervisor, which promptly enumerates and re-names all of its attached drives. It often leads to a case of re-naming /dev/sda, promptly “losing” the root device, and kernel panicking.

So, if you are passing things you never want the hypervisor to see, you need to modify its boot configuration to “hide” those devices from it. Edit /boot/extlinux.conf and append pciback.hide=(B:D.F) to the Linux command line, right after the splash parameter

vi /boot/extlinux.conf 
<navigate to right after the word splash>
i
pciback.hide=(06:00.0)(01:00.0)
<esc> :wq
extlinux -i /boot

The above example excludes two devices. Multiple devices simply go next to each other in their own parenthesis, but the format is the same if you only passing a single device.

Reboot the hypervisor, and you are good to go. You can now pass hardware through to VMs to your heart’s content.

Convert xenserver installation to software RAID-1

Update 2/28/2015:  I have a newer article explaining how to do this in Xenserver 6.5.


After having a hard drive nearly die on me and threaten to obliterate the VMs living on it I realized it would be a good idea to have my xenserver installation live on a RAID array.

Following this guide I was able to successfully migrate my running xenserver installation to a software based RAID 1, with a few tweaks. In my case I wanted to migrate from a single old drive to two newer ones.

Below are the steps I took to accomplish this.

Partition the new drives

This assumes that your current drive resides on /dev/sda, and your two new drives are /dev/sdb and /dev/sdc.

sgdisk -p /dev/sda
sgdisk --zap-all /dev/sdb
sgdisk --zap-all /dev/sdc
sgdisk --mbrtogpt --clear /dev/sdb
sgdisk --mbrtogpt --clear /dev/sdc
sgdisk --new=1:34:8388641 /dev/sdb
sgdisk --new=1:34:8388641 /dev/sdc
sgdisk --typecode=1:fd00 /dev/sdb
sgdisk --typecode=1:fd00 /dev/sdc
sgdisk --attributes=1:set:2 /dev/sdb
sgdisk --attributes=1:set:2 /dev/sdc
sgdisk --new=2:8388642:16777249 /dev/sdb
sgdisk --new=2:8388642:16777249 /dev/sdc
sgdisk --typecode=2:fd00 /dev/sdb
sgdisk --typecode=2:fd00 /dev/sdc

The third partition (VM storage) had to be tweaked a bit since these are larger drives than the current xenserver installation. I simply used gdisk instead of sgdisk for this task.

gdisk /dev/sdb
n #create new partition
<enter> #accept defaults for partition number, first, and last sectors
<enter>
<enter>
t #select partition type
3 #select partition number 3
fd00  #set for raid
w   #write changes to disk

Repeat above steps for the other disk (/dev/sdc in my case)

Create the RAID arrays for each partition

mdadm --create /dev/md0 --level=1 --raid-devices=2  /dev/sdb1 /dev/sdc1
mdadm --create /dev/md1 --level=1 --raid-devices=2 /dev/sdb2 /dev/sdc2
mdadm --create /dev/md2 --level=1 --raid-devices=2 /dev/sdb3 /dev/sdc3

Watch array build (optional)

cat /proc/mdstat

Alternatively you can use the watch command to get a real time update of the raid build:

watch -n 1 cat /proc/mdstat

Format & mount the array

mkfs.ext3 /dev/md0
mount /dev/md0 /mnt

Copy the root filesystem to the new array

cp -vxpr / /mnt

Install bootloader on the new disks

mount --bind /dev /mnt/dev
mount -t sysfs none /mnt/sys
mount -t proc none /mnt/proc
chroot /mnt /sbin/extlinux --install /boot
dd if=/mnt/usr/share/syslinux/gptmbr.bin of=/dev/sdb
dd if=/mnt/usr/share/syslinux/gptmbr.bin of=/dev/sdc

Generate new initrd image

chroot /mnt
mkinitrd -v -f --theme=/usr/share/splash --without-multipath /boot/initrd-`uname -r`.img `uname -r`
exit

Modify boot file

Edit /mnt/boot/extlinux.conf and replace every mention of the old root filesystem (root=LABEL=xxx) with root=/dev/md0.

vi /mnt/boot/extlinux.conf
:%s/LABEL=<root label>/\/dev\/md0/
:wq

Reboot

Keep the old drive in, but make sure to boot from either one of the member drives of your new array.

Create storage repository

Create new local storage repository with the new RAID array similar to here.

xe sr-create content-type=user device-config:device=/dev/md2 host-uuid=<UUID of xenserver host> name-label="RAID-1" shared=false type=lvm

Migrate VMs / disks

Migrate any disk images or VMs living on the old drive to the new array.

If these VMs / disks are not powered on or being used, it is as simple as pulling up xencenter, right clicking on the VM and clicking move then  select new storage repository.

If the VMs are online you can live migrate them to a different xenserver, then live migrate them back to the proper storage repository.

Remove old storage repository

Following instructions found here.
Note: In my case the transfer returned a strange error but was still successful. I had to restart the XAPI toolstack in order for it to let me remove the old storage repository.

xe sr-list name-label="<name of SR to remove>"
xe pbd-list sr-uuid=<UUID of SR above>
xe pbd-unplug uuid=<UUID of pbd above>
xe sr-forget uuid=<UUID of SR>

Final reboot

Shutdown, disconnect the old drive, and boot back up from the new array. Success.

Configure e-mail alerts (optional)

Now that you have a working RAID array you might want to receive e-mail alerts if there are problems with the array.

First, build an mdadm.conf

mdadm --detail --scan > /etc/mdadm.conf

Modify mdadm.conf to add your desired e-mail address for notifications

sed -i '1i MAILADDR <e-mail address>' /etc/mdadm.conf

Thanks to this site for the sed -i 1i trick.

Lastly, enable the mdadm monitoring service. I found via this site that this is fairly easy to do.  Simply enter these two commands:

service mdmonitor start
chkconfig mdmonitor on

Xenserver uses ssmtp to send e-mail. You can follow this guide on how to set it up for SSL if you happen to have an ISP that blocks port 25 (as I do.) Otherwise modify /etc/ssmtp/ssmtp.conf to suit your needs.

You can generate a test event from mdadm to make sure e-mail is configured properly:

mdadm --monitor --test /dev/md0 --oneshot

To get e-mail alerts to work right I had to ensure that FromLineOverride was NOT set to yes (default). I also had to add this line to /etc/ssmtp/revaliases:

root:<e-mail address being sent from>


Update 02/03/2015:  A commenter made me realize I forgot a step – copying the Control Domain OS to the new Raid array. I’ve added that step above, after the “Format & Mount the array” section.

Update 02/17/2015: If you are using Xenserver 6.5 you might come across the following error message when trying to create RAID arrays:

mdadm: unexpected failure opening /dev/md0

If this happens, load the md kernel driver like so:

modprobe md

It should then let you create your arrays.
Verify backup integrity with rsync, sed, cat, and tee

Recently it became apparent that a large data transfer I did might have had some errors. I wanted to find an easy way to compare the source and destination to make sure that they were identical. My solution: rsync, sed, cat and tee

I have used rsync quite a bit but did not know about the –checksum flag until recently. When you run rsync with –checksum, it takes much longer, but it effectively does something similar to what a ZFS scrub does – it runs a checksum of every source file and compares it with the checksum of each destination file.  If there is a mismatch, rsync will overwrite the destination file with the source file to correct it.

In my situation I performed a large data migration from my old mdadam-based RAID array to my brand new ZFS array. During the transfer the disks were acting very strange, and at one point one of the disks even popped out of the array. The culprit turned out to be a faulty SATA controller. I bought a cheap 4 port SATA controller from Amazon for my new ZFS array. Do not do this! Spring the cash out for a better controller. The cheap ones, this one at least, only caused headache. I removed it and used the on-board SATA ports on my motherboard and the issues went  away.

All of those shennanigans made me wonder if there was corrupt data on my new ZFS array. A ZFS scrub repaired 15.5G of data! While I’m sure that fixed a lot of the issues, I realized there probably was still some corruption. This is how I verified it

rsync -Pahn --checksum /path/to/source /path/to/destination | tee migration.txt

-P shows progress, -a means archive, -h is for human readable measurements, and -n means dry run (don’t actually copy anything)

Tee is a cool utility that allows you to redirect output of a command both to a file and to standard output. This is useful if you want to see the verification take place in real time but also want to analyze it later.

After the comparison (which took a while!) I wanted to see the discrepancies. the -P flag lists each directory rsync checks as well as which files it detected. You can use sed in conjunction with cat to weed out the unwanted lines (directory listings) so that only the files with discrepancies are left.

 cat pictures.txt | sed '/\/$/d' | tee pictures-truncated.txt

The sed regex simply looks for any line ending in a / (directory listing) and removes that line. What is left is the files in question. You can combine the entire thing into one line like so

rsync -Pahn --checksum /path/to/source /path/to/destination | sed '/\/$/d' | tee migration.txt

In my case I wanted to compare discrepencies with rsync and make decisions on if I wanted to actually fix the issues. If you are 100% sure the source is OK to remove the destination completely, you can simply run

rsync -Pah --checksum --delete /path/to/source /path/to/destination

Flashing updates to HP Proliant DL380 G5

A little while ago I bought an old HP Proliant DL380 G5 from ksl classifieds. I have used it off and on as a backup server but noticed that the drive performance was pretty abysmal. In an effort to fix this I decided to try and upgrade the ROM on the RAID controller it came with – an HP Smartarray P400 SAS/SATA controller.

It turned out to be more difficult than I expected. I first tried booting into Ubuntu server per this guide but I ran into problems with getting it to work. I tried a 32bit version of Ubuntu but I couldn’t even get that version to boot – maybe because of the 6GB of  RAM this unit has.

In experimenting with this I learned a little bit about Hp iLo syntax. This server comes with HP iLo 2, which has a web as well as an ssh interface. I encountered a need to hard reset the server (it was locked up) but the web admin “power off” button did nothing. I had to ssh into the ILO IP address and issue the following command:

power reset

I eventually abandoned my Ubuntu attempts and went with Arch Linux. Its live CD worked like a charm the first time – no fuss. I simply loaded the live CD, copied the update package to my current directory, marked it executable, and ran it.

scp nas:/storage/CP017698.scexe .
chmod +x CP017698.scexe
./CP017698.scexe

Capture

It took about five minutes.

I then set to flash the BIOS, which hadn’t been updated since 2007. It was easier than the RAID array because HP created .ISO images for this task. I obtained the BIOS from here. It was a Windows executable for some reason. The EXE extracted the various image files and had a handy how-to guide.

I took the iLO network CD installation route. I brought up the virtual media manager, loaded the ISO provided, and booted the machine. It brought up a simple flashing screen which updated the BIOS in about 5 minutes.

Capture

My proliant is feeling very hip and up to date now.

Recovering a failed RaidZ pool

Scenario: A drive is your RaidZ pool has gone bad. You have a replacement drive ready to go. You pull the drive you thought was the failed drive.. only to realize that you just pulled a good drive out, causing the array to go completely offline.

Has this happened to you? It has not happened to me yet, but I wanted to see how ZFS responded. I have to say I am pretty impressed.

I purposely pulled two working drives from my test zpool array. The status of the pool became Unavailable, as is to be expected. The zpool status command gave a helpful hint “Replace the drive and run zpool clear”

I replaced the last drive I had previously pulled and ran the command:

zpool clear storage

That was all I had to do! The array came back up (although in a degraded state) and all my files were there.

Output of zpool status at this point:

[root@freenas /data]# zpool status
  pool: storage
 state: DEGRADED
status: One or more devices has been removed by the administrator.
        Sufficient replicas exist for the pool to continue functioning in a
        degraded state.
action: Online the device using 'zpool online' or replace the device with
        'zpool replace'.
  scan: scrub repaired 0 in 0h26m with 0 errors on Sun Sep  7 09:51:19 2014
config:

        NAME                     STATE     READ WRITE CKSUM
        storage                  DEGRADED     0     0     0
          raidz1-0               DEGRADED     0     0     0
            ada2p1               ONLINE       0     0     0
            7167795297630497018  REMOVED      0     0     0  was /dev/ada3p1
            ada4p1               ONLINE       0     0     0
            ada1p1               ONLINE       0     0     0

errors: No known data errors

My next experiment was to bring the pool back to full health again. I tried to simply re-insert the last drive into my pool but it complained that it was already a part of the pool. The drive in question used to be labeled ada3p1. I tried “zpool detach storage ada3p1” but it complained: only applicable to mirror and replacing vdevs

After searching I found a mention here that said you can call out specific devices in your pool to clear. I ran the command
“zpool clear storage ada3p1” and it completed without any issues; however it still wouldn’t let me add the drive back into the pool saying it was already there.

What allowed me to bring the array back to full health was:

zpool online storage ada3p1

The amazing part – zfs realized that it only needed to sync a small amount of data to bring it back into sync with the pool!

 scan: resilvered 24K in 0h0m with 0 errors on Sun Sep  7 12:23:39 2014
config:

        NAME        STATE     READ WRITE CKSUM
        storage     ONLINE       0     0     0
          raidz1-0  ONLINE       0     0     0
            ada2p1  ONLINE       0     0     0
            ada3p1  ONLINE       0     0     0
            ada4p1  ONLINE       0     0     0
            ada1p1  ONLINE       0     0     0

Compared to mdadm where it would rebuild the whole array even if it was the same disk you pulled, this is astounding.

I realized that this issue would only happen if you’re putting the same drive you just pulled back into the array, so I then tried pulling a drive and putting another in its place. After partitioning the drive, a simple

zpool replace storage 7167795297630497018 ada3p1

Did the trick (where the string of numbers is the placeholder for the drive you pulled – a zfs status will tell you what that number is.)  Done.