Tag Archives: pfSense

Fix no internet in pfSense OpenVPN

I came across an issue with pfSense where I had created an openVPN connection but it would not work with internet traffic. The VPN connection established fine and I could connect to all internal hosts, but all internet traffic simply didn’t work. I checked the firewall logs and there were no firewall denies.

After scratching my head for a while I came across this post which suggests it might be due to the fact that there was no outbound NAT defined for the VPN network I created.

I went to Firewall / NAT / Outbound and sure enough, there was no outbound NAT rule for my VPN network. I manually created it for my VPN network and voila! Internet over the VPN!

Fix pfSense OpenVPN unable to bind to VIP issue

A while ago I bought multiple static IP addresses from my ISP. I configured the IPs as Virtual IP addresses through Firewall / Virtual IPs. Everything was dandy.. until I tried to assign OpenVPN to listen on one of my new IP addresses. No matter what I tried I could only get it to work if it listened on my gateway IP.. none of my other static IP addresses would work. The GUI would let me save the configuration, but if I headed over to Status / Openvpn I would see the following:

[error] Unable to contact daemon Service not running?

Digging further in the logs by going to Status / System Logs and then selecting the OpenVPN tab revealed the following snippet:

Time Process PID Message
May 15 19:42:00 openvpn 73195 Exiting due to fatal error
May 15 19:42:00 openvpn 73195 TCP/UDP: Socket bind failed on local address [AF_INET]<redacted>:443: Can’t assign requested address

After much digging I finally stumbled upon this post in the pfsense threads. In it they mention that in the Firewall / Virtual IPs screen not to bind  (in the interface option) your IP addresses to the WAN interface, but rather to bind them to localhost. That did the trick!

Site to site VPN between pfSense and DD-WRT

I’ve been trying to establish a site-to-site VPN connection between my house and my parents’ for a couple years now. Each time I try I become frustrated and eventually give up. No longer! I’ve finally gotten a site to site VPN working between my pfSense router and my parents’ Netgear Nighthawk R8000 running DD-WRT v3.

It was quite the undertaking for me to get these two systems talking. I drew a lot of inspiration from here. In order to get this to work you need to keep these things in consideration:

  • Protocol, port, device type, encryption cipher, hash algorithm, TLS authentication, and certificate settings all need to match
  • VPN IP addresses need to be assigned to both the server and the client
  • Routes for each network need to be established on both devices
  • Firewalls need to be configured to allow traffic to/from each network through the VPN tunnel

I used the following settings to get things working between these two devices:

OpenVPN Server (pfSense)

If you haven’t already, generate a certificate authority and server certificate. Do this in System / Cert Manager and click Add. When generating the certificate make sure the Certificate Type is Server Certificate.

General

  • Server mode: Peer to Peer (SSL / TLS)
  • Protocol: UDP
  • Device mode: tap

Cryptographic settings

  • Enable authentication of TLS packets: checked
  • Automatically generate a shared TLS authentication key: checked
  • Peer certificate authority & Server Certificate:  Select appropriate CA / certificate from the dropdowns here
  • DH Parameter length: 2048
  • Encryption algorithm: AES-256-CBC
  • Auth digest algorithm: SHA256 (256 BIT)
  • Certificate depth: One (Client + Server)

Tunnel Settings

  • IPv4 Tunnel network: Enter a unique (not existing on either netwonk) network here in CIDR format, ex 10.1.1.0/24
  • Ipv4 Local Network(s): Enter the networks you would like the remote network to access
  • IPv4 Remote Network(s): Enter the networks you would like the local network to access
  • Compression: Enabled with Adaptive Compression

Advanced Configuration

Optional? I found that for some reason the routing table wasn’t properly populated with the remote network on my pfSense server. I added a custom option to take care of that:

route <remote network> <remote subnet mask> <remote VPN IP>

In my example it ended up being “route 192.168.98.0 255.255.255.0 10.54.98.2”

Key export

You will need to export the Certificate Authority certificate as well as the client certificate & private key files for use with dd-wrt. Do this by going to System / Cert Manager. There are little icons to the right of the certificates where you can click to download them.

Export the CA certificate as well as both the certificate and key from whatever was specified in the Server Certificate section from the above OpenVPN configuration.

OpenVPN client (dd-wrt)

Go to Services / VPN and look for the OpenVPN Client section

  • Start OpenVPN Client: Enable
  • Tunnel Device: TAP
  • Tunnel Protocol: UDP
  • Encryption cipher: AES-256 CBC
  • Hash Algorithm: SHA256
  • User Pass Authentication: Disable
  • Advanced Options: Enable
  • LZO Compression: Adaptive
  • NAT: Enable
  • Firewall protection: Disable
  • Bridge TAP to br0: Enable
  • TLS Auth Key: <Paste the contents of the “Key” section under pfSense’s Cryptographic settings area of the OpenVPN server configuration>
  • CA Cert: <Paste contents of downloaded CRT file from pfsense’s CA>
  • Public Client Cert: <Paste contents of downloaded CRT file from pfsense’s certificate section>
  • Private Client Key: <Paste contents of downloaded .key file from pfsense’s certificate section>

IN THEORY this should be all that you have to do. The tunnel should establish and traffic should flow between both networks. Sadly it wasn’t that simple for my setup.

Troubleshooting

One-way VPN

After setting up the tunnel I saw everything was connected but the traffic was unidirectional (remote could ping local network but not visa versa.)

On the pfsense router, I ran

netstat -r | grep 192.168

(change the grep to whatever your remote network is)

I noticed that there were no routes to the remote network. To fix this I appended a server option in the OpenVPN server config (adjust this to match your networks)

route 192.168.98.0 255.255.255.0 10.54.98.2

Blocked by iptables

Adding the route on the server helped but things still weren’t getting through. I enabled logging on the DD-WRT side, consoled into the router, and ran the following:

watch -n 1 "dmesg | grep 192.168.98"

This revealed a lot of dropped packets from my OpenVPN server’s network. After a lot of digging I found this forum post that suggested a couple custom iptables rules to allow traffic between the bridged network and the OpenVPN network (adjust interface names as necessary)

iptables -I FORWARD -i br0 -o tap1 -j ACCEPT 
iptables -I FORWARD -i tap1 -o br0 -j ACCEPT

This doesn’t survive a reboot, so you’ll want to enter those two commands in the Administration / Commands section of the dd-wrt web configuration and click “Save Firewall”

Success

Finally, after a custom routing rule on the pfsense side and a custom iptables rule on the dd-wrt side, two way VPN has been established!
Migrate from Sophos UTM to pfSense part 1

I’ve been using a Sophos UTM virtual appliance as my main firewall / threat manager appliance for about two years now. I’ve had some strange issues with this solution off and on but for the most part it worked. The number of odd issues has begun to build, though.

Recently it decided to randomly drop some connections even though logs showed no dropped packets. The partial connections spanned across various networks and devices. I never did figure out what was wrong. After two days of furiously investigating (including disconnecting all devices from the network), the problem went away completely on its own with no action on my part. It was maddening – enough to drive me to pfSense.

As of version 2.2 pfSense can be fully virtualized in Xen, thanks to FreeBSD 10.1. This allowed me the option to migrate. Below are the initial steps I’ve taken to move to pfSense.

Features checklist

I am currently using the following functions in Sophos UTM. My goal is to move these functions to equivalents in pfSense:

  • Network firewall
  • Web Application Firewall, also known as a reverse proxy.
  • NTP server
  • PPPOE client
  • DHCP server
  • DNS server
  • Transparent proxy for content filtering and reporting
  • E-mail server / SPAM protection
  • Intrusion Detection system
  • Anti-virus
  • SOCKS proxy
  • Remote access portal (for downloading VPN configurations, etc)
  • Citrix Xenserver support (for live migration etc)
  • Log all events to a syslog server
  • VPN server
  • Daily / weekly / monthly e-mail reports on bandwidth usage, CPU, most visited sites, etc.

I haven’t migrated all of these function over to pfSense which is why this article is only Part 1. Here is what I have done so far.

Xenserver support

Installing xen tools is fairly straightforward thanks to this article. It’s simply a matter of dropping to a shell on your pfSense VM to install and enable xen tools

pkg install xe-guest-utilities
echo "xenguest_enable=\"YES\"" >> /etc/rc.conf.local
ln -s /usr/local/etc/rc.d/xenguest /usr/local/etc/rc.d/xenguest.sh 
service xenguest start

PPPoE client

The wizard works fine for configuring PPPOE, however I experienced some very strange issues with internet speed. Downstream would be fine but upstream would be incredibly slow. Another symptom was NAT / port forwarding appearing not to work at all.

It turns out the issue was pfSense’s virtualized status. There is a bug in the virtio driver that handles virtualized networking. You have to disable all hardware offloading on both the xenserver hypervisor and the pfSense VM to work around the bug. Details on how to do this can be found here. After that fix was implemented, speed and performance went back to normal.

DNS server

To get this working like it did in Sophos you have to disable the default DNS resolver service and enable the DNS forwarder service instead. Once DNS forwarder is enabled, check the box “register DHCP leases in DNS” so that DHCP hostnames come through to clients.

Syslog

Navigate to Status / system logs / settings tab and  tick “Send log messages to remote syslog server” and fill out the appropriate settings.

Note for Splunk users: the Technology Add-on for parsing pfsense logs expects the sourcetype to equal pfsense (not syslog). Create a manual input for logs coming from pfsense so it’s tagged as pfsense and not syslog (thanks to this post for the solution on how to get the TA to work properly.)

VPN

OpenVPN – wizard ran fine. Install OpenVPN Client Export utility package for easy exporting to clients. Once package is installed go to VPN / OpenVPN and you will see a new tab – Client Export.

Note you will need to create a user and check the “create certificate” checkbox or add a user certificate to existing user by going to System / User manager, Editing the user and clicking the plus next to User Certificates. The export utility will only show users that have valid certificates attached to them. If no users have valid certificates the Client Export tab will be blank.

Firewall

One useful setting to note is to enable NAT reflection. This allows you to access NATed resources as if you were outside the network, even though you are inside it. Do this by going to System / Advanced and clicking on the Firewall / NAT tab. Scroll halfway down to find the Network Address Translation section. Change NAT reflection mode for port forwards to Enable (Pure NAT)

It’s also very helpful to configure host and port aliases by going to Firewall / Aliases. This is roughly equivalent to creating Network and Host definitions in Sophos. When you write firewall rules you can simply use the alias instead of writing out hosts IPs and ports.

So far so good

This is the end of part 1. I’ve successfully moved the following services from Sophos UTM to pfSense:

  • Network firewall
  • PPPOE client
  • Log all events to a syslog server
  • VPN server
  • NTP server
  • DHCP server
  • DNS server
  • Xenserver support

I’m still working on moving the other services over. I’ve yet to find a viable alternative to the web application firewall but I haven’t given up yet.

Fix NAT not working with pfSense in Xenserver

After a few very frustrating experiences I’ve decided I want to migrate away from Sophos UTM for my home firewall. I enjoy Sophos’ features but do not enjoy the sporadic issues it’s been giving me.

My colleagues all rave about pfSense and how awesome it is so I thought I would give it a try. I have a completely virtualized setup using Citrix Xenserver 6.5 which has prevented me from trying pfSense in the past. The latest release, version 2.2.2, is based on FreeBSD 10.1, which includes native Xen device support. Now we’re talking.

Installation was quick and painless. After some configuration, the basic internet connection function was working swimmingly. As soon as I tried to forward some ports from my WAN interface to hosts on my network, though, things did not go well at all. I began to doubt my ability to configure basic NAT.

It looks simple enough – go to Firewall / NAT, specify the necessary source and destination IPs and Ports, and click apply. Firewall rules were added automatically. Except it didn’t work. I enabled logging on everything and there were no dropped packets to be found, but they were clearly being dropped. I thought it might be something weird with Sophos being upstream so I built my own private VM network but the issue was the same. NAT simply didn’t work. Silently dropped packets. I am not a fan of them.

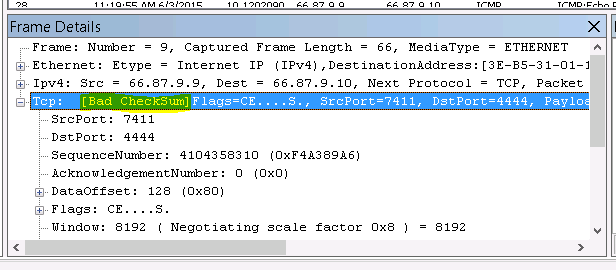
I was about to give up on pfSense but something told me it had to be a problem with my virtualization setup. I ran a packet capture via Diagnostics / Packet capture and after much sifting I found this gem:

checksumAll of my packets sent to the WAN interface returned [Bad CheckSum] that I was only able to discover via packet capture – they weren’t in the logs anywhere.

Armed with this information I stumbled on this forum post and discovered I am not alone in this. There apparently is a bug with FreeBSD 10.1 and the virtIO network drivers used by Xen, KVM, and others that causes it to miscalculate checksums, resulting in either dropped or very slow packets (I experienced both.)

The solution is to disable tx checksum offloading on both the PFsense side and the hypervisor side. In pfSense this is done by going to System / Advanced / Networking and checking “Disable hardware checksum offload”

To accomplish this on the xenserver side, follow tdslot’s instructions from the forum post linked above, replacing vm-name-label with the name of your pfSense VM:

Find your PFsense VM network VIF UUID’s:

[root@xen ~]# xe vif-list vm-name-label="RT-OPN-01"
uuid ( RO)            : 08fa59ac-14e5-f087-39bc-5cc2888cd5f8
...
...
...
uuid ( RO)            : 799fa8f4-561d-1b66-4359-18000c1c179f

Then modify those VIF UUID’s captured above with the following settings (discovered thanks to this post)

  • other-config:ethtool-gso=”off”
  • other-config:ethtool-ufo=”off”
  • other-config:ethtool-tso=”off”
  • other-config:ethtool-sg=”off”
  • other-config:ethtool-tx=”off”
  • other-config:ethtool-rx=”off”
xe vif-param-set uuid=08fa59ac-14e5-f087-39bc-5cc2888cd5f8 other-config:ethtool-tx="off"
xe vif-param-set uuid=799fa8f4-561d-1b66-4359-18000c1c179f other-config:ethtool-tx="off"

Lastly, shutdown the VM and start it again (not reboot, must be a full shutdown and power on.)

It worked! NAT worked as expected and a little bit of my sanity was restored. I can now make the switch to pfSense.