As time goes on it’s getting harder to access the remote console on one of my older systems. It requires an old version of Java that just doesn’t work right on modern operating systems. Fortunately, Docker has come to my rescue.
ipmi-kvm-docker is a simple docker setupthat will spin up an old version of firefox with the old version of Java that’s required. It wraps it all nicely in a graphical environment inside the docker container and uses novnc to serve this environment up as a web page. You can configure which port it uses, and then you simply connect to your docker host on that port. You can also specify a volume to mount if you have ISOs or other files you’d like your IPMI environment to see. Brilliant.
I simply ran these commands on my docker system to get it up and running:
docker run -p 8080:8080 -v /your/local/folder:/root/images solarkennedy/ipmi-kvm-docker
Then all I had to do was connect to my docker system on port 8080 in a browser. It worked great. My 10+year old server is still going strong, and easy to reinstall now thanks to this tool.
I needed to access my aging Dell PowerEdge R610 iDRAC console on my shiny new 13″ Macbook Pro M1. Unfortunately just like in Linux I ran into the “Connection failed” problem described in this post.
It was actually pretty easy to do for Mac. I installed the latest java for Mac from Oracle’s website. Once installed, I needed to find the location of the Java home directory for my mac. I found this stackoverflow discussion which directed me to use the /usr/libexec/java_home command.
Armed with that command in a subshell I was able to get to the file I wanted to edit:
sudo vim "$(/usr/libexec/java_home)/lib/security/java.security"
Once there I removed RC4 from the
jdk.tls.disabledAlgorithms
line. It worked! It was an easier process than on Linux or Windows.
I recently acquired a Dell PowerEdge R610 and had a hard time getting its iDRAC to work properly on my ElementaryOS setup (Ubuntu 18.04 derivative.) I had two problems: Connection failed error and keyboard not working.
The post explains the problem is with the security settings of Java 8+ preventing the connection. I didn’t know where my security file was so I first ran a quick find command to find it:
sudo find / -name java.security
In my case it was located in /etc/java-11-openjdk/security/java.security
The last step was to remove RC4 from the list of blacklisted ciphers, as this is the cause of the problem.
Update 2022-04-13 I recently had an issue where the keyboard didn’t work despite having Java 8. I fixed it by going to Tools and checking “Pass all keystrokes to server” within the jvm window.
My system was defaulting to using JRE 11, which apparently causes the keyboard to not function at all. I found on this reddit post that you really need an older version of Java. To do so on Ubuntu 18.04 you need to install it along with the icedtea plugin and run update-alternatives
sudo apt install openjdk-8-jre icedtea-8-plugin
Edit /etc/java-8-openjdk/security/java.security and remove the restriction on the RC4 algorhythm. Then configure the system to run java 8:
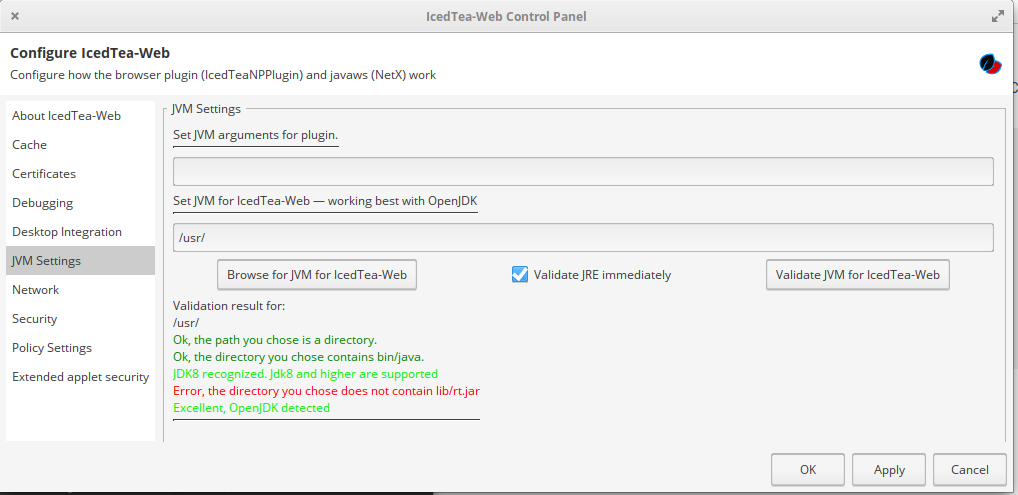
Lastly, configure the icedtea plugin to run Java 8 instead of 11, because for some reason this plugin ignores the system java settings. Launch the IcedTea Web Control panel (find it in your system menu) and then Navigate to JVM settings. Enter /usr/ in the section “Set JVM for IcedTea-Web – working best with OpenJDK” section. Then hit Apply / OK
Phew. FINALLY you should be able to use iDRAC 6 on your modern Ubuntu system.
An unfortunate bug exists for the AMD Threadripper family of GPUs which causes VGA Passthrough not to work properly. Fortunately some very clever people have implemented a workaround to allow proper VGA passthrough until a proper Linux Kernel patch can be accepted and implemented. See here for the whole story.
Right now my Thrdearipper 1950x successfully has GPU passthrough thanks to HyenaCheeseHeads “java hack” applet. I went this route because I really didn’t want to try and recompile my ProxMox kernel to get passthrough to work. Per the description “It is a small program that runs as any user with read/write access to sysfs (this small guide assumes “root”). The program monitors any PCIe device that is connected to VFIO-PCI when the program starts, if the device disconnects due to the issues described in this post then the program tries to re-connect the device by rewriting the bridge configuration.” Instructions taken from the above Reddit post.
Go to https://pastebin.com/iYg3Dngs and hit “Download” (the MD5 sum is supposed to be 91914b021b890d778f4055bcc5f41002)
Rename the downloaded file to “ZenBridgeBaconRecovery.java” and put it in a new folder somewhere
Go to the folder in a terminal and type “javac ZenBridgeBaconRecovery.java”, this should take a short while and then complete with no errors. You may need to install the Java 8 JDK to get the javac command (use your distribution’s software manager)
In the same folder type “sudo java ZenBridgeBaconRecovery”
Make sure that the PCIe device that you intend to passthru is listed as monitored with a bridge
Now start your VM
In my case (Debian Stretch, ProxMox) I needed to install openjdk-8-jdk-headless
Next I have a little script on startup to spawn this as root in a detached tmux session, so I don’t have to remember to run it (If you try to start your VM before running this, it will hose passthrough on your system until you reboot it.) Be sure to change the script to point to wherever you compiled ZenBridgeBaconRecovery
#!/bin/bash
cd /home/nicholas  #change me to suit your needs
sudo java ZenBridgeBaconRecovery
And here is the command I use to run on startup:
tmux new -d '/home/nicholas/passthrough.sh'
Again, be sure to modify the above to point to the path of wherever you saved the above script.
So far this works pretty well for me. I hate having to run a java process as sudo, but it’s better than recompiling my kernel.
Update 6/27/2018: I’ve created a systemd service script for the ZenBaconRecovery file to run at boot. Here is my file, placed in
/etc/systemd/system/zenbridge.service: (change your working directory to match the zenbridgebaconrecovery java file location. Don’t forget to do systemctl daemon-reload.)
Per an update on the reddit thread motherboard manufactures have finally put out BIOS updates that resolve the PCI passthrough problems. I updated my X399 Tachi to the latest version of its UEFI BIOS (3.20) and indeed PCI passthrough worked without any more wonky workarounds!
I banged my head on a wall for a while before I finally found a fix to this one. OpenJDK8 has new security features that break compatibility with the IPMI interfaces of my older servers. The problem in my case stemmed from the fact that the java applet is signed, just with an algorhythm that JDK8 blacklists. So, I had to remove MD5 from the blacklisted algorhythms to get this to work. Thanks to this site for guidance on how to do this.
Per that site, this is what I did to fix the issue:
Find the java.security file. In my case it is located in /usr/lib/jvm/java-8-openjdk-amd64/jre/lib/security/java.security
I recently gnashed my teeth at trying to get java to directly bind to port 443 instead of using nginx to proxy to a java application I had to use. I was surprised at the complication of finding the solution, but I eventually did thanks to the following sites:
java -version

java: error while loading shared libraries: libjli.so: cannot open shared object file: No such file or directory
The above error means that after setting setcap, it breaks how java looks for its library to run. To fix this, we need to symlink the library it’s looking for into /usr/lib, then run ldconfig