Category Archives: Networking

Fix battle.net 2600 error

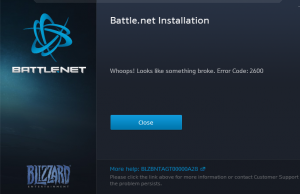
Recently I tried to install the latest patch for Heroes of the Storm when I got a nasty error code 2600, Whoops! something broke.

wrong

Re-installing battle.net didn’t fix the issue. After much frustration I came across this post, which describes situations when you’re behind a caching proxy (which I am.)

I did as it directed, which is to disable the caching function of my proxy and delete anything Blizzard-related from my %temp% folder.

That did the trick. All is well now!

Update: I decided that rather than disabling caching / virus checkings completely I would create an exception in Sophos UTM web access policy. Thanks to the guidance from here I added the following exception:

blizzard
Skipping: Authentication / Caching / Block by download size / Antivirus / Extension blocking / MIME type blocking / URL Filter / Content Removal / SSL scanning / Certificate Trust Check / Certificate Date Check
Matching these URLs: ^https?://([A-Za-z0-9.-]*\.)?blizzard\.com/
^https?://([A-Za-z0-9.-]*\.)?blizzard\.vo\.llnwd\.net/
^https?://([A-Za-z0-9.-]*\.)?blizzard.com\.edgesuite\.net/
^https?://([A-Za-z0-9.-]*\.)?battle\.net/

Sophos UTM returns NXDOMAIN for valid domain names

This issue took me a while to figure out. It’s actually been an issue for a while but I didn’t notice it until XBMC became Kodi. XBMC moved their domain name to kodi.tv and suddenly I was unable to access their site at all.

An nslookup returns NXDOMAIN immediately; however, querying a different server, say Google’s DNS, would return a valid address.

After scratching my head for weeks I came across this post which outlines the exact same problem – any .tv domains are instantly not resolved. I didn’t notice it until XBMC moved to kodi.tv because I don’t visit .tv domains.

The culprit: static DNS entries without a fully qualified domain name. I have plenty of these, and in this case, I have a computer named simply “tv” which Sophos translates into an internal DNS zone; Consequently it doesn’t even bother querying other DNS servers for anything ending in .tv.

The fix: make sure you have fully qualified domain names for all of your static DNS entries. This best practice will save you headaches in the long run.

Manually install Sophos UTM update

In the event that you want to install a soft released update to your Sophos UTM appliance before it has been picked up by auto update, you must download and install the patch manually. There is no way to do this in the GUI (yet.) Procedure taken from this helpful post (thanks, heartbleed!)

  1. Shell into the firewall and navigate to /var/up2date/sys
    cd /var/up2date/sys
  2. wget the patch file (.tgz.gpg extension)
    wget ftp://ftp.astaro.com/UTM/v9/up2date/u2d-sys-9.205012-206035.tgz.gpg
  3. Invoke auisys.plx with the –showdesc paramater
    auisys.plx --showdesc
  4. Install the update.
    cc system_up2date system_update

    Alternatively you can go into the web interface and schedule the install from there.

Easy peasy.

Configuring a Cisco 881w from scratch

Below are my rough notes for configuring a Cisco 881W router with a broken WAN port from scratch. The commands below will get it running from a clean slate to a running system.

Enable saving of running config 

Create WAN VLAN

  • int vlan 5
  • name WAN

Enable DHCP on WAN port

  • int vlan 5
  • ip address dhcp
  • no shut

Configure port Fa3 to be the new WAN port

  • int fa3
  • switchport mode access
  • switchport access vlan 5

Create LAN VLAN

Assign remaining ports to Vlan 1

  • int range fa0 – 2
  • switchport mode access
  • switchport access vlan 1
  • no shut

Configure IP address for vlan 1

  • int vlan 1
  • ip address 192.168.1.1 255.255.255.0

Enable ssh

  • hostname mythbox
  • ip domain-name mooo.com
  • aaa new-model
  • username cisco password 0 cisco
  • crypto key generate rsa
  • ip ssh time-out 60
  • ip ssh authentication-retries 2

Configure an enable password

  • enable secret cisco

Create access list allowing only internal subnet for SSH (optional)

  • access-list 23 permit 192.168.1.0 0.0.0.255
  • line vty 0 4
  • access-class 23 in
  • transport input ssh

enable DHCP

  • service dhcp
  • no ip dhcp conflict logging
  • ip dhcp pool myth
  • network 192.168.1.0 /24
  • dns-server 192.168.1.1
  • default-router 192.168.1.1

Enable DNS server

  • ip dns server
  • TODO: Only allow DNS from internal interfaces

Enable PAT overload (NAT) from WAN interface

Configure outside / inside interfaces

  • int vlan 5
  • ip nat outside
  • int vlan 1
  • ip nat inside

Configure access list (config mode)

  • access-list 101 permit ip any any
    (can be more strict with first any by putting local subnet instead)
  • ip nat inside source list 101 interface vlan 5 overload

Disable VTP and STP

Needed if you’re going to use this in an enterprise network

  • no spanning-tree vlan 1
  • no spanning-tree vlan 5
  • vtp mode transparent

Configure Wireless access point

Place wireless on same VLAN as wired network

  • interface wlan-ap0
  • ip unnumbered vlan 1
  • no shut

Switch wireless access point to autonomous mode

  • conf t
  • service-module wlan-ap 0 bootimage autonomous
  • service-module wlan-ap 0 reload

Reset wireless module to default

Necessary if you don’t know the enable password of the current config of the wireless controller

  • service-module wlan-ap0 reset default-config

 Flash wireless module IOS version

Copy IOS image from USB drive to internal flash

  • copy usbflash:<filename> flash:<filename>

Configure TFTP server for the flash file

  • tftp-server flash:<filename>

Console into wireless module

  • ^Z
  • service-module wlan-ap0 session
  • password cisco/cisco if prompted (this is the router user/pass combination)
  • enable password is Cisco
  • escape character is ctrl shift 6 and then the letter x. router prompt will show. type disconnect to exit the wireless console shell

Flash wireless ROM via TFTP

  • archive download-sw overwrite /reload tftp://192.168.1.1/<filename>

Configure Wireless Access Point

Enable HTTP management

  • ip http server

Enable wireless radio

  • int Dot11Radio0
  • no shut

Connect to wireless management page

Determine the IP address of the wireless access point and connect to it using your browser

  • ^Z
  • sh ip interfaces brief

The default WAP page username/password is admin / Cisco

Manual Wireless Configuration

The wireless management page is very clunky. Following guidance from this site, I modified the steps slightly to include WPA 2 with AES encryption to allow for faster wireless N speeds. Replace ssid with desired wireless SSID and testpassword with desired password.

configure terminal
interface Dot11Radio0
encryption vlan 1 mode ciphers aes-ccm
ssid mythbox1
no shutdown
station-role root
exit

dot11 ssid mythbox1
Vlan 1
authentication open
authentication key-management wpa version 2
wpa-psk ascii 0 testpassword
guest-mode
exit

dot11 network-map

interface Dot11Radio0.1
encapsulation dot1Q 1 native
no ip route-cache
bridge-group 1
bridge-group 1 subscriber-loop-control
bridge-group 1 block-unknown-source
no bridge-group 1 source-learning
no bridge-group 1 unicast-flooding
bridge-group 1 spanning-disabled
exit

interface GigabitEthernet0.1
encapsulation dot1Q 1 native
no ip route-cache
bridge-group 1
no bridge-group 1 source-learning
bridge-group 1 spanning-disabled
exit