Tag Archives: linux

Configuring rsync between two machines

rsync is a powerful backup tool. I have used it over SSH before but never with its own internal daemon. Following this guide I configured the rsync daemon with a share and host based access control. I then configured an rsync task in freeNAS to sync pictures between itself and the rsync server via rsync, not SSH (for speed). In this example my server is running Debian Wheezy and the client is running FreeNAS.

  1. On the server, create /etc/rsyncd.conf and add the following:
    max connections = 1
    log file = /var/log/rsync.log
    timeout = 300
    [Pictures]
    comment = All our pictures
    path = /storage/Pictures
    read only = yes
    list = yes
    uid = nobody
    gid = nogroup
    #auth users = mongrel
    list = yes
    hosts allow = 127.0.0.0/8 192.168.0.0/16
    #secrets file = /etc/rsyncd.secrets

    Note the only access control here is via source IP address. You can also have username/password access controls which I commented out.

  2. (Still on the server) start the rsync daemon
    rsync --daemon
  3. Configure the client. I used the freeNAS GUI which generated the following cron job
    rsync -r -t -z --delete  192.168.54.10::Pictures '/mnt/storage/Pictures/'

    Putting that to the test in the command line with an additonal -P parameter to see progress, I saw that the command synchronized successfully. Excellent.

I tested transfer speeds using both the rsync daemon and ssh method. There was a noticeable (8 MB/s) difference in transfer speeds. The rsync way is definitely faster.

Watch a zpool resilver in freeNAS

In my experiments with freeNAS and RaidZ I have come to miss some functionality I enjoyed with Linux and mdadm. One such function was being able to watch an array rebuild, or in ZFS parlance, a pool resilvering.

My inability to watch the resilvering stems from the difference between what the watch command in Linux does and what it does in FreeBSD. Watch in BSD snoops on a tty line whereas watch in Linux executes a command repeatedly.

One option is to install a watch utility for BSD that behaves as the Linux watch command; however, freeNAS is a small read only image so installing things isn’t an option.

The way to do it in freeNAS is to use a while loop in the command line. After 20 minutes of googling I realized that there is no easy way to do this in one line like you can in bash (something about things requiring to be on a new line), so I had to settle for a quick script like one outlined here.

My familiarity with scripts comes from BASH, but I quickly found out freeNAS doesn’t ship with BASH.

echo $shell
/bin/csh

edit: It turns out freeNAS does indeed ship with bash! It’s just not the default shell. Simply execute “bash” in the shell and use your familiar bash shell syntax to your heart’s content. The BASH equivalent of the script below is:

while [ true ]; do clear; zpool status; sleep 1; done

I’ll leave the rest in for reference sake.


I did some digging on how to write CSH scripts and thanks to this website was able to write a simple CSH script to execute a given command at a given interval indefinitely.

Here is my C style watch script:

#!/bin/csh

#A simple script to replace the Linux watch functionality. The first input it takes is how many seconds to refresh; the second, the command to run. If the command has arguments (spaces), it must be passed in quotes.

set INTERVAL = "$1"
set COMMAND = "$2"

while ( 1 )
        clear
        $COMMAND
        sleep $INTERVAL
end

I placed this script in the /tmp directory, made it executable by running chmod +x, and then executing it by running ,/script.sh 1 “command”

Check hard drives for bad sectors in Linux/BSD

It turns out that when hard drives fail, they don’t all fail completely. In fact, most fail silently, getting worse and worse as time moves on, causing bitrot and other issues.

I had a suspicion that one of my drives was failing so I thought I would test it. The tool for the job: badblocks.

badblocks writes data to the drive and then reads it back to ensure it gets the expected result. I have learned a lot about hard drive failure lately and now subscribe to running badblocks on every new hard drive I receive to ensure it is a good drive. The command I use is:

badblocks -wsv <device>

This is a destructive write test – it will wipe the disk. You can also run a non-destructive test, but for new disks you can go ahead and wipe them. I also use badblocks to ensure old disks can still be trusted with data. It’s great for “burn in” testing to ensure a drive won’t fail.


Update 3/1/19: If you encounter the following error:

badblocks: Value too large for defined data type invalid end block (5860522584): must be 32-bit value

It means your drive is too big for badblocks to recognize using the default sector size. Fix this by specifying a 4k sector size:

badblocks -b 4096 -wsv <device>

Thanks to Ubuntu Forums for the info.

Manually install Sophos UTM update

In the event that you want to install a soft released update to your Sophos UTM appliance before it has been picked up by auto update, you must download and install the patch manually. There is no way to do this in the GUI (yet.) Procedure taken from this helpful post (thanks, heartbleed!)

  1. Shell into the firewall and navigate to /var/up2date/sys
    cd /var/up2date/sys
  2. wget the patch file (.tgz.gpg extension)
    wget ftp://ftp.astaro.com/UTM/v9/up2date/u2d-sys-9.205012-206035.tgz.gpg
  3. Invoke auisys.plx with the –showdesc paramater
    auisys.plx --showdesc
  4. Install the update.
    cc system_up2date system_update

    Alternatively you can go into the web interface and schedule the install from there.

Easy peasy.

Configure SSMTP to use SSL/TLS connections

SSMTP is a very simple SMTP mail program which is used to send e-mails to a target server. It’s not a fully feature e-mail server but simply passes e-mails on. I first became acquainted with it because it’s the only mail server you can install on Citrix Xenserver. I now use it with all my servers because it’s very easy to configure.

Simply install it via command line:

sudo apt-get install ssmtp

There is only one config file to worry about: /etc/ssmtp/ssmtp.conf. To configure it to use an SSL connection (for gmail or if, like me, your ISP blocks port 25), add the following options, changing the brackets with your mailserver, username, and password.

mailhub=<mailserver>:587
UseSTARTTLS=YES
AuthUser=<username>
AuthPass=<password>
AuthMethod=DIGEST-MD5

If you just pasted the above config into your ssmtp.conf be sure to check the resulting config file for duplicate entries.

It’s as simple as that. All outgoing mail will be sent to the server specified above.

Put Xen dom0 to sleep with active pci passthrough VMs

Thanks to Xen 4.3, it is now possible to suspend / resume dom0 while domUs are running. Unfortunately, if you have a VM actively using pci passthrough, the whole machine completely locks up about 10 seconds after resuming from S3 sleep.

As Xen is a lot more geared to servers I realize I might be an edge case; However, I would really like to be able to suspend my entire machine to S3 with VMs actively using PCI passthrough (in my case, a video card and USB controller). For quite some time I thought I was out of luck. After learning about the hot swapping capabilities of Xen 4.2+ and its pciback driver, I thought I would take another whack at it.

My solution is to create a custom script which detaches all PCI passthrough devices on the VM before going to sleep. That same script would re-attach those devices to my VM on resume.

My dom0 is currently Linux Mint 16 so I placed the resulting script in the /etc/pm/sleep.d/ directory and named it 20_win8.1 . It works like a charm! I can suspend and resume to my heart’s content without having to worry about if I remembered to shut down my VM first.

My script is below. Be sure to modify it for the BDF of your devices and the name of your VM(s) if you decide to use it.

#!/bin/bash
#Sleep / hibernate script for Xen with active DomUs using PCI Passthrough
#This script is necessary to avoid freezing of dom0 on resume for Xen 4.3
#Modified 08/19/2014

#Name of the VM we're passing PCI things to
VM="win8.1"

#B:D.F of PCI devices passed through to VM
VIDCARD="01:00.0"
VIDCARDAUDIO="01:00.1"
FRONTUSB="00:1d.0"

#xen attach/detach commands. Replace with xm if you're using that toolstack instead
ATTACH="xl pci-attach"
DETACH="xl pci-detach"

case "$1" in
    hibernate|suspend)
        $DETACH $VM $VIDCARD
        $DETACH $VM $VIDCARDAUDIO
        $DETACH $VM $FRONTUSB
        ;;
    thaw|resume)
        $ATTACH $VM $VIDCARD
        $ATTACH $VM $VIDCARDAUDIO
        $ATTACH $VM $FRONTUSB
        ;;
    *)
        ;;
esac
exit $?

Hotplug devices between Xen dom0, domU, and back again

In my experiments with Xen to make dual booting obsolete,  I’ve come across a need to hotplug PCI devices between dom0 and domU; Specifically, the SATA controller that my DVD-RW drive is connected to.

My DVD drive supports Lightscribe, which unfortunately is not nearly as strong in Linux as it is in Windows. You can get it to work but the label maker program is extremely basic. If I want to burn a lightscribe disc and have it look at all pretty it requires Windows.

The way I was doing PCI passthrough before was pretty inconvenient. It involved editing /etc/xen/pciback.conf and adding the bus:device.function (BDF) of the device I want to pass. This causes that device to be claimed by the pciback driver at boot time.

That’s all and well and good for the virtual machine, but what if you want your dom0 to use that device? You would have to remove the device from pciback.conf and reboot the machine.

As of Xen 4.2 there is now a better way.  You can have the pciback driver claim a device and return it to its original driver at any time without having to reboot.  The four magic commands are:

xl pci-assignable-add <BDF>
xl pci-attach <domain id / name> <BDF>
xl pci-detach <domain id / name> <BDF>
xl pci-assignable-remove -r <BDF>

The -r in pci-assignable-remove is necessary – it instructs xen to load the original driver that was loaded before we invoked pci-assignable-add. If you are using the xm toolstack instead, simply replace xl with xm.

Detaching from Dom0 and attaching to DomU

In my case I enter the following into a console whenever I want my Windows 8.1 virtual machine to have physical control of my DVD drive:


sudo xl pci-assignable-add 03:00.0
sudo xl pci-attach win8.1 03:00.0


Windows specific issues

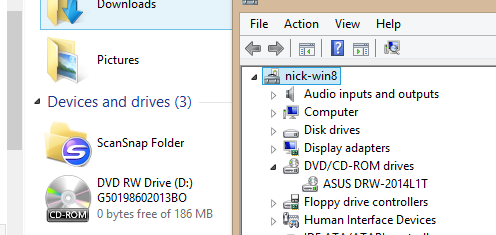
It should have been as simple as that; Unfortunately, I ran into a road block. For some reason on the first try, Windows detected the drive but wouldn’t load any drivers for it (it thought none were necessary)

Screenshot from 2014-08-17 15:08:08
(this screenshot was taken when I was using a hard drive for troubleshooting, but the issue was the same with the DVD drive)

I tried ejecting the SATA controller and scanning for new devices as described on various forums, but that didn’t seem to work. The fix for me was to reboot the VM. Rebooting caused the PCI device to detach, so after the VM finished rebooting I had to re-issue “sudo xl pci-attach win8.1 03:00.0” to attach it again.  Triumph!

Screenshot from 2014-08-17 15:20:17

I tried to make the second pci-attach command unnecessary by adding pci=03:00.0 to my virtual machine’s configuration file, but since I was passing a storage controller it kept trying to boot from drives attached to that controller instead of the virtual machine’s hard drive. I tinkered around with the config file for a while to try and get it to boot from the VMs hard drive again but couldn’t get it to work.

Since everything works by simply issuing pci-attach twice I gave up and just moved on. In one final bout of tinkering I discovered that if you issue pci-attach right after you boot the VM but before the OS finishes loading, it works on the first try. So the moral of the story here is Microsoft weirdness requires you to jump through some minor hoops to get this to work.

Returning to Dom0

When I want my dom0 to have the drive back I issue the following:


sudo xl pci-detach win8.1 03:00.0
sudo xl pci-assignable-remove -r 03:00.0


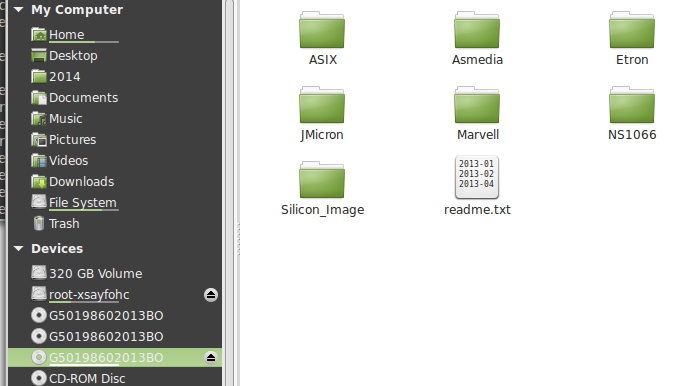
No complications here, although there is a funny bug. The file manager used in Linux Mint 16 gets confused and keeps adding CD ROM entries each time I pass the drive back and forth, but everything still works – it’s just a visual bug.

The drive is now accessible by dom0 once again. Success!

Screenshot from 2014-08-17 15:47:31


Xenserver and clock drift

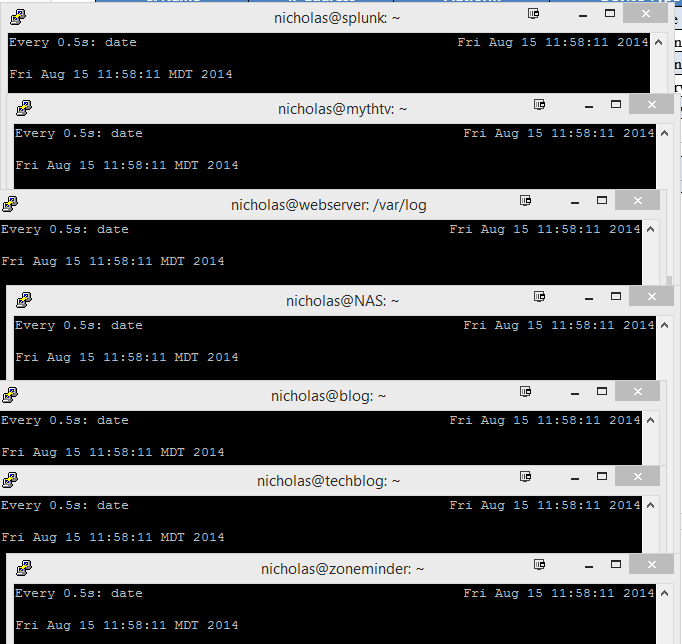
When it comes to a virtual machine’s clock my experience with other virtualization solutions has been that it’s automatically synchronized with the host machine. I didn’t notice until recently that this is not the case with Citrix Xenserver – at least when it comes to PVHVM machines.

I tried installing openntpd on each of my VMs and setting it to my internal NTP server (which in turn synchronizes with the web.) After a few days I was frustrated to see that the servers were still not in sync – some were minutes behind while others were inexplicably minutes ahead. Some of this might have to do with my experiments on live migrating these VMs a while back.

At any rate, it was clear that openntpd failed to do the job. Some research revealed that there is a bug where it reports adjusting the clock when the real status was an error. That little bug cost me an hour or two of digging and troubleshooting. Very frustrating.

I switched to plain old ntp instead and the problem was resolved within moments.

clock

Moral of the story: Make sure you have a proper NTP setup for each of your VMs if you’re going to use Citrix Xenserver.