Category Archives: Hardware

Manually configure D-Link DCS-930L wireless camera

I recently acquired a pair of D-Link DCS-930L wireless cameras for cheap. I got them to supplement my iSpy home security setup. These cameras come with all sorts of cloud management software that I’m not interested in. I just want to configure them to be wireless cameras for my iSpy system to handle.

There is a trick to configuring these cameras for wi-fi without installing any software or buying a D-Link cloud router. You simply have to plug the camera into an enternet connection, configure your computer to be on the same network as the camera, navigate to the camera’s management webpage, and make a few changes. Let’s begin. (I got my information from the manual for this device, located here.)

  1. Use the supplied ethernet cable to plug the camera’s ethernet port into your computer’s ethernet port. You will have to manually configure your computer’s IP address to be on the 192.168.0.0/24 subnet (something like 192.168.0.2.)
  2. The default IP address for this camera is 192.168.0.20. Go there in a browser.
  3. Default username: admin, blank password
  4. Navigate to the Setup tab (at the top), then click Wireless setup (on the left)
  5. Join your AP by doing a site survey and connecting to your wireless network. Enter your security key (if any) in the passphrase box.
  6. Reboot to have settings take effect (Maintenance (top) System (left) reboot the device)
  7. Un-plug ethernet cable (it doesn’t appear to connect wirelessly if ethernet is plugged in)

Now that we’re up and running we need to tell iSpy (or any other camera software) to connect to the camera. A very helpful guide to URLs these cameras use is located on iSpy’s webpage.


The URL for MJPEG capture is:

http://<IP ADDRESS>/MJPEG.CGI

The URL for JPEG capture is:

 http://<IP ADDRESS>/image.jpg

Be sure to fill in <IP ADDRESS> with the IP your camera gets from Wi-Fi, of course.

Success!

I read you can install openwrt on these devices.. but that’s a post for another day.
Install fresh Windows 8.1 on Lenovo G50-S70

Inspired by Lenovo’s bone headed move to install the superfish malware on its machines, I decided to wipe my mother’s Lenovo G50-S70 laptop and start anew. It was supposed to be easy but I ended up running into some issues with this new fangled hardware.

Microsoft has released a very easy tool to create boot ISO images and / or USB media to install Windows 8.1. For Windows 8.1 certified devices like the Lenovo G50 this is extra nice because the key is embedded in the UEFI BIOS – no need to write down or memorize a key.

After creating a USB drive, however, I was greeted with a lovely error message:

Select the driver to install.

It seemed that the install media didn’t see the G50’s hard drive. I could not get past this error message. All drivers on Lenovo’s website are .EXE files which don’t extract well – even when extracted, the installer didn’t like them.

The solution is to boot into a Windows PE environment and run the Windows installer from there. I chose this PE image, which worked quite nicely. Once booted from this PE disk, I was able to mount the install media and run setup.exe manually. This time the installer saw the hard drives and installed Windows 8.1 as you would expect. Success.

Fix tiny text in Windows 8.1

I really enjoy my new Microsoft Surface Pro 3. It has a high DPI screen which makes things very clear and sharp. Unfortunately, when you plug it into an external monitor, many Windows applications don’t deal with the DPI setting properly and thus appear blurry and/or the text is very tiny.

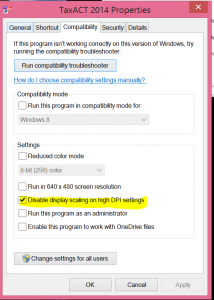
The workaround for this issue is a new compatibility mode setting in Windows 8 – Disable display scaling on high DPI settings. Simply right click on the shortcut of the problem application and go to properties, then go to the Compatibility tab, then check the box.

dpi

Success. Thanks to Microsoft for the information.

Add folders to libraries in Windows 8.1

I recently purchased a shiny new Microsoft Surface Pro 3. I must say so far I am quite impressed with it. I love the form factor. It’s a laptop or tablet depending on what I want to do with it.

When I’m in tablet mode using “Metro” apps I noticed that many of them require the use of Libraries. It took me longer than I care to admit to figure out how to add folders to libraries so I’m including that here.

In Windows 7 it was pretty easy – right click on the library and do properties, go to folders and add. The default explorer view in Windows 8.1 does not have a Libraries option.. so how do you do it?

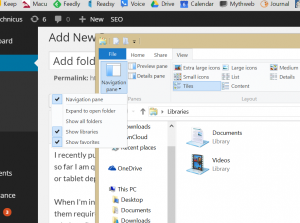
Thanks to this guide I discovered it’s a simple matter of telling Explorer to show Libraries again. Open Explorer, go to the View tab, then click on Navigation Pane (top left), then select Libraries.

libraries

Note: There is no Print Screen key on the surface, press Fn + Space instead.

Once that’s done you can the the Library in the Navigation pane just like you can in Windows 7, and you can add folders to those libraries to your heart’s content.

Manually reproduce flux on your monitor

I recently got a new job which uses a VDI infrastructure. We don’t have individual workstations, but rather terminal into a central server which serves us individual desktops. One unfortunate side effect of this configuration is that f.lux (which I’ve written about before) doesn’t appear to do anything. Research suggests that f.lux must talk directly to display hardware to work – no remote desktops.

A co-worker suggested fiddling with the monitor’s color settings to try and reproduce what f.lux does. I hadn’t thought of that before!

It turns out my monitors have  pre-built color temperatures, but the lowest they go is 5400k. My color temperature comfort level is more like 3400k, which as it turns out what most office lighting is.

The monitors allow me to manually select RGB percentages. The trick was translating 3400k (f.lux setting) to percentages of red, green, and blue. Searching Google for the RGB values of 3400k revealed this page, which had some helpful information. 3400k translates to the hex values #ffc184.

The last step was translating that hex to percentages. Googling “ffc183 in percentage rgb” revealed this link, which is what I wanted!

In short: 3400k in flux roughly equates to:

100% red
76% green
51% blue

Success! My eyes are much more comfortable now.