I needed to send some test packets over UDP to make sure connectivity was working. I found this site which outlined how to do it really well
nc -u <IP/hostname> <port>
Then on the next line you can send test messages, then hit CTRL+D when done. In my case I wanted to test sending syslog data, so I did nc -u <hostname> 514, then wrote test messages. the -u specifies UDP and 514 is the syslog port. I was then able to confirm on the other end the message was received. Handy.
I’ve once again switched from Proxmox to Arch Linux for my desktop machine. Both use KVM so it’s really just a matter of using the different VM manager syntax (virt-manager vs qm.) I used my notes from my previous stint with Arch, my article on GPU Passthrough in Proxmox as well as a thorough reading of the Arch wiki’s PCI Passthrough article.
Enable IOMMU
Configure GRUB to load the necessary iommu modules at boot. Append amd_iommu=on iommu=pt to the end of GRUB_CMDLINE_LINUX_DEFAULT (change accordingly if you have Intel instead of AMD)
sudo vim /etc/default/grub
...
GRUB_CMDLINE_LINUX_DEFAULT="loglevel=3 amd_iommu=on iommu=pt"
Run update-grub
sudo update-grub
Reserve GPU for VFIO
Reserve the GPU you wish to pass through to a VM for use with the vfio kernel driver (so the host OS doesn’t interfere with it)
Determine the PCI address of your GPU
Run lspci -v and look for your card. Mine was 01:00.0 & 01:00.1. You can omit the part after the decimal to include them both in one go – so in that case it would be 01:00
Run lspci -n -s <PCI address from above> to obtain vendor IDs. Example : lspci -n -s 01:00 01:00.0 0300: 10de:1b81 (rev a1) 01:00.1 0403: 10de:10f0 (rev a1)
Assign your GPU to vfio driver using the IDs obtained above. Example using above IDs: echo "options vfio-pci ids=10de:1b81,10de:10f0" >> /etc/modprobe.d/vfio.conf
Reboot the host to put the kernel / drivers into effect.
Assuming you’re using network manager for your connections, create a bridge (thanks to ciberciti.biz & the arch wiki for information on how to do so.) Replace interface names with ones corresponding to your machine:
sudo nmcli connection add type bridge ifname br0 stp no
sudo nmcli connection add type bridge-slave ifname enp4s0 master br0
sudo nmcli connection show
#Make note of the active connection name
sudo nmcli connection down "Wired connection 2" #from above
sudo nmcli connection up bridge-br0
Create a second bridge bound to lo0 for host-only communication. Change IP as desired:
sudo nmcli connection add type bridge ifname br99 stp no ip4 192.168.2.1/24
sudo nmcli connection add type bridge-slave ifname lo master br99
sudo nmcli connection up bridge-br99
Configure VM
Initial configuration
When creating the passthrough VM, make sure chipset is Q35.
Set the CPU model to host-passthrough (type it in, there is no dropdown for it.)
When adding disks / other devices, set the device model to virtio
Add your GPU by going to Add Hardware and finding it under PCI Host Device.
Windows 10 specific tweaks
If your passthrough VM is going to be windows based, some tweaks are required to get the GPU to work properly within the VM.
Ignore MSRs (blue screen fix)
Later versions of Windows 10 instantly bluescreen with kmode_exception_not_handled unless you pass an option to ignore MSRs. Add the kvm ignore_msrs=1 option in /etc/modprobe.d/kvm.conf to do so. Optionally add the report_ignored_msrs=0 option to squelch massive amounts of kernel messages every time an MSR was ignored.
Use the virsh edit command to make some tweaks to the VM configuration. We need to hide the fact that this is a VM otherwise the GPU drivers will not load and will throw Error 43. We need to add a vendor_id in the hyperv section, and create a kvm section enabling hidden state, which hides certain CPU flags that the drivers use to detect if they’re in a VM or not.
If you operate on a multi-core system such as my AMD Ryzen Threadripper the you will want to optimize your CPU core configuration in the VM per the CPU Pinning section in the Arch Wiki
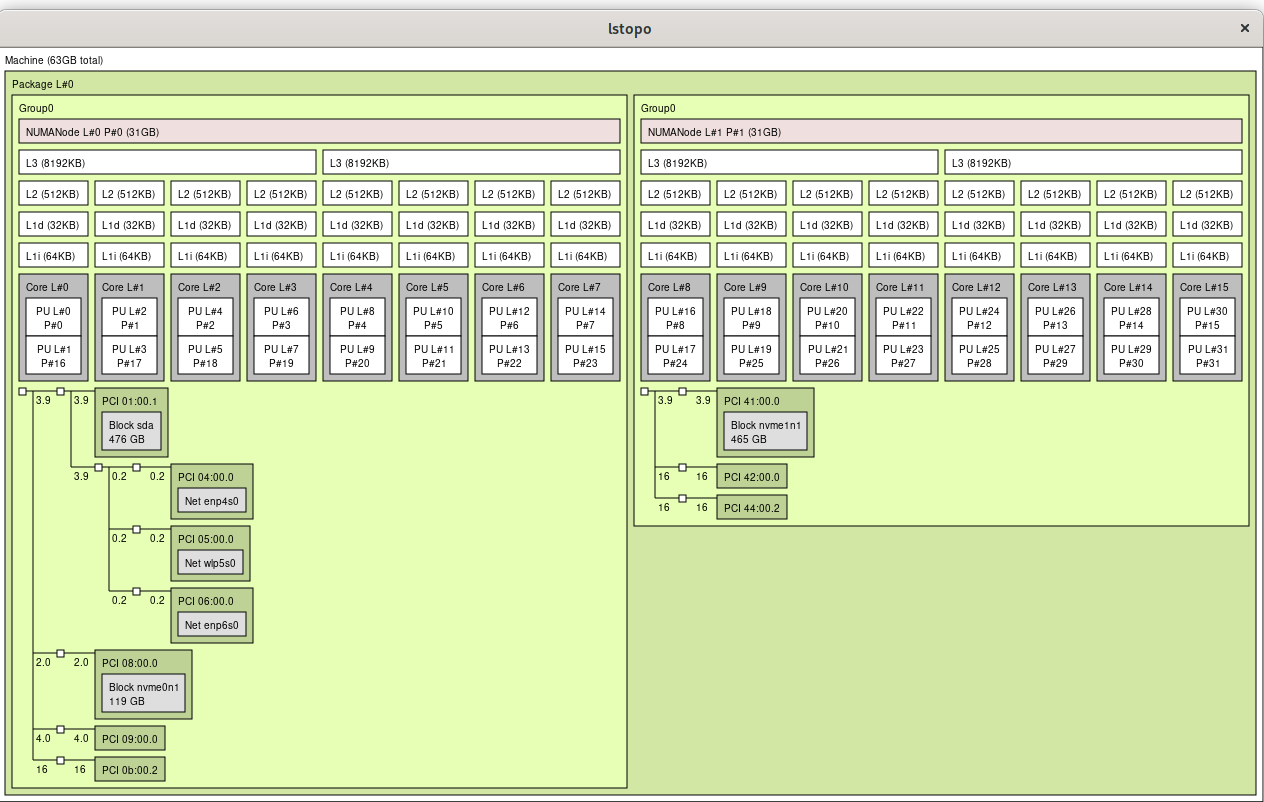
Determine your CPU topology by running lscpu -e and lstopo The important things to look for are the CPU number and core number. On my box, it looks like this:
From the above output I see my CPU core 0 is shared by CPUs 0 & 16, meaning CPU 0 and CPU 16 (as seen by the Linux kernel) are hyperthreaded to the same physical CPU core.
Especially for gaming, you want to keep all threads on the same CPU cores (for multithreading) and the same CPU die (on my threadripper, CPUs 0-7 reside on one physical die, and CPUs 8-15 reside on the other, within the same socket.)
In my case I want to dedicate one CPU die to my VM with its accompanying hyperthreads (CPUs 0-7 & hyperthreads 16-23) You can accomplish this using the virsh edit command and creating a cputune section (make sure you have a matching vcpu count for the number of cores you’re configuring.) Also edit CPU mode with the proper topology of 1 socket, 1 die, 8 cores with 2 threads. Lastly, configure memory to only be from the proper NUMA node the CPU cores your VM is using (Read here for more info.)
Non-uniform memory access is essential for 1st and 2nd gen Ryzen chips. It turns out that by default my motherboard hid the real NUMA configuration from the operating system. Remedy this by changing the BIOS setting to set Memory Interleaving = Channel (for my ASRock X399 motherboard it’s in CBS / DF options.) See here: https://www.reddit.com/r/Amd/comments/6vrcq0/psa_threadripper_umanuma_setting_in_bios/
After changing BIOS setting, lstopo now shows proper configuration:
CPU frequency
Change CPU frequency setting to use performance mode:
Append default_hugepagesz=1G hugepagesz=1G hugepages=16 to the kernel line in /etc/default/grub and re-run sudo grub-mkconfig -o /boot/grub/grub.cfg
Configure FIFO CPU scheduling
The Arch Wiki mentions to run qemu-system-x86_64 with taskset and chrt but doesn’t mention how to do so if you’re using virt-manager. Fortunately this reddit thread outlined how to accomplish it: libvirt hooks. Create the following script and place it in /etc/libvirt/hooks/qemu , change the VM variable to match the name of your VM, mark that new file as executable (chmod +x /etc/libvirt/hooks/qemu ) and restart libvirtd
#!/bin/bash
#Hook to change VM to FIFO scheduling to decrease latency
#Place this file in /etc/libvirt/hooks/qemu and mark it executable

#Change the VM variable to match the name of your VM
VM="win10"

if [ "$1" == "$VM" ] && [ "$2" == "started" ]; then
  if pid=$(pidof qemu-system-x86_64); then
     chrt -f -p 1 $pid
    echo $(date) changing CPU scheduling to FIFO for VM $1 pid $pid >> /var/log/libvirthook.log
  else
    echo $(date) Unable to acquire PID of $1 >> /var/log/libvirthook.log
  fi
fi
#Additional debug
#echo $(date) libvirt hook arg1=$1 arg2=$2 arg3=$3 arg4=$4 pid=$pid >> /var/log/libvirthook.log
Isolate CPUs
Update 7/28/20: I no longer do this in favor of the qemu hook script above, which prioritizes to p1 the qemu process for the cores it needs. I’m leaving this section here for historical/additional tweaking purposes.
Update 6/28/20: Additional tuning since I was having some stuttering and framerate issues. Also read here about the emulatorpin option
Dedicate CPUs to the VM (host will not use them) – append isolcups, nohz_full & rcu_nocbs kernel parameters into /etc/default/grub
Update 7/8/2020: I found this article and this reddit thread (and this one) on how to use pulseaudio for your guest VM to get low latency guest VM audio piped to the host machine.
Update qemu config
edit /etc/libvirt/qemu.conf: uncomment the line #user = "root" and replace “root” with your username
Update pulseaudio config
Edit /etc/pulse/daemon.conf and uncomment the following lines (remove semicolon)
I cloned an Ubuntu 20.04 VM and was frustrated to see both boxes kept getting the same DHCP IP address despite having different network MAC addresses. I finally found on this helpful post which states Ubuntu 20.04 uses systemd-networkd for DHCP leases which behaves differently than dhclient. As wickedchicken states,
systemd-networkd uses a different method to generate the DUID than dhclient. dhclientby default uses the link-layer address while systemd-networkd uses the contents of /etc/machine-id. Since the VMs were cloned, they have the same machine-id and the DHCP server returns the same IP for both.
To fix, replace the contents of one or both of /etc/machine-id. This can be anything, but deleting the file and running systemd-machine-id-setup will create a random machine-id in the same way done on machine setup.
So my fix was to run the following on the cloned machine:
For the systems that registered their hostnames under the wrong IPs, I had to take the following action for my Ubuntu 20.04 desktop as well as my Ubiquiti USG-Pro 4
I’ve started experimenting with CentOS 8 & Podman (a fork of Docker.) I ran into an issue where one of my containers needed internet access, but could not connect. After some digging I found this site which explains why:
I realized that openvswitch won’t fail back over to the original slave once it comes back online. I couldn’t for the life of me find the equivalent of bond-primary syntax for openvswitch; however I did find this command:
I really banged my head on the wall on this one. I recently decided to re-architect my networking setup in proxmox to utilize bonded network configuration. I followed this writeupexactly. The problem is it didn’t work.
I would copy the example exactly, only changing the interface name, and yet every time I tried to start the networking service I would get this lovely error:
rawdevice bond0 not present
I finally found on the Debian Wiki one critical line :
First install the ifenslave package, necessary to enable bonding
For some reason the ProxMox howtos don’t speak of this – I guess because it comes installed by default. I discovered, however, that if you install ifupdown2 it removes ifenslave. I had installed ifupdown2 in the past to reload network configuration without rebooting. Aha!
I re-installed ifenslave (which removed ifupdown2 and re-installed ifupdown) and suddenly, the bond worked!
Bond not falling back to primary intrerface
I had configured my bond in active – backup mode. I wanted it to prefer the faster link, but if there was a failure in that link it wouldn’t switch back automatically (thanks to this site for showing me the command to check:
cat /proc/net/bonding/bond0
I read again in Debian bonding wiki that I needed to add this directive to the bond:
bond-primary enp2s0
Here is my complete working active-backup configuration, assigning vlan 2 to the host, and making enp2s0 (the 10gig nic) the primary, with a 1gig backup (eno1)
auto bond0
iface bond0 inet manual
        slaves enp2s0 eno1
        bond-primary enp2s0
        bond_miimon 100
        bond_mode active-backup

iface bond0.2 inet manual

auto vmbr0v2
iface vmbr0v2 inet static
        address 192.168.2.2
        netmask 255.255.255.0
        gateway 192.168.2.1
        bridge_ports bond0.2
        bridge_stp off
        bridge_fd 0

auto vmbr0
iface vmbr0 inet manual
        bridge_ports bond0
        brideg_stp off
        bridge_fd 0
I recently began a project of segmenting my LAN into various VLANs. One issue that cropped up had me banging my head against the wall for days. I had a particular VM that would use OpenVPN to a private VPN provider. I had that same system sending things to a file share via transmission-daemon.
Pre-subnet move everything worked, but once I moved my file server to a different subnet suddenly this VM could not access it while on the VPN. Transmission would hang for some time before finally saying
transmission-daemon.service: Failed with result 'timeout'.
The problem was since my file server was on a different subnet, it was trying to route traffic to it via the default gateway, which in this case was the VPN provider. I had to add a specific route to tell the server to use my LAN network instead of the VPN network in order to restore connectivity to the file server (thanks to this site for the primer.)
I had to create a file /etc/sysconfig/network-scripts/route-eth0 and give it the following line:
192.168.2.0/24 via 192.168.1.1 dev eth0
This instructed my VM to get to the 192.168.2 network via the 192.168.1.1 gateway on eth0. Restart the network service (or reboot) and success!
I love the Ubiquiti Unifi interface. The only thing missing in my environment was the gateway. I had no complaints with my OPNSense firewall, but that missing section on the Unifi controller homepage haunted me, so I took the plunge and got a Unifi Secure Gateway Pro 4.
Basic Configuration
Initial setup
Official documentation is pretty detailed. Before you install your USG you will want to go into your controller and define your current network by going to Settings / Networks / LAN. This is where you specify DHCP scope and settings. I did not do this and struggled to get DHCP running properly as a result. Be sure to also set NTP settings, as these will also be applied to your USG.
To configure your USG for adoption, hop on the 192.168.1.0/24 network and sign into 192.168.1.1 via a web browser. Username and password are both ubnt. On this screen you can specify WAN and LAN settings. Configure your USG to match the network and gateway settings you’ve defined in your controller and hit apply. Now you can go into your controller and adopt the firewall into your environment.
Firewall
Basic port forwarding rules, static routes, and firewall rules can all be handled in the controller GUI via settings / Routing & Firewall. The GUI assumes your gateway only has one public IP address going to it. If you have multiple public IPs then you will need to configure them in config.gateway.json (see the Advanced Configuration section below.)
DHCP
As stated in the Initial Setup section, this is handled by the controller. You can specify a DHCP scope in the USG’s limited web interface but any settings there are quickly overwritten by the controller pushing out its configuration.
DHCP reservations are handled in the controller via the clients tab (on the left.) Open the client you want to make a reservation for, click the settings cog (top right), click Network, then click “Use Fixed IP Address” and specify the IP you want that device to use.
You can also specify advanced DHCP settings under Settings / Services / DHCP.
You can create User Groups in the Unifi interface which define maximum bandwidth usage. You can then assign that User group to a specific client in the Unifi interface.
NAT
The Unifi GUI only supports Destination NAT (DNAT) and only supports the gateway’s WAN IP. You can configure this via settings / Routing & Firewall / Port Forwarding. For more advanced configuration, see below.
Advanced Configuration
A major downside of the USG is that the Unifi interface, while awesome, is extremely limited when it comes to Firewall functions. Thus, most configuration has to be done in the command line to get it to compete with OPNSense.
The core concept with the Unifi ecosystem is that devices are controlled by the Unifi Network Management controller. Thus, with the USG, any changes made to the firewall itself are overwritten by the controller on next provision.
In order to persist any command line changes you make, you must create a config.gateway.json file as outlined here, then copy it to your controller, which will then push the config to your USG on each provision. You will run into problems if you get this json file wrong (reboot loops) so you want to be very sure everything is correct in that file. I recommend a json validator (or an IDE like VS Code.)
One good shortcut I’ve found when googling how to do things is to simply use “edgerouter” instead of “USG” for the search term. The syntax to configure the edgerouter is identical (they both run EdgeOS.)
The most foolproof way to get a config.gateway.json that works is to run the configure commands manually on your USG, then when everything is how you want it, run this command to generate the running config in json format:
mca-ctrl -t dump-cfg > config.txt
You can then read config.txt and look for the specific settings you configured and save them into your config.gateway.json. The JSON syntax follows the CLI commands, with each part of the command broken into different brackets and quotes. An example config.gateway.json looks like this:
Use the static-host-mapping parameter to specify static DNS entries. Make sure the fqdn is listed in your config, otherwise they may or may not work. Example snippet:
Sadly there is no live / realtime graphs in the UniFi interface. It’s still possible to get that information if you drop to CLI; however the utilities to see this are not installed by default – you will need to install them (iftop & bmon in my case.) Thanks to this helpful reddit post that got me going.
As of this writing the USG PRO 4 is based in Debian Wheezy, so you will need to add those repositories to the device in order to use apt-get to install iftop & bmon.
Be sure not to get the wrong Debian version. Also be sure not to issue apt-get upgrade – bad things will happen in both cases and you will need to hard reset your device to fix them.
You can add the repositories using the firewall configure command. These can be translated into a config.gateway.json if desired, but I decided not to since this is a pretty low level change that you might not want to happen on future devices. Also note that you will have to re-install these tools after a firmware upgrade.
configure
#Main wheezy archive
set system package repository wheezy components 'main contrib non-free'
set system package repository wheezy distribution wheezy
set system package repository wheezy url 'http://archive.debian.org/debian/'
commit
save
exit

sudo apt-get update
sudo apt-get install iftop bmon
I came across an interesting situation where if I rebooted my Ubiquiti UniFi Switch 24 for a firmware upgrade, all my VM hosts would reboot themselves. It turned out to be due to my having enabled HA in ProxMox. The hosts would temporarily lose connectivity to each other and begin to fence themselves off from the cluster. This caused HA to kill the VMs on those hosts. Then once connectivity was restored everything would eventually come back up.
The proper way to fix this would be to have multiple paths for each host to talk to each other, so if one switch goes down the cluster is still able to communicate. In my case, where I only have one switch, the “poor man’s fix” was to simply disable HA altogether during the switch reboot, as outlined here. Then, once the switch is back up, re-enable HA.
On each node, stop the pve-ha-lrm service. Once it’s stopped on all hosts, stop the pve-ha-crm service. Then reboot your switch.
After the switch is back up, start pve-ha-lrm on each node first, then pve-ha-crm (if it doesn’t auto start itself) to re-enable HA.
A new firewall means a new site to site VPN configuration. My current iteration of this is a USG Pro 4 serving as an OpenVPN server and a Netgear Nighthawk R8000 serving as a VPN client joining their two networks together.
First, I had to wrap my head around some concepts. To set this up you need three sets of certificates and a DH file:
CA: To generate and validate certificates
Server: To encrypt/decrypt traffic for the Server
Client: To encrypt/decrypt traffic from the Client
DH: Not a certificate but still needed by the server for encryption
The server and client will also need openvpn configurations containing matching encryption/hashing methods, CA public key, and protocol/port settings.
Generate certificates
If you already have PKI infrastructure in place you simply need to generate two sets of keys and a DH file for the server/client to use. If you don’t, the easy-rsa project comes to the rescue. This tutorial uses easy-rsa version 3.
I didn’t want to generate the certificates on my firewall so I picked a Debian system to do the certificate generation. First, install easy-rsa:
sudo apt install easy-rsa
In Debian easy-rsa is installed to /usr/share/easy-rsa/
Optional: Set desired variables by moving /usr/share/easy-rsa/vars.example to /usr/share/easy-rsa/vars and un-commenting / editing to suit your needs (in my case I like to extend the life of my certificates beyond two years.)
Next, create your PKI and generate CA certificates:
Now create your DH file. Grab a cup of coffee for this one, it can take up to ten minutes to complete:
/usr/share/easy-rsa/easyrsa gen-dh
Then create your server & client certificates. For this guide we are calling the server ovpn-server and the client ovpn-client
#For the server
/usr/share/easy-rsa/easyrsa gen-req ovpn-server nopass
/usr/share/easy-rsa/easyrsa sign-req server ovpn-server

#For the client
/usr/share/easy-rsa/easyrsa gen-req ovpn-client nopass
/usr/share/easy-rsa/easyrsa sign-req client ovpn-client
You will be asked for a common name. Remember what you put here, you will need it later. If you just hit enter and accept the default the common name will match what was passed in the above commands (ovpn-server for the server certificate and ovpn-client for the client certificate.)
Lastly, copy these files to their respective hosts:
USG Server: CA, Server key & cert, and DH file. (substitute with IP of your device)
Documentation for the EdgeRouter is much easier to find than for the USG. Since they use the same operating system I based this off of this guide from Logan Marchione for the EdgeRouter. SSH into your USG and issue the following, substituting the $variables with the values you desire for your network.
Explanation of variables:
VPN_SUBNET: Used for VPN communication. Must be different from both server and client subnets. SERVER_SUBNET: Subnet on server side you wish to pass to client network VPN_PORT: Change this to desired listening port for the OpenVPN server REMOTE_SUBNET: Subnet on client side you wish to pass to server network REMOTE_NETMASK: Netmask of client subnet REMOTE_VPN_IP: Static IP you wish to give the client on the VPN subnet. REMOTE_CERT_NAME: Common name given to client certificate generated previously.
Replace $variables below before pasting into USG terminal:
configure
#OpenVPN config
set interfaces openvpn vtun0
set interfaces openvpn vtun0 description "OpenVPN Site to Site"
set interfaces openvpn vtun0 mode server
set interfaces openvpn vtun0 encryption aes256
set interfaces openvpn vtun0 hash sha256
set interfaces openvpn vtun0 server subnet $VPN_SUBNET
set interfaces openvpn vtun0 server push-route $SERVER_SUBNET
set interfaces openvpn vtun0 tls ca-cert-file /config/auth/ca.crt
set interfaces openvpn vtun0 tls cert-file /config/auth/ovpn-client.crt
set interfaces openvpn vtun0 tls key-file /config/auth/ovpn-client.key
set interfaces openvpn vtun0 tls dh-file /config/auth/dh.pem
set interfaces openvpn vtun0 openvpn-option "--port $VPN_PORT"
set interfaces openvpn vtun0 openvpn-option --tls-server
set interfaces openvpn vtun0 openvpn-option "--comp-lzo yes"
set interfaces openvpn vtun0 openvpn-option --persist-key
set interfaces openvpn vtun0 openvpn-option --persist-tun
set interfaces openvpn vtun0 openvpn-option "--keepalive 10 120"
set interfaces openvpn vtun0 openvpn-option "--user nobody"
set interfaces openvpn vtun0 openvpn-option "--group nogroup"
set interfaces openvpn vtun0 openvpn-option "--route $REMOTE_SUBNET $REMOTE_NETMASK $REMOTE_VPN_IP"
set interfaces openvpn vtun0 server client $REMOTE_CERT_NAME ip $REMOTE_VPN_IP
set interfaces openvpn vtun0 server client $REMOTE_CERT_NAME subnet $REMOTE_SUBNET $REMOTE_NETMASK

#Firewall config
set firewall name WAN_LOCAL rule 50 action accept
set firewall name WAN_LOCAL rule 50 description "OpenVPN Site to Site"
set firewall name WAN_LOCAL rule 50 destination port $VPN_PORT
set firewall name WAN_LOCAL rule 50 log enable
set firewall name WAN_LOCAL rule 50 protocol udp
commit
If the code above commits successfully, the next step is to add the config to config.gateway.json. The USG’s config is managed by its Unifi controller, so for any of the changes made above to stick we must copy them to /usr/lib/unifi/data/sites/default/config.gateway.jsonon the controller (create the file if it doesn’t already exist.)
A quick shortcut is to run the mca-ctrl -t dump-cfg command, then parse out the parts you want to go into config.gateway.json as outlined in the UniFi documentation. For the lazy, here is the config.gateway.json generated from the above commands (be sure to modify $variables to suit your needs.)
Configuration is doable from the GUI but I found much easier with the command line. I got a lot of the configuration from this gist from braian87b
Install openvpn and the luci-app-openvpn packages:
opkg update
opkg install openvpn luci-app-openvpn
OpenVPN config files are located in /etc/config. In addition to the certificates we copied there earlier, we will also want to copy the openvpn client configuration to that directory.
Here is the config file matching the configuration generated above. Again, remember to replace $variables with your config matching what was generated above. Save it to /etc/config/site2site.conf
#/etc/config/site2site.conf
client
dev tun
proto udp
remote $DNS_OR_IP_OF_USG_OPENVPN_SERVER $VPN_PORT
cipher AES-256-CBC
auth SHA256
resolv-retry infinite
nobind
comp-lzo yes
persist-key
persist-tun
verb 3
ca /etc/config/ca.crt
cert /etc/config/ovpn-client.crt
key /etc/config/ovpn-client.key
remote-cert-tls server
With the openvpn config file, client certificate & key, and CA certificate we are ready to configure firewall rules and instruct the router to initiate the VPN connection.
# a new OpenVPN instance:
uci set openvpn.site2site=openvpn
uci set openvpn.site2site.enabled='1'
uci set openvpn.site2site.config='/etc/config/site2site.conf'

# a new network interface for tun:
uci set network.site2sitevpn=interface
uci set network.site2sitevpn.proto='none' #dhcp #none
uci set network.site2sitevpn.ifname='tun0'

# a new firewall zone (for VPN):
uci add firewall zone
uci set firewall.@zone[-1].name='vpn'
uci set firewall.@zone[-1].input='ACCEPT'
uci set firewall.@zone[-1].output='ACCEPT'
uci set firewall.@zone[-1].forward='ACCEPT'
uci set firewall.@zone[-1].masq='1'
uci set firewall.@zone[-1].mtu_fix='1'
uci add_list firewall.@zone[-1].network='site2sitevpn'

# enable forwarding from LAN to VPN:
uci add firewall forwarding
uci set firewall.@forwarding[-1].src='lan'
uci set firewall.@forwarding[-1].dest='vpn'

# Finally, you should commit UCI changes:
uci commit
Monitor VPN connection progress by using logread. If all goes well you will see the successful connection established message. If not, you’ll be able to get an idea of what’s wrong.
logread -f
If all goes well you’ll now have a bidirectional VPN between your two sites; however, traffic from the server’s subnet going directly to the client router itself (the OpenWRT device’s IP) will be considered as coming from the WAN interface and will be blocked. If you need to access the OpenWRT device directly from the USG’s subnet, you’ll need to add a firewall rule allowing it to do so:
uci add firewall rule
uci set firewall.@rule[-1]=rule
uci set firewall.@rule[-1].enabled='1'
uci set firewall.@rule[-1].target='ACCEPT'
uci set firewall.@rule[-1].src='wan'
uci set firewall.@rule[-1].name='Allow VPN to access router'
uci set firewall.@rule[-1].src_ip='$SERVER_SUBNET'
uci set firewall.@rule[-1].dest_ip='$INTERNALL_IP_OF_OPENWRT_ROUTER'
uci commit
Troubleshooting
One-sided VPN
I fought for some time with the fact that the VPN was established, but only traffic going from the Client network to the Server network would work. Traffic from the OpenVPN server subnet to the OpenVPN client subnet would simply hang and not work.
I finally found on the ubiquiti forums that this is due to default OpenVPN behavior of restricting traffic from the server subnet to the client subnet (see the OpenVPN how-to for more information.) The solution is to add lines in the server config informing it of the client network and to allow traffic to it. Below is an example USG config allowing informing it of remote subnet 192.168.230/24 and assigning the Client an IP of 10.0.76.253:
set interfaces openvpn vtun5 server client client1 ip 10.0.76.253
set interfaces openvpn vtun5 server client client1 subnet 192.168.230.0/24
VPN status stays “stopped” in OpenWRT
The best way to troubleshoot is to look at the logs in realtime. SSH to the OpenWRT router and run the command “logread -f” then try to initiate the connection again. The errors there will point you to the problem.