Category Archives: Virtualization

Posts about hypervisors and virtualization

Transfer VMs between Xenserver pools

When Xenserver 7 came out I found myself unable to easily upgrade to it thanks to my custom RAID 1 build.  If I wanted Xenserver 7 I would have to blow the whole instance away and start from scratch. This posed a problem because I have a pool of 2 xenserver hosts. You cannot add a server with a higher xenserver version to a lower versioned pool; the pool master must always have the highest version of Xenserver installed. My decision to have an mdadm RAID 1 setup on my pool master ultimately turned into forced VM downtime for an upgrade despite having a pool of other xenserver hosts.

After transferring VMs to my secondary host and promoting it to pool master, I wiped my primary xenserver and installed 7. When it was up and running I essentially had two separate pools running. To transfer my VMs back to my primary server I had to resort to the command line.

Offline VM transfer

The xe vm-export and vm-import commands work with stdin/out and piping. This is how I accomplished transferring my VMs directly between two pools. Simply pipe xe vm-export commands with an ssh xe vm-import command like so:

xe vm-export uuid=<VM_UUID> filename= | ssh <other_server> xe vm-import filename=/dev/stdin

Note the lack of a filename – this instructs xenserver to pipe to standard output instead. Also note that transferring the VM scrambles the MAC addresses of its interfaces. If you want to keep the MAC address you’ll have to manually re-assign it after the copy is complete.

Minimal downtime

For the method above you will have to turn the VM off in order to transfer it.  I had some VMs that I didn’t want to stay down for the entire transfer. A way around this is to take a snapshot of the VM and then copy the snapshot to the other pool. Note that this method does not retain any changes made inside the VM that occurred after you took the snapshot. You will have to manually transfer any file changes that took place during the VM transfer (or be fine with losing them.)

In order to export a snapshot you must first convert it to a VM from a template (thanks to this site for outlining how.) The full procedure is as follows:

  1. Take a snapshot of the VM you want to move
    xe vm-snapshot uuid=<VM_UUID> new-name-label=<snapshotname>
  2. Convert the snashot template to a VM (the command xe snapshot-list is a handy way to obtain UUIDs of your snapshots)
    xe template-param-set is-a-template=false ha-always-run=false uuid=<UUID of snapshot>
  3. Transfer the template to the new pool
    xe vm-export uuid=<UUID of snapshot> filename= | ssh <other_server> xe vm-import filename=/dev/stdin
  4. Rename VM and/or modify interface MAC addresses as needed on the new host. Stop the VM on the old host and start it on the new one.

I used both methods above to successfully move my VMs from my older 6.5 pool to the newer 7 pool. Success.
PCI Passthrough in Xenserver 7 “Dundee”

I’ve recently upgraded to the latest version of Citrix Xenserver 7 (codenamed “Dundee”.) 7 is based on CentOS 7 and has a massive amount of changes under the hood. One such change was how they handle PCI Passthrough.

It took some time to figure PCI Passthrough out. 7 uses grub instead of extlinux for the bootloader. It appears to be grub2 but they don’t use the standard update-grub tool, rather you simply edit the config file and do nothing else.

After much searching I found this post which led me in the right direction. In Xenserver 7, for pci passthrough support you must do the following:

  • Prepare the VM for PCI passthrough (this part hasn’t changed)
    xe vm-param-set other-config:pci=0/0000:B:D.f uuid=<vm uuid>
  • Modify /boot/grub/grub.cfg and append the following to the end of the module2 line (if you boot from EFI the file to modify is /boot/efi/EFI/xenserver/grub.cfg)
     xen-pciback.hide=(B:D.f)
    
  • Reboot

You will now be able to pass through hardware to your virtual machines in Xenserver 7. Hooray.

Install multiple xenserver patches at once

I came across a need to install multiple patches manually (via SSH) on one of my xenservers. It’s quite tedious to do this manually so I found a way to here.)

Download all the patch .zip files to a directory your xenserver can access. Then, extract them all with this command:

find *.zip -exec unzip {} \;

Next, upload all the .xsupdates:

find *.xsupdate -exec xe patch-upload file-name={} \;

This spits out a bunch of UUIDs. Make note of these. You will also need to get your host-uuid by using the

xe host-list

command.

Lastly, a quick for loop applies the patches we want (replace the UUIDs with those of the patches uploaded earlier and the host-uuid with yours)

for file in c3520494-be00-4133-afb3-adf8ab5edb11 7fea2d85-7ce1-428c-a92f-57e37551d6f1 d9862b7f-9be6-4672-b9a8-4f52f776fd03 a424dfe5-8be8-4bd6-a49e-62620e369a43 e28bb0ae-e43f-46d9-9147-c7dc712508eb; do xe patch-apply uuid=$file host-uuid=46f8ef28-8ee1-44b5-967c-b8e48585094b; done

That did the trick for me. After applying the patches I came across this post which appears to have a much better script. Whatever works.

Xenserver NFS SR from FreeNAS VM hack

I have a Citrix xenserver 6.5 host which hosts a FreeNAS VM that exports an NFS share. I then have that same xenserver host use that NFS export as a SR for other VMs on that same server. It’s unusual, but it saves me from buying a separate server for VM storage.

The problem is if you reboot the hypervisor it will fail to connect to the NFS export (because the VM hosting it hasn’t booted yet.) Additionally it appears Xenserver does not play well at all with hung NFS mounts. If you try to shutdown or reboot your FreeNAS VM while Xenserver is still using its NFS export, things start to freeze. You will be unable to do anything to any of your VMs thanks to the hung NFS share. It’s a problem!

My hack around this mess is to have FreeNAS, not Xenserver, control starting and stopping these VMs.

First, create public/private key pair for ssh into xenserver

ssh-keygen

This will generate two files, a private key file and a public (.pub) file. Copy the contents of the .pub file into the xenserver’s authorized_keys file:

echo "PUT_RSA_PUBLIC_KEY_HERE" >> /root/.ssh/authorized_keys

Copy the private key file (same name but without .pub extension) somewhere on your FreeNAS VM.

Next, create NFS startup and shutdown scripts. Thanks to linuxcommando for some guidance with this.  Replace the -i argument with the path to your SSH private key file generated earlier. You will also need to know the PBD UUID of the NFS store. Discover this by issuing

xe pbd-list

Copy the UUID for use in the scripts.

vi nfs-startup.sh
#!/bin/bash
#NFS FreeNAS VM startup script

SSH_COMMAND="ssh -o UserKnownHostsFile=/dev/null -o StrictHostKeyChecking=no -i <PRIVATE_KEY_LOCATION> -l root <ADDRESS_OF_XENSERVER>"

#Attach NFS drive first, then start up NFS-reliant VMs
$SSH_COMMAND xe pbd-plug uuid=<UUID_COPIED_FROM_ABOVE>

sleep 10

#Issue startup commands for each of your NFS-based VMs, repeat for each VM you have
$SSH_COMMAND xe vm-start vm="VM_NAME"
...
vi nfs-shutdown.sh
#!/bin/bash
#NFS FreeNAS VM shutdown script
#Shut down NFS-reliant VMs, detach NFS SR

#Re-establish networking to work around the fact that Network goes down before this script is executed within FreeNAS
/sbin/ifconfig -l | /usr/bin/xargs -n 1 -J % /sbin/ifconfig % up
SSH_COMMAND="ssh -o UserKnownHostsFile=/dev/null -o StrictHostKeyChecking=no -i <PRIVATE_KEY_LOCATION> -l root <ADDRESS_OF_XENSERVER>"

#Issue shutdown commands for each of your VMs
$SSH_COMMAND xe vm-shutdown vm="VM_NAME"

sleep 60

$SSH_COMMAND xe pbd-unplug <UUID_OF_NFS_SR>

#Take the networking interfaces back down for shutdown
/sbin/ifconfig -l | /usr/bin/xargs -n 1 -J % /sbin/ifconfig % down

Don’t forget to mark them executable:

chmod +x nfs-startup.sh
chmod +x nfs-shutdown.sh

Now add the scripts as a startup task in FreeNAS  and shutdown task respectively by going to System / Init/Shutdown Scripts. For startup, Select Type: Script, Type: postinit and point it to your nfs-startup.sh script. For shutdown, select Type: Script and Type: Shutdown.

Success! Now whenever your FreeNAS VM is shut down or rebooted, things will be handled properly which will prevent your hypervisor from freezing.


Improve FreeNAS NFS performance in Xenserver

My home lab consists of a virtualized instance of freenas, Citrix Xenserver, and various VMs. Recently I wanted to migrate some of my VMs to an NFS export from FreeNAS. To my dismay, the speed was abysmal (3 MB/second write speeds.) This tutorial will walk you through how to improve FreeNAS NFS performance in Xenserver by adding an log device (ZIL) to your ZFS pool.

After much research I realized the problem lies with ZFS behind the NFS export. Xenserver mounts the NFS share in such a way that it constantly wants to synchronize writes, which slows things down.

The solution: add a ZIL device. Since my freeNAS is virtualized, I chose the route of adding a virtual disk that is attached to an SSD. This process wasn’t straightforward.  If you have a virtual FreeNAS this is how to improve NFS performance:

  1. Add a disk in xenserver. Rule of thumb for size is half the amount of system RAM. I added 16GB ZIL disk to be safe.
  2. Add the following tunables in FreeNAS (to allow the OS to properly see xen hard drives)
    1. hint.ada.0.at, scbus100 (for the FreeNAS OS disk)
    2. hint.ada.1.at, scbus100 (for the newly added ZIL disk)
  3. Reboot FreeNAS
  4. In the FreeNAS GUI, click the ZFS Volume Manager, select your volume to expand from the dropdown, and select the device to be a LOG volume (ZIL)

That’s it! Once I added an SSD based ZIL device for my ZFS pool, NFS writes went from 3 MB/s to 60 MB/s. Awesome.

Fix No USB devices connected in Virtualbox

Recently on my Linux Mint 13.2 system I was playing with Virtualbox. I wanted to pass through a USB device to a virtualbox VM but despite installing the appropriate extension pack, I was greeted with this lovely message in the USB menu:

No USB devices connected

I discovered here that you need to be a member of the vboxusers group. One quick command solved this:

sudo usermod -a -G vboxusers <username>

Once I did that I logged out and logged back in. Voila! USB passthrough worked.

Install Virtualbox on a Chromebook

I am really enjoying my Chromebook Pixel 2015. Recently I needed to spin up a few VMs on this box. I tried to install virtualbox but it turns out that the kernel for the chromebook does not include virtualbox headers. Fortunately it’s fairly easy to add them, thanks to divx118’s scripts.

First, enable the necessary chromebook kernel flags. Run these commands in a crosh shell (not in a chroot)

cd ~/Downloads
wget https://raw.githubusercontent.com/divx118/crouton-packages/master/change-kernel-flags
sudo sh ~/Downloads/change-kernel-flags

Note: You will need to repeat the above steps after each chromeos update.

Next, open up a chroot shell and do the following:

cd ~
wget https://raw.githubusercontent.com/divx118/crouton-packages/master/setup-headers.sh
sudo sh setup-headers.sh

Lastly, reboot the chromebook. Once you’re back up, enter your chrooted environment and install Virtualbox from their Oracle’s download page. Don’t use the virtualbox repositories – they don’t work.

Install the downloaded deb file with dpkg

dpkg -i virtualbox-5.0_5.0.10-104061~Ubuntu~trusty_amd64.deb

You might get this error:

dpkg: dependency problems prevent configuration of virtualbox-5.0:
 virtualbox-5.0 depends on libqt4-opengl (>= 4:4.7.2); however:
  Package libqt4-opengl is not installed.

The fix to that error is to run the following command to install missing dependencies:

apt-get -f install

If you get weird errors about VT-X not being enabled in the BIOS, try running the script and rebooting again.

Success!

Xenserver SSH backup script

Citrix Xenserver is an amazing hypervisor with pretty much every function released to you for free. One thing they do not handle, however, is automated backups.

I have hacked together a backup script for myself that seems to work fairly well. It is my own mix of this and this script along with some logic for e-mail reporting that I came up with myself. It does not require any modification of the xenserver host at all (no need to mount anything!) with the exception of adding a public key to the xenserver’s authorized_keys file.

This script can be run on anything with BASH and the appropriate UNIX tools (even other xenservers if you want) and uses SSH to initiate and transfer the backups to a location of your choosing.

Place this script on the machine you want to be initiating / saving the backups on. It requires that you generate an SSH public/private key pair, which can be done with this command:

ssh-keygen

Add the resulting .pub file’s contents to your xenserver’s /root/.ssh/authorized_keys file (create it if it doesn’t exist.) Take note of the location of the private key file that was generated with that command and put that path in the script.

You can download the script here or view it below. This script has been working pretty well for me. Note it will not work with any VMs that have spaces in their names. I was too lazy to debug this so I just renamed the problem VMs to remove the spaces. Enjoy!

#!/bin/bash

# Modified August 30, 2015 by Nicholas Jeppson
# Taken from http://discussions.citrix.com/topic/345960-xenserver-automated-snapshots-script/ and modified to allow for ssh backups
# Additional insight taken from https://github.com/cepa/xen-backup

# [Usage & Config]
# This script involves two computers: a xenserver machine and a backup machine.
# Put this script on the backup server and run with any account that has privileges to the desired export directory.
#
# This script assumes you have already created a private and public key pair on the backup server
# as well as adding respective the public key to the xenserver authorized_keys file.
#
# [How it works]
# Step1: Snapshots each VM on the xen server
# Step2: Backs up the snapshots to specified location
# Step3: Deletes temporary snapshot created in step 1
# Step4: Deletes old VM backups as defined later in this file
#
# [Note]
# This script will only work with VMs that don't have spaces in their names
# Please make sure you have enough disk space for BACKUP_PATH, or backup will fail
#
# Tested on xenserver 6.5
#
# Modify the variables in the config section below to suit your particular environment's needs.
#

############### Config section ###############

#Location where you want backups to go
BACKUP_PATH="/mnt/backup/OS/"

#SSH configuration
SSH_CIPHER="arcfour128"

#Number of backups to keep
NUM_BACKUPS=2

#Xenserver ssh configuration
#This dictates the address and location of keyfiles as they reside on the xenserver
XEN_ADDRESS="192.168.1.1"
XEN_KEY_LOCATION="/home/backup/.ssh/backup"
XEN_USER="root"

#E-mail configuration
EMAIL_ADDRESS="youremail@provider.here"
EMAIL_SUBJECT="`hostname -s | awk '{print "["toupper($1)"]"}'` VM Backup Report: `date +"%A %b %d %Y"`"

########## End of Config section ###############

ret_code=0

#Replace any spaces found with backslashes because dd doesn't like them
BACKUP_PATH_ESCAPED="`echo $BACKUP_PATH | sed 's/ /\\\ /g'`"

# SSH command
remote_exec() {
chmod 0600 $XEN_KEY_LOCATION
ssh -i $XEN_KEY_LOCATION -o "StrictHostKeyChecking no" -c $SSH_CIPHER $XEN_USER@$XEN_ADDRESS $1
}

backup() {
echo "======================================================"
echo "VM Backup started: `date`"
begin="$(date +%s)"
echo "Backup location: ${BACKUP_PATH}"
echo

#add a slash to the end of the backup path if it doesn't exist
if [[ "$BACKUP_PATH" != */ ]]; then
BACKUP_PATH="$BACKUP_PATH/"
fi

#Build array of VM names
VMNAMES=$(remote_exec "xe vm-list is-control-domain=false | grep name-label | cut -d ':' -f 2 | tr -d ' '")

for VMNAME in $VMNAMES
do
echo "======================================================"
echo "$VMNAME backup started `date`"
echo
before="$(date +%s)"

# create snapshot
TIMESTAMP=`date '+%Y%m%d-%H%M%S'`
SNAPNAME="$VMNAME-$TIMESTAMP"
SNAPUUID=$(remote_exec "xe vm-snapshot vm=\"$VMNAME\" new-name-label=\"$SNAPNAME\"")

# export snapshot
# remote_exec "xe snapshot-export-to-template snapshot-uuid=$SNAPUUID filename= | gzip" | gunzip | dd of="$BACKUP_PATH/$SNAPNAME.xva"
remote_exec "xe snapshot-export-to-template snapshot-uuid=$SNAPUUID filename=" | dd of="$BACKUP_PATH/$SNAPNAME.xva"

#if export was unsuccessful, return error
if [ $? -ne 0 ]; then
echo "Failed to export snapshot name = $snapshot_name$backup_ext"
ret_code=1

else
#calculate backup time, print results
after="$(date +%s)"
elapsed=`bc -l <<< "$after-$before"`
elapsedMin=`bc -l <<< "$elapsed/60"`
echo "Snapshot of $VMNAME saved to $SNAPNAME.xva"
echo "Backup completed in `echo $(printf %.2f $elapsedMin)` minutes"

# destroy snapshot
remote_exec "xe snapshot-uninstall force=true snapshot-uuid=$SNAPUUID"

#remove old backups (uses num_backups variable from top)
BACKUP_COUNT=$(find $BACKUP_PATH -name "$VMNAME*.xva" | wc -l)

if [[ "$BACKUP_COUNT" -gt "$NUM_BACKUPS" ]]; then

OLDEST_BACKUP=$(find $BACKUP_PATH -name "$VMNAME*" -print0 | xargs -0 ls -tr | head -n 1)
echo
echo "Removing oldest backup: $OLDEST_BACKUP"
rm $OLDEST_BACKUP
if [ $? -ne 0 ]; then
echo "Failed to remove $OLDEST_BACKUP"
fi
fi
echo "======================================================"
fi
done

end=$"$(date +%s)"
total_time=`bc -l <<< "$end-$begin"`
total_time_min=`bc -l <<< "$total_time/60"`
echo "Backup completed: `date`"
echo "VM Backup completed in `echo $(printf %.2f $total_time_min)` minutes"
echo
}

#Run the backup function and save all output to a variable, including stderr
BACKUP_OUTPUT=$(backup 2>&1)

#Clean up the output of the backup function
#Remove records count from dd, do some basic math to make dd's numbers more human readable
BACKUP_OUTPUT_HUMANIZED=$(echo "$BACKUP_OUTPUT" | sed -r '/.*records /d' | tr -d '()' \
| awk '{sub(/.*bytes /, $1/1024/1024/1024" GB "); sub(/in .* secs/, "in "$5/60" mins "); sub(/mins .*/, "mins (" $7/1024/1024" MB/sec)"); print}')

#Send a report e-mail with the backup results
echo "$BACKUP_OUTPUT_HUMANIZED" | mail -s "$EMAIL_SUBJECT" "$EMAIL_ADDRESS"

exit $ret_code

Fix NAT not working with pfSense in Xenserver

After a few very frustrating experiences I’ve decided I want to migrate away from Sophos UTM for my home firewall. I enjoy Sophos’ features but do not enjoy the sporadic issues it’s been giving me.

My colleagues all rave about pfSense and how awesome it is so I thought I would give it a try. I have a completely virtualized setup using Citrix Xenserver 6.5 which has prevented me from trying pfSense in the past. The latest release, version 2.2.2, is based on FreeBSD 10.1, which includes native Xen device support. Now we’re talking.

Installation was quick and painless. After some configuration, the basic internet connection function was working swimmingly. As soon as I tried to forward some ports from my WAN interface to hosts on my network, though, things did not go well at all. I began to doubt my ability to configure basic NAT.

It looks simple enough – go to Firewall / NAT, specify the necessary source and destination IPs and Ports, and click apply. Firewall rules were added automatically. Except it didn’t work. I enabled logging on everything and there were no dropped packets to be found, but they were clearly being dropped. I thought it might be something weird with Sophos being upstream so I built my own private VM network but the issue was the same. NAT simply didn’t work. Silently dropped packets. I am not a fan of them.

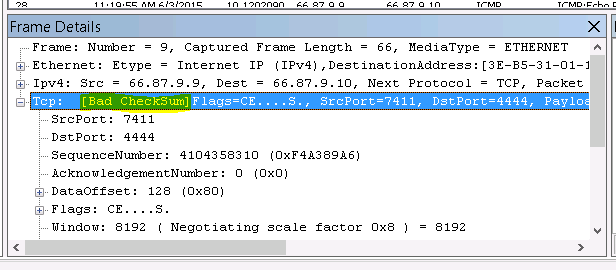
I was about to give up on pfSense but something told me it had to be a problem with my virtualization setup. I ran a packet capture via Diagnostics / Packet capture and after much sifting I found this gem:

checksumAll of my packets sent to the WAN interface returned [Bad CheckSum] that I was only able to discover via packet capture – they weren’t in the logs anywhere.

Armed with this information I stumbled on this forum post and discovered I am not alone in this. There apparently is a bug with FreeBSD 10.1 and the virtIO network drivers used by Xen, KVM, and others that causes it to miscalculate checksums, resulting in either dropped or very slow packets (I experienced both.)

The solution is to disable tx checksum offloading on both the PFsense side and the hypervisor side. In pfSense this is done by going to System / Advanced / Networking and checking “Disable hardware checksum offload”

To accomplish this on the xenserver side, follow tdslot’s instructions from the forum post linked above, replacing vm-name-label with the name of your pfSense VM:

Find your PFsense VM network VIF UUID’s:

[root@xen ~]# xe vif-list vm-name-label="RT-OPN-01"
uuid ( RO)            : 08fa59ac-14e5-f087-39bc-5cc2888cd5f8
...
...
...
uuid ( RO)            : 799fa8f4-561d-1b66-4359-18000c1c179f

Then modify those VIF UUID’s captured above with the following settings (discovered thanks to this post)

  • other-config:ethtool-gso=”off”
  • other-config:ethtool-ufo=”off”
  • other-config:ethtool-tso=”off”
  • other-config:ethtool-sg=”off”
  • other-config:ethtool-tx=”off”
  • other-config:ethtool-rx=”off”
xe vif-param-set uuid=08fa59ac-14e5-f087-39bc-5cc2888cd5f8 other-config:ethtool-tx="off"
xe vif-param-set uuid=799fa8f4-561d-1b66-4359-18000c1c179f other-config:ethtool-tx="off"

Lastly, shutdown the VM and start it again (not reboot, must be a full shutdown and power on.)

It worked! NAT worked as expected and a little bit of my sanity was restored. I can now make the switch to pfSense.

Fix Xen VGA Passthrough in Linux Mint 17.1

I wrote in my last post about how I upgraded from Linux Mint 16 to 17.1. I thought everything went smoothly, but it turns out one feature did break: VGA passthrough via Xen. For the past year or so I’ve had a Windows 8.1 gaming VM with direct access to my video card. It’s worked out nicely in Linux Mint 16 but broke completely in 17.1.

I followed the advice of powerhouse on the Linux Mint forums on how to get things up and running, but it wasn’t quite enough. After much banging of my head against the wall I read on the Xen mailing list that there was a regression in VGA passthrough functionality with Xen 4.4.1, which is the version of Xen Mint 17.1 uses.

I finally came to a solution to my problem today – upgrade to Xen 4.5. I couldn’t find any pre-built packages for Ubuntu 14.04 (the base of Mint 17.1) so I ended up compiling Xen 4.5 from source. Below is what I did to make it all work.

Fix broken symlink for /usr/lib/xen-default

sudo rm /usr/lib/xen-default
sudo ln -s /usr/lib/xen-4.4/ /usr/lib/xen-default

Update the DomU CFG file

A couple things needed tweaking. Here is my working cfg:

builder='hvm'
memory = '8192'
name = 'win8.1'
vcpus=6
cpus="2-7"
pae=1
acpi=1
apic=1
vif = [ 'mac=3a:82:47:2a:51:20,bridge=xenbr0,model=virtio' ]
disk = [ 'phy:/dev/mapper/desktop--xen-Win8.1,xvda,w' ]
device_model_version = 'qemu-xen-traditional'
boot='c'
sdl=0
vnc=1
vncpasswd=''
stdvga=0
serial='pty'
tsc_mode=0
viridian=1
usb=1
usbdevice='tablet'
gfx_passthru=0
pci=[ '01:00.0', '01:00.1' , '00:1d.0' ]
localtime=1
pci_power_mgmt=1
on_xend_stop = "shutdown"
xen_platform_pci=1
pci_power_mgmt=1

For some, that’s all they had to do. For me, I had to do a few more things.

Compile Xen 4.5

This step was thanks to two different sites, this one and this one.

Install necessary packages

sudo apt-get install build-essential bcc bin86 gawk bridge-utils iproute libcurl3 libcurl4-openssl-dev bzip2 module-init-tools transfig tgif texinfo texlive-latex-base texlive-latex-recommended texlive-fonts-extra texlive-fonts-recommended pciutils-dev mercurial libjpeg-dev make gcc libc6-dev-i386 zlib1g-dev python python-dev python-twisted libncurses5-dev patch libvncserver-dev libsdl-dev libpixman-1-dev iasl libbz2-dev e2fslibs-dev git-core uuid-dev ocaml ocaml-findlib libx11-dev bison flex xz-utils libyajl-dev gettext markdown libaio-dev pandoc

Checkout Xen source

git clone git://xenbits.xen.org/xen.git xen-4.5.0
cd xen-4.5.0
git checkout RELEASE-4.5.0

Build from source

./configure --libdir=/usr/lib
 make world -j8

When I tried this the make failed with this error:

/usr/include/linux/errno.h:1:23: fatal error: asm/errno.h: No such file or directory
 #include <asm/errno.h>

The fix (thanks to askubuntu)  was to install linux-libc-dev and make a symlink for it:

sudo apt-get install linux-libc-dev
sudo ln -s /usr/include/asm-generic /usr/include/asm

It then compiled successfully.

Install freshly compiled Xen 4.5

sudo make install
sudo update-rc.d xencommons defaults
sudo update-rc.d xendomains defaults
sudo ldconifg

Set grub to boot from new Xen kernel

sudo update-grub
sudo vim /etc/default/grub

Edit GRUB_DEFAULT to match wherever update-grub put your new Xen kernel (in my case it was the second entry, so my GRUB_DEFAULT=1), then run update-grub again

sudo update-grub

Reboot

Success at last. Enjoy your VM gaming once more with Xen 4.5.