Recently I have noticed some odd traffic coming to one of my blogs. This particular blog is set to NOT be indexed by search engines b(robots.txt deny.) Every bot that’s touched that site has honored that file… until now.
Periodically I will get huge spikes of traffic (huge for my small site, anyway.) The culprit is always the same: Apple! Why are they crawling my site? I can’t find a definitive reason. A couple searches reveals articles like this one speculating that Apple is starting a search engine. The problem is the traffic I’m seeing from Apple shows just a safari user agent, nothing about being a bot. A discussion on Reddit talks about Apple crawling sites, but they also list a user agent I’m not seeing.
The user agent reported by the bot that’s been crawling me (ignoring robots.txt file) is:
Mozilla/5.0 (Windows NT 6.1; WOW64) AppleWebKit/537.36 (KHTML, like Gecko) Chrome/31.0.1623.0 Safari/537.36
The IPs rotate randomly from Apple’s IP space, with the biggest offender being 17.142.152.102.
| x_forwarded_for | count |
| 17.142.152.102 | 1680 |
| 17.142.151.205 | 982 |
| 17.142.151.80 | 444 |
| 17.142.152.14 | 174 |
| 17.142.151.134 | 36 |
| 17.142.152.78 | 28 |
| 17.142.151.182 | 26 |
| 17.142.151.239 | 26 |
| 17.142.150.250 | 24 |
| 17.142.152.101 | 24 |
| 17.142.152.151 | 24 |
| 17.142.151.198 | 22 |
| 17.142.149.55 | 21 |
| 17.142.147.58 | 7 |
| 17.142.148.75 | 7 |
| 17.142.151.49 | 6 |
| 17.142.148.12 | 4 |
| 17.142.151.197 | 4 |
| 17.149.228.59 | 4 |
| 17.142.152.118 | 3 |
| 17.142.149.167 | 2 |
| 17.142.151.179 | 2 |
| 17.142.151.79 | 2 |
| 17.142.151.92 | 2 |
| 17.142.144.105 | 1 |
I e-mailed Apple at abuse@apple.com requesting they stop this action. I didn’t expect anything from it, and indeed nothing happened. I kept getting crawled.
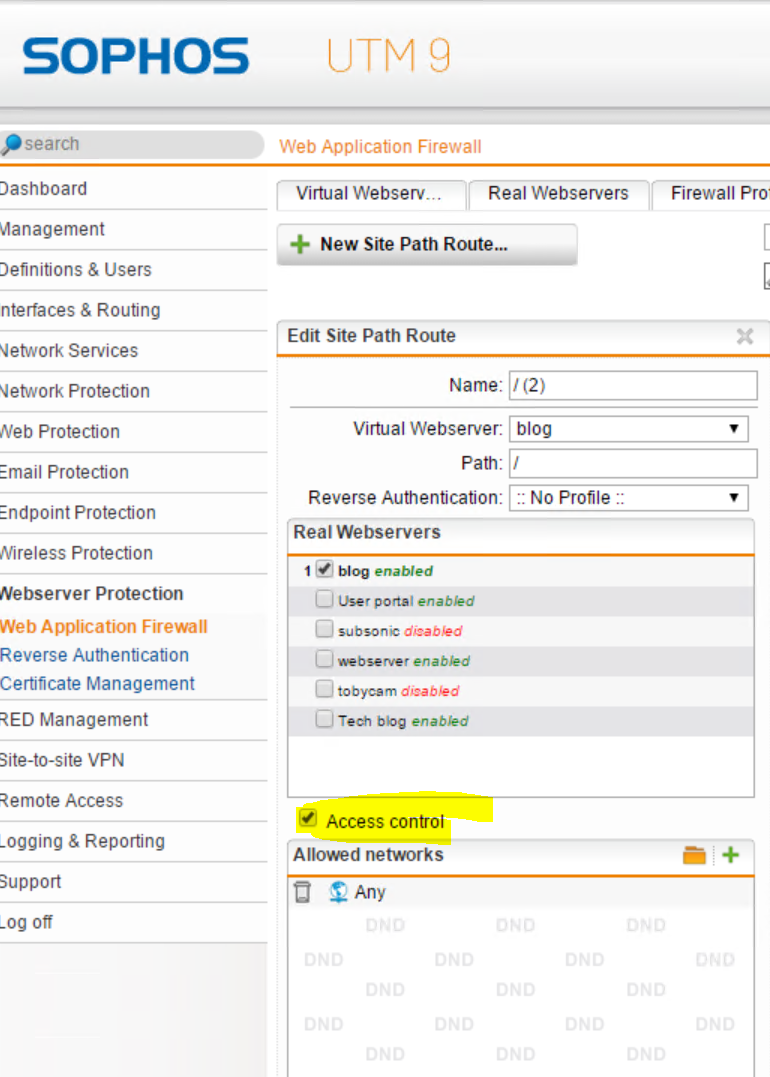
So, now to the title of this post. I had to tell my Web Application Firewall to block Apple’s address space. Sophos UTM 9.3 makes this easier, although the option is somewhat hidden for some reason. The option is in the “Site Path Routing” tab within the Web Application Firewall context. Once there, edit your site path and check the “Access Control” checkbox.
In my case I decided to block the entire subnet – 17.0.0.0/8. No more Apple crawling.. at least from the 17 network.