Category Archives: Web

Fix owncloud client sync “not valid JSON!” error

Recently I migrated my owncloud installation from one webserver to another. I learned that all you have to do is copy the data/ and config/ directories from your owncloud installation to the new machine’s owncloud folder to migrate everything over.

After the migration, I noticed the Windows desktop sync clients stopped working (android worked fine, though.) The main error messasge was not helpful:

Failed to connect to owncloud at https://servername/path/status.php: Unknown error

I found out from here that you can alter the shortcut for the Windows client and append –logwindow to the Target section. Once that was done, I was able to get more information:

03-02 10:01:27:240 0x50f9ec8 networkjobs.cpp:453 status.php from server is not valid JSON!

Manually navigating to status.php in the browser didn’t reveal anything – it appeared to load normally.

After much digging I found a suggestion to check the admin settings within owncloud. This is where I realized I probably didn’t migrate things properly. There was a big warning about invalid .htaccess files. Progress!

The lack of an .htaccess file made me realize that instead of completely moving the entire folder from the old owncloud install to the new, I needed to copy into the existing new owncloud directory. In moving instead of copying I somehow missed a few important files.

I started over, this time copying all files inside data and config into the new owncloud data and config directories. Apparently the Windows sync client requires valid .htaccess configuration before it will work.  Success!

Generate SSL certificate for use with Sophos UTM

HTTPS certificate handling in Sophos UTM is a bit different than other systems. I do this often enough but never remember exactly how to do it.

Here are the “cliff notes” of getting an SSL certificate loaded into Sophos UTM. This can be done on any linux / unix system with openssl installed. The full guide was taken from here.

Generate a private key

When creating your key, make sure you use a passphrase.

openssl genrsa -aes256 -out <keyname>.key 2048

Create a certificate signing request (CSR)

openssl req -new -key keyname.key -out csrname.csr

Upload CSR to your certificate company

Sophos UTM uses Openssl so select that option if prompted by your certificate company Specify Apache CSR if asked. Validate your domain ownership, then wait for e-mail with response.

Download output from certificate company

If they give you a zip file, unzip it first

unzip file_from_authority.zip

Combine all files provided into one

You only have to do this if your CA provides more than one CRT file

cat CA1.crt CA2.crt ...   >  combined.crt

Generate p12 file for use with UTM

Generate a pkcs12 file by supplying all files generated above. Be sure to specify an export password (Sophos requires one.)

openssl pkcs12 -export -in combined.crt -inkey <keyname>.key -out desired_p12_file_name.p12

Upload into Sophos UTM

Navigate to certificate management and specify upload key. Upload the file. Be sure to enter the password you used when creating the key earlier.

That’s it!

Fix Apache Permission Denied errors

The other day I ran the rsync command to migrate files from an old webserver to a new one. What I didn’t notice right away was that the rsync changed the permissions of the folder I was copying into.

The problem presented itself with a very lovely 403 forbidden error message when trying to access any website that server hosted. Checking the logs (/var/log/apache2/error.log on my Debian system) revealed this curious message:

[error] [client 192.168.22.22] (13)Permission denied: access to / denied

This made it look like apache was denying access for some reason. I verified apache config and confirmed it shouldn’t be denying anything. After some head scratching I came across this site which explained that Apache throws that error when it encounters filesystem access denied error messages.

I was confused because /var/www, where the websites live, had the appropriate permissions. After some digging I found that the culprit in my case was not /var/www, but rather the /var directory underneath /var/www. For some reason the rsync changed /var to not have any execute permissions (necessary for folder access.)  A simple

chmod o+rx /var/

resolved my problem. Next time you get 403 it could be underlying filesystem issues and not apache at all.

Disable access logging in Tomcat 7

Guacamole is a great HTML5 VPN gateway. It allows me to access internal applications without having to install any software. I wrote about it briefly in this article.  It wasn’t until I noticed that my Splunk indexer reported warnings that I had exceeded my 500MB quota (the free license maximum amount) that I realized that guacamole has a verbosity problem.

In examining the logs it appears that Guacamole passes about 6 HTTP requests per second while you’re using it. This problem is magnified if you have guacamole sitting behind an apache server, as each request is logged twice – once in Apache access logs, and again in Tomcat access logs.

Since I already have that same information in apache access logs and I don’t allow access directly to Tomcat, I set out to disable Tomcat logging completely. Things have changed between versions so it got a little confusing.

To disable logging in Tomcat 7, you have to edit /etc/tomcat7/server.xml (that’s where it lives in Ubuntu Server 14.04 anyway) and comment out a section (thanks to Stack Overflow for helping me figure this out.)

vim /etc/tomcat7/server.xml

Find this line:

    <Valve className="org.apache.catalina.valves.AccessLogValve" directory="logs"  
           prefix="localhost_access_log." suffix=".txt"
           pattern="%h %l %u %t &quot;%r&quot; %s %b" resolveHosts="false"/>

Comment out the line like this:

    <!-- <Valve className="org.apache.catalina.valves.AccessLogValve" directory="logs"  
           prefix="localhost_access_log." suffix=".txt"
           pattern="%h %l %u %t &quot;%r&quot; %s %b" resolveHosts="false"/> -->

Save the file and restart Tomcat.

:wq
service tomcat7 restart

No more duplicate logging.

Use Sophos User portal and WAF on same port

The Sophos UTM firewall is a great piece of security software. It is designed with businesses in mind but is also free for home use. It has many features, two of which (User Portal and Web Application Firewall) compete for the same port – TCP 443 (https.) This is a shame if you want to run both services simultaneously but only have one IP address.

For some reason the folks at Astaro (Sophos) have not engineered a way to allow the WAF and User Portal to play nicely, saying on their forums to just configure them to use different ports. What if you have people who are behind firewalls that only allow ports 80 and 443? You are stuck.

I didn’t like that answer so I set out to research a way around this. The solution to this problem lies with Apache and its reverse proxy feature. A reverse proxy is a webserver that receives HTTP requests and forwards them to some other location, then returns the response.

My solution to the “I want both WAF and User Portal to use the same port” problem is to put the user portal on a different, internal-only port, spin up a small apache server, configure it to forward all requests to the user portal address:port combination, and add it as a real server in the sophos WAF.

Change user portal port

Easy enough: Go to Management / User Portal / Advanced tab, scroll down to the “Network Settings” section and pick a different port, then click apply.

Spin up a reverse proxy web server

I went with Ubuntu Server 14.04 so I could have newer software packages.

  1. Install apache
    sudo apt-get install apache2
  2. Enable needed modules
    sudo a2enmod ssl
    sudo a2enmod proxy
    sudo a2enmod proxy_http
  3. Configure apache to proxy all requests to your user portal
    #Add the following to default-ssl.conf
    sudo vim /etc/apache2/sites-enabled/default-ssl.conf
    SSLProxyEngine On
    #Enable the next 3 lines if you want to ignore certificate errors
    #SSLProxyVerify none
    #SSLProxyCheckPeerCN off
    #SSLProxyCheckPeerName off
    
    #Configure the reverse proxy to forward all requests
    ProxyPass / https://<your firewall IP>:<port you chose earlier>/
    ProxyPassReverse / https://<your firewall IP>:<port you chose earlier>/
    #Make sure slashes are at the end (important)
  4. Restart apache
    sudo service apache2 reload

 Add your reverse proxy to Sophos UTM

  1. Add your proxy server as a real webserver. Go to Webserver protection / Web Application Firewall / Real Webservers and add your proxy server address. Make sure the type is “Encrypted HTTPS” (important.)
  2. Add your desired URL as a virtual server and point to your proxy real server (Virtual Webservers tab.) You’ll have to have an SSL certificate generated, which is beyond the scope of this post.

Caveats

The above configuration will work with every function of the User Portal.. except for the HTML5 VPN gateway. For some inexplicable reason it has scripts hard coded to use the root directory, which Apache won’t proxy properly even if you have rewrite rules in place. I fiddled with this for hours before I finally gave up and looked elsewhere for an HTML5 VPN solution.

Guacamole

It’s more than just dip, it’s an excellent open source HTML5 RDP/VNC/SSH gateway. Unlinke Sophos’s option, guacamole properly handles being in a subdirectory. Unfortunately it is very frustrating and user un-friendly to configure. I decided just to use a pre-configured VM appliance from Green Reed Technology. It’s an excellent appliance and “just works” – a much better experience than wrestling with archaic configuration files. You can get it from here.
 

Block bad networks from sites behind Sophos WAF

Recently I have noticed some odd traffic coming to one of my blogs. This particular blog is set to NOT be indexed by search engines b(robots.txt deny.) Every bot that’s touched that site has honored that file… until now.

Periodically I will get huge spikes of traffic (huge for my small site, anyway.) The culprit is always the same: Apple! Why are they crawling my site? I can’t find a definitive reason. A couple searches reveals articles like this one speculating that Apple is starting a search engine. The problem is the traffic I’m seeing from Apple shows just a safari user agent, nothing about being a bot. A discussion on Reddit talks about Apple crawling sites, but they also list a user agent I’m not seeing.

The user agent reported by the bot that’s been crawling me (ignoring robots.txt file) is:

Mozilla/5.0 (Windows NT 6.1; WOW64) AppleWebKit/537.36 (KHTML, like Gecko) Chrome/31.0.1623.0 Safari/537.36

The IPs rotate randomly from Apple’s IP space, with the biggest offender being 17.142.152.102.

x_forwarded_for count
17.142.152.102 1680
17.142.151.205 982
17.142.151.80 444
17.142.152.14 174
17.142.151.134 36
17.142.152.78 28
17.142.151.182 26
17.142.151.239 26
17.142.150.250 24
17.142.152.101 24
17.142.152.151 24
17.142.151.198 22
17.142.149.55 21
17.142.147.58 7
17.142.148.75 7
17.142.151.49 6
17.142.148.12 4
17.142.151.197 4
17.149.228.59 4
17.142.152.118 3
17.142.149.167 2
17.142.151.179 2
17.142.151.79 2
17.142.151.92 2
17.142.144.105 1


I e-mailed Apple at abuse@apple.com requesting they stop this action. I didn’t expect anything from it, and indeed nothing happened. I kept getting crawled.

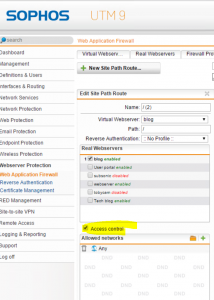
So, now to the title of this post. I had to tell my Web Application Firewall to block Apple’s address space. Sophos UTM 9.3 makes this easier, although the option is somewhat hidden for some reason. The option is in the “Site Path Routing” tab within the Web Application Firewall context. Once there, edit your site path and check the “Access Control” checkbox.

Capture

In my case I decided to block the entire subnet – 17.0.0.0/8. No more Apple crawling.. at least from the 17 network.

Two factor authentication in WordPress with Authy

With data breaches as rampant as they are I’ve decided to get more serious about security and implement two factor authentication. Authy is a great way to add this to WordPress, and it’s free (or at least most of its features are.) This information comes from their blog.

  1. Install the Authy plugin from here
  2. Create an account at https://dashboard.authy.com
  3. Add an application for your blog to the Authy dashboard and copy the API key given to you
  4. Activate the Authy wordpress plugin, go into settings and paste in the API key
  5. Activate two factor authentication for your user by mousing over the top right corner and selcting “Edit my profile”, scroll down to the bottom, and click “Enable/Disable Authy”

When I did this I had forgotten that I had a different login plugin running – Login Lockdown. With both these enabled I could no longer log in! There was some sort of conflict between the two plugins. I had to disable both plugins by following this guide.

  1. Navigate to your wordpress directory and go to wp-content/plugins
  2. Rename the offending plugin directory to something like pluginname-disabled
  3. Log into WordPress and go to your plugins page, it will generate an error
  4. Now that you’re logged in, you can rename those folders back to their original name to either re-activate or delete those plugins.

Now you are much more secure. Even if someone has your password they will not be able to log in unless they also have your phone.

Mythweb broken after upgrading to Ubuntu 14.04

I recently upgraded my mythbuntu installation from 12.04 to 14.04. For some reason the distribution upgrade tool failed on me. I had to upgrade manually by updating everything in /etc/apt/sources* to point to trusty instead of precise.

After a reboot I was surprised to find out that everything upgraded beautifully except for one thing – mythweb. When I tried to start Apache I was greeted with this lovely message:

* The apache2 configtest failed.
Output of config test was:
AH00526: Syntax error on line 30 of /etc/apache2/sites-enabled/mythweb.conf:
Illegal option AllowAll
Action 'configtest' failed.
The Apache error log may have more information.

It turns out Ubuntu 14.04 uses a different version of Apache with different syntax, which breaks the configuration. Thanks to this post I found the fix to be relatively easy:

sudo rm /etc/apache2/sites-available/mythweb.conf
sudo dpkg-reconfigure mythweb
sudo /etc/init.d/apache2 start

After that was done, all was well and upgraded.

Add x-forwarded-for header to Apache

If you happen to be running your site behind a web application firewall you will notice that initially you will not be able to determine the true source of traffic coming to your server. The default setup for Apache will only show traffic coming from the firewall itself.

To fix this, you need to tweak the LogFormat parameters in /etc/apache2/apache2.conf (for Debian distros) or wherever your apache config file is in other distros. Per here, you need to add

 %{X-Forwarded-For}i

to your config file. Here is an example setup successfully implementing X forwarded For as well as maintaining logging the IP of the WAF itself (in case you have more than one..)

LogFormat "%v:%p %{X-Forwarded-For}i %h %l %u %t \"%r\" %>s %O \"%{Referer}i\" \"%{User-Agent}i\"" vhost_combined
LogFormat "%{X-Forwarded-For}i %h %l %u %t \"%r\" %>s %O \"%{Referer}i\" \"%{User-Agent}i\"" combined
LogFormat "%{X-Forwarded-For}i %h %l %u %t \"%r\" %>s %O" common
LogFormat "%{Referer}i -> %U" referer
LogFormat "%{User-agent}i" agent