Category Archives: Web

FreeBSD: allow non-root processes to bind port 80

In experimenting with FreeNAS jails I wanted to allow a web service to use port 80. Normally 80 is a high order port reserved for root-level processes for security reasons. Since this is a FreeBSD jail and not a full on system I’m not worried about this.

The command to do so is fairly simple (thanks to this page for information)

sysctl net.inet.ip.portrange.reservedhigh=0

The above command is not permanent; to make it so add it to /etc/sysctl.conf:

echo "net.inet.ip.portrange.reservedhigh=0" >> /etc/sysctl.conf

Install Guacamole 0.9.9 on Ubuntu 15.10

Lately I’ve been trying to upgrade my installation of Guacamole 0.9.8 to 0.9.9. You’d think it would be simple. It is not. I ended up just blowing up my 0.9.8 VM and starting over, this time with Ubuntu 15.10. I found this excellent guide which got me most of the way there, with one small hiccup that took way more time than it should have to figure out.

I will paste the guide I got from the above site for convenience with my added notes for clarification on parts that I had trouble with.

Installation

#!/bin/bash
# WORKING ON UBUNTU 15.10 WITH GUAC 0.9.9 AND TOMCAT8

#Update Everything
apt-get update && apt-get -y dist-upgrade

#Install Stuff
#You will be prompted for a mysql root password. Remember this for the configuration step; change MYSQLROOTPASSWORD to whatever you enter here.
apt-get -y install libcairo2-dev libpng12-dev libossp-uuid-dev libfreerdp-dev libpango1.0-dev libssh2-1-dev libtelnet-dev libvncserver-dev libpulse-dev libssl-dev libvorbis-dev libwebp-dev mysql-server mysql-client mysql-common mysql-utilities tomcat8

# Install libjpeg-turbo-dev
wget -O libjpeg-turbo-official_1.4.2_amd64.deb http://downloads.sourceforge.net/project/libjpeg-turbo/1.4.2/libjpeg-turbo-official_1.4.2_amd64.deb
dpkg -i libjpeg-turbo-official_1.4.2_amd64.deb

# Add GUACAMOLE_HOME to Tomcat8 ENV
echo "" >> /etc/default/tomcat8
echo "# GUACAMOLE EVN VARIABLE" >> /etc/default/tomcat8
echo "GUACAMOLE_HOME=/etc/guacamole" >> /etc/default/tomcat8

#Download Guacamole Files
wget -O guacamole-0.9.9.war http://downloads.sourceforge.net/project/guacamole/current/binary/guacamole-0.9.9.war
wget -O guacamole-server-0.9.9.tar.gz http://sourceforge.net/projects/guacamole/files/current/source/guacamole-server-0.9.9.tar.gz
wget -O guacamole-auth-jdbc-0.9.9.tar.gz http://sourceforge.net/projects/guacamole/files/current/extensions/guacamole-auth-jdbc-0.9.9.tar.gz
wget -O mysql-connector-java-5.1.38.tar.gz http://dev.mysql.com/get/Downloads/Connector/j/mysql-connector-java-5.1.38.tar.gz

#Extract Guac
tar -xzf guacamole-server-0.9.9.tar.gz
tar -xzf guacamole-auth-jdbc-0.9.9.tar.gz
tar -xzf mysql-connector-java-5.1.38.tar.gz

# MAKE DIRECTORIES
mkdir /etc/guacamole
mkdir /etc/guacamole/lib
mkdir /etc/guacamole/extensions

# Install GUACD
cd guacamole-server-0.9.9
./configure --with-init-dir=/etc/init.d
make
make install
ldconfig
systemctl enable guacd
cd ..

# Move files to correct locations
mv guacamole-0.9.9.war /etc/guacamole/guacamole.war
ln -s /etc/guacamole/guacamole.war /var/lib/tomcat8/webapps/
cp mysql-connector-java-5.1.38/mysql-connector-java-5.1.38-bin.jar /etc/guacamole/lib/
cp guacamole-auth-jdbc-0.9.9/mysql/guacamole-auth-jdbc-mysql-0.9.9.jar /etc/guacamole/extensions/

Configuration

# Configure guacamole.properties 
echo "mysql-hostname: localhost" >> /etc/guacamole/guacamole.properties 
echo "mysql-port: 3306" >> /etc/guacamole/guacamole.properties 
echo "mysql-database: guacamole_db" >> /etc/guacamole/guacamole.properties 
echo "mysql-username: guacamole_user" >> /etc/guacamole/guacamole.properties
 
# This is where you will want to change "PASSWORD" 
echo "mysql-password: PASSWORD" >> /etc/guacamole/guacamole.properties 
rm -rf /usr/share/tomcat8/.guacamole 
ln -s /etc/guacamole /usr/share/tomcat8/.guacamole 

# Restart Tomcat Service 
service tomcat8 restart

#Configure the MySQL database
#Make sure you change MYSQLROOTPASSWORD and PASSWORD
mysql -u root -pMYSQLROOTPASSWORD
create database guacamole_db;
create user 'guacamole_user'@'localhost' identified by 'PASSWORD';
GRANT SELECT,INSERT,UPDATE,DELETE ON guacamole_db.* TO 'guacamole_user'@'localhost';
flush privileges;
quit

#Populate the database
#Make sure you change MYSQLROOTPASSWORD
cat guacamole-auth-jdbc-0.9.9/mysql/schema/*.sql | mysql -u root -pMYSQLROOTPASSWORD guacamole_db

After that it should be as simple as logging into your shiny guacamale server as guacadmin/guacadmin.

It wasn’t that simple for me. When I tried to log in all I got was a blank page. Reading the log file /var/log/tomcat8/localhost.<date>.log revealed the following:

Error querying database. Cause: java.sql.SQLException: Access denied for user 'guacamole_user '@'localhost' (using password: YES)

I kept changing and double checking the password for guacamole and couldn’t figure out why it was getting access denied. I even manually logged into mysql with that username and password and it worked, yet guacamole would not load in the browser.

After staring at the log long enough I realized that there is a space before the closing tick on the username. Aha! There were pesky trailing spaces in my guacamole.properties. Removing those spaces did the trick. Always some mundane detail!

Finally I have guacamole 0.9.9 working.

Configure ARC welder to access local folder

ARC Welder is an amazing tool. It’s a chrome extension that allows you to take an android APK file and convert it into a chrome extension. This means you can run android apps on any device with Chrome installed. Sweet!

I came across a need for an arc welder app to access my local filesystem. I wanted to share a file that was on my host system with the android app. After some digging I came across this forum post which details what you need to do.

The solution is specify a certain option when using arc welder:

{"enableExternalDirectory": true}

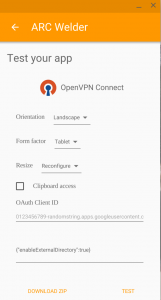
You do this on the final screen before you click test app / download zip.

Screenshot 2016-01-28 at 1.24.25 PM

Arc welder will prompt you to pick a folder. Once that’s done, you can navigate to the Downloads folder in your app and your linked folder will be there. Pretty slick.

(No, OpenVPN ended up not working, but I wanted to save this knowledge in case I want to try a different app that needs / creates files.)

Fix Plex SSL behind Reverse Proxy

Recently I updated to the latest version of Plex. I run Plex behind a Reverse Proxy server. When I initially set it up it was to provide HTTPS before Plex supported it. Now that Plex supports it I still use it to have my custom domain name attached to it.

This latest Plex update seemed to have broken SSL connectivity completely.. I couldn’t get SSL to work no matter what I tried. After pulling much hair out I found out there is a new option under advanced server settings:

Settings / Server / Show Advanced / Network

Scroll downs until you see

Custom server access URLs

It is here that you need to supply your own domain name and port. I struggled this for a while. If you type https://<domain name>, but don’t specify a port, it defaults to 32400, not 443. I finally got SSL to work with plex again by entering https://mydomain.name:443 in that field.

Plex works with SSL once more. All is right with the world again.

Install Guacamole 0.9.8 in CentOS 7

Lately I’ve embarked in installing the latest version of Guacamole, 0.9.8, in a fresh installation of CentOS 7. Kudos go to the excellent guide I found from here.  Derek’s guide is for 0.9.7 but it also works for 0.9.8. I ran into a few hangups but after I figured them out it worked beautifully.

First, fetch the needed binaries:

rpm -Uvh http://mirror.metrocast.net/fedora/epel/7/x86_64/e/epel-release-7-5.noarch.rpm   # EPEL Repo
yum -y install wget   # wget
wget http://download.opensuse.org/repositories/home:/felfert/Fedora_19/home:felfert.repo && mv home\:felfert.repo /etc/yum.repos.d/   # Felfert Repo
yum -y install tomcat libvncserver freerdp libvorbis libguac libguac-client-vnc libguac-client-rdp libguac-client-ssh
yum -y install cairo-devel pango-devel libvorbis-devel openssl-devel gcc pulseaudio-libs-devel libvncserver-devel terminus-fonts \
freerdp-devel uuid-devel libssh2-devel libtelnet libtelnet-devel tomcat-webapps tomcat-admin-webapps java-1.7.0-openjdk.x86_64

Next, install guac server (the latest as of this writing is 0.9.8)

mkdir ~/guacamole && cd ~/
wget http://sourceforge.net/projects/guacamole/files/current/source/guacamole-server-0.9.8.tar.gz
tar -xzf guacamole-server-0.9.8.tar.gz && cd guacamole-server-0.9.8
./configure --with-init-dir=/etc/init.d
make
make install
ldconfig

I received an error while running ./configure :

checking for jpeg_start_compress in -ljpeg... no
configure: error: "libjpeg is required for writing jpeg messages"

It means I didn’t have libjpeg dev libraries installed. Easily fixed:

yum install libjpeg-turbo-devel

Next, install the guacamole war files

mkdir -p /var/lib/guacamole && cd /var/lib/guacamole/
 wget http://sourceforge.net/projects/guacamole/files/current/binary/guacamole-0.9.8.war -O guacamole.war
 ln -s /var/lib/guacamole/guacamole.war /var/lib/tomcat/webapps/
 rm -rf /usr/lib64/freerdp/guacdr.so
 ln -s /usr/local/lib/freerdp/guacdr.so /usr/lib64/freerdp/

Next comes configuring the database

#Install database and connector
yum -y install mariadb mariadb-server
 mkdir -p ~/guacamole/sqlauth && cd ~/guacamole/sqlauth
 wget http://sourceforge.net/projects/guacamole/files/current/extensions/guacamole-auth-jdbc-0.9.8.tar.gz
 tar -zxf guacamole-auth-jdbc-0.9.8.tar.gz
 wget http://dev.mysql.com/get/Downloads/Connector/j/mysql-connector-java-5.1.32.tar.gz
 tar -zxf mysql-connector-java-5.1.32.tar.gz
 mkdir -p /usr/share/tomcat/.guacamole/{extensions,lib}
 mv guacamole-auth-jdbc-0.9.8/mysql/guacamole-auth-jdbc-mysql-0.9.8.jar /usr/share/tomcat/.guacamole/extensions/
 mv mysql-connector-java-5.1.32/mysql-connector-java-5.1.32-bin.jar /usr/share/tomcat/.guacamole/lib/
 systemctl restart mariadb.service

#Configure database
mysqladmin -u root password MySQLRootPass
mysql -u root -p   # Enter above password
create database guacdb;
create user 'guacuser'@'localhost' identified by 'guacDBpass';
grant select,insert,update,delete on guacdb.* to 'guacuser'@'localhost';
flush privileges;
quit
cd ~/guacamole/sqlauth/guacamole-auth-jdbc-0.9.8/mysql/schema/
cat ./*.sql | mysql -u root -p guacdb   # Enter SQL root password set above

Now we need to configure guacamole to use our new database.

mkdir -p /etc/guacamole/ && vi /etc/guacamole/guacamole.properties
# MySQL properties
mysql-hostname: localhost
mysql-port: 3306
mysql-database: guacdb
mysql-username: guacuser
mysql-password: guacDBpass

# Additional settings
mysql-disallow-duplicate-connections: false

Link the file you just made to the tomcat configuration directory

ln -s /etc/guacamole/guacamole.properties /usr/share/tomcat/.guacamole/

Cleanup temporary files and enable necessary services on boot

cd ~ && rm -rf guacamole*
systemctl enable tomcat.service && systemctl enable mariadb.service && chkconfig guacd on
systemctl reboot

Lastly, open the firewall up for port 8080 (thanks stack overflow)

firewall-cmd --permanent --add-port=8080/tcp
firewall-cmd --reload

Navigate to guacamole in your browser: http://<IP address>/guacamole:8080. You should see the guacamole login screen.

Additional hiccup

This new version of guacamole has a different user interface. It took me longer than I’d like to admit to realize how to get out of a guacamole session once it’s started. Sessions are now full screen with no obvious way to exit.

The way to exit the full screen guacamole session is to press the magic key combination of ctrl, alt, and shift. It will reveal a menu from the side. This is all clearly defined in the user documentation, but my lack of willingness to read it caused me to waste much time. Lesson learned!

Get free SSL certificates from startssl

SSL certificates can be a pain, especially if you have to pay for them. It turs out you can get free SSL certificates from startssl.com, though, so at least your wallet doesn’t have to suffer!

In order to create an account with them, head over to https://www.startssl.com/ Their account creation process is a little strange. Follow their instructions for generating a certificate for authentication (they don’t use passwords.)

Note: if you are getting frustrated because you follow their certificate login process only to have your browser tell you there is no cert it’s likely due to some caching of the certificate error page in your browser. Clear cache and cookies (or open a browser in incognito / privacy mode) and try again to log in.

First, validate your domain using their validation wizard. Once your domain is validated, head over to the Certificates wizard to generate a certificate.

I don’t trust any website that generates private SSL keys for you, so I recommend you create your own with the openssl command (steps copied from my sophos SSL certificate tutorial) and skip the creation step on their website.

  1. Generate a Certificate Signing Request (CSR) by creating a key and using it to generate the CSR
  2. openssl genrsa -aes256 -out <keyname>.key 2048
    openssl req -new -key keyname.key -out csrname.csr

2. Copy the content of the csr file into the CSR form box and click Next

3. If you’re lucky, you’ll be provided the key files immediately. Sometimes it takes a few hours for them to approve the certificate creation first.

4. Once the certificate is created, head over to Toolbox / Retrieve certificate. After selecting the appropriate certificate, copy everything in the box and paste it into a crt file.

5. Obtain Startcom’s intermediate and root CA files by going to Toolbox / Startcom CA Certificates. Download the “Server Certificate Bundle with CRLs” file.

6. Combine the generated certificate and Startcom certificate bundle into a single file:

cat ca-bundle.pem generated_crt_file.crt  > combined.crt

Sometimes you will need to wait 6-12 hours after getting key before installing it. This allows for OCSP to propagate as explained here. If you get certificate errors after installing, this may be the cause.

7. Profit.


Install Owncloud 8 on Centos 7

I recently needed to re-install my Owncloud VM. I’ve been on a CentOS kick lately so I decided to see if I could install OwnCloud 8 on a Centos 7 base install. It turned out to not be as easy as I thought it would be.

When I tried to install owncloud on my CentOS 7 system, I kept getting a 404 error message even though I followed the documentation outlined here.

It turns out that they changed where the RPM is held and apparently forgot to update the documentation. I discovered this by manually navigating to download.suse.org/repositories/isv:ownCloud:community and browsing the directories. The documentation has you grab a repo from Centos_Centos-7 folder, which is broken. It looks like the proper directory is just Centos_7.

I had to remove the old repo, purge the cache, and try again. To do so, remove the .repo file and purge via yum:

cd /etc/yum.repos/d/
rm isv\:ownCloud\:community.repo
yum --enablerepo=isv_ownCloud_community clean metadata
wget http://download.opensuse.org/repositories/isv:ownCloud:community/CentOS_7/isv:ownCloud:community.repo
yum install owncloud

The above procedure is what you should run if you’ve already tried to use the broken link in the documentation and failed. If you haven’t installed owncloud yet, do the following

cd /etc/yum.repos/d/
wget http://download.opensuse.org/repositories/isv:ownCloud:community/CentOS_7/isv:ownCloud:community.repo
yum install owncloud

Success.

Fix Owncloud 8.1.1 samba shares not working

It never seems to go smoothly, does it? I just upgraded my version of Owncloud from 8.0.4 to 8.1.1 on my Ubuntu Trusty Tahr 14.04 VM. After the upgrade I noticed that all my samba (SMB) shares were gone. The logs were not very helpful, full of things like these:

Exception: {"Exception":"Icewind\\SMB\\Exception\\InvalidHostException","Message":"","Code":0,"Trace":"#0 \/var\/www\/owncloud\/apps\/files_external\/3rdparty\/icewind\/smb\/src\/Connection.php(37): Icewind\\SMB\\Connection

Additionally errors like this were showing up:

Your web server is not yet set up properly to allow file synchronization because the WebDAV interface seems to be broken.

After much digging I discovered this post which had a suggestion to install libsmbclient-php. In Ubuntu 14.04 it involves this command:

sudo apt-get install php5-libsmbclient

That did the trick! After installing php5-libsmbclient my samba shares worked once more.


Owncloud server did not acknowledge the last chunk error

I experienced an issue with Owncloud today where small files wouldn’t synchronize properly. The error message was

The server did not acknowledge the last chunk. (No e-tag were present)

I could not find a way around this issue. Some googling revealed this page on github. It appears I’m not the only one with this issue.

Deep in the thread, asinteg-daehn provided a workaround for the issue. It’s not ideal, but it works. Rename the file to something else, wait for it to sync, then rename it back.

Update:
Currently only found a WORKAROUND: Renaming of all affected files.

  • open activity dialog of OC Client
  • go to each affected file by double clicking on it’s error message
  • rename it by e.g. a prefix “_” -> “_myfile.txt”
  • resync succeeds
  • now rename it back
  • resync should succeed, too

This is very annoying, but a simple workaround.

It worked for me. Hopefully it will work for you too.

Block annoying bots with Apache .htaccess

Recently one of my sites has been having its database crash repeatedly. Investigation reveals it always happens while an aggressive bot is crawling it. Since the site is small it was causing the database to run out of memory and die.

The Web Application Firewall that this site is behind frustratingly does not have a feature for blocking user agents. I decided to resort to Apache on the webserver itself to serve as a gatekeeper. The user agent in question? flipboard proxy. It also conveniently appears to ignore robots.txt.

Thanks to this article I learned the details on how to get Apache to block this particular user agent. Creating an .htaccess file (if it doesn’t already exist) and putting it in the root directory of the website causes it to apply to the entire site. Within the .htaccess file, place the following directives:

#block bad bots with a 403
#SetEnvIfNoCase User-Agent "facebookexternalhit" bad_bot
SetEnvIfNoCase User-Agent "Twitterbot" bad_bot
SetEnvIfNoCase User-Agent "Baiduspider" bad_bot
SetEnvIfNoCase User-Agent "MetaURI" bad_bot
SetEnvIfNoCase User-Agent "mediawords" bad_bot
SetEnvIfNoCase User-Agent "FlipboardProxy" bad_bot
<Limit GET POST HEAD>
 Order Allow,Deny
 Allow from all
 Deny from env=bad_bot
</Limit>

Save the file in the root of your website and make sure its permissions are such that your apache server can read the file. Success! Flipboard proxy (and other bad bots) no longer crashes the site. Instead, it gets served a 403 – Forbidden page for every request it makes.