Tag Archives: Ubuntu

UBUNTU 20.04 cloned VM same DHCP IP fix

I cloned an Ubuntu 20.04 VM and was frustrated to see both boxes kept getting the same DHCP IP address despite having different network MAC addresses. I finally found on this helpful post which states Ubuntu 20.04 uses systemd-networkd for DHCP leases which behaves differently than dhclient. As wickedchicken states,

systemd-networkd uses a different method to generate the DUID than dhclientdhclient by default uses the link-layer address while systemd-networkd uses the contents of /etc/machine-id. Since the VMs were cloned, they have the same machine-id and the DHCP server returns the same IP for both.

To fix, replace the contents of one or both of /etc/machine-id. This can be anything, but deleting the file and running systemd-machine-id-setup will create a random machine-id in the same way done on machine setup.

So my fix was to run the following on the cloned machine:

sudo rm /etc/machine-id
sudo systemd-machine-id-setup
sudo reboot

That did the trick!


For the systems that registered their hostnames under the wrong IPs, I had to take the following action for my Ubuntu 20.04 desktop as well as my Ubiquiti USG-Pro 4

Ubiquiti: Clear DHCP lease

clear dhcp lease ip <ip_address>

Ubuntu desktop: Flush DNS

sudo systemd-resolve --flush-caches
Folding@home opencl error fix

I decided to contribute my GPU on my Ubuntu-based system to the Folding@Home effort for COVID-19. I kept getting this error message for my NVIDIA GeForce GTX 1050 TI when I tried:

ERROR:WU00:FS00:Failed to start core: OpenCL device matching slot 0 not found, make sure the OpenCL driver is installed or try setting 'opencl-index' manually

I had the nvidia opencl packages installed but apparently missed something. I finally found on the folding at home forum what I was missing – ocl-icd-opencl-dev

sudo apt install ocl-icd-opencl-dev

After running the above command and restarting the FAHClient service, the GPU started folding. For science!


EDIT 5/6/2020: After a re-install I had the issue where the GPU wouldn’t show up at all. It addition to ocl-icd-opencl-dev, it looks like you also need nvidia-cuda-dev.

sudo apt install ocl-icd-opencl-dev nvidia-cuda-dev

chroot into encrypted drive

I foolishly went browsing in my EFI partition on my Ubuntu (Elementary OS) laptop and decided to delete the Ubuntu folder. This made my laptop unbootable. This was my procedure to bring it back to life:

Boot into Ubuntu Live CD / USB environment

Decrypt LUKS encrypted drive (https://blog.sleeplessbeastie.eu/2015/11/16/how-to-mount-encrypted-lvm-logical-volume/)

sudo fdisk -l
#Determine encrypted partition is /dev/nvme0n1p3 because it's the largest
sudo cryptsetup luksOpen /dev/nvme0n1p3 encrypted_device
sudo vgchange -ay

Mount encrypted drive & chroot (https://askubuntu.com/questions/831216/how-can-i-reinstall-grub-to-the-efi-partition)

sudo mount /dev/elementary-vg/root /mnt
sudo mount /dev/nvme0n1p2 /mnt/boot/
sudo mount /dev/nvme0n1p1 /mnt/boot/efi
for i in /dev /dev/pts /proc /sys /run; do sudo mount -B $i /mnt$i; done
sudo chroot /mnt
sudo grub-install
update-grub  

#end chroot & unmount
exit
cd
for i in /mnt/dev/pts /mnt/dev  /mnt/proc /mnt/sys /mnt/run /mnt/boot/efi /mnt/boot /mnt; do sudo umount $i;  done

Java IDRAC 6 Ubuntu 18.04 setup

I recently acquired a Dell PowerEdge R610 and had a hard time getting its iDRAC to work properly on my ElementaryOS setup (Ubuntu 18.04 derivative.) I had two problems: Connection failed error and keyboard not working.

Connection Failed

After much searching I finally found this post:

https://mindlesstux.com/2018/06/21/fix-for-java-8-idrac-6-connection-failed/

The post explains the problem is with the security settings of Java 8+ preventing the connection. I didn’t know where my security file was so I first ran a quick find command to find it:

sudo find / -name java.security

In my case it was located in /etc/java-11-openjdk/security/java.security

The last step was to remove RC4 from the list of blacklisted ciphers, as this is the cause of the problem.

sudo vim /etc/java-11-openjdk/security/java.security

#change jdk.tls.disabledAlgorithms=SSLv3, RC4, DES, MD5withRSA, DH keySize < 1024, \ to be:
jdk.tls.disabledAlgorithms=SSLv3, DES, MD5withRSA, DH keySize < 1024, \

Save and exit, and iDRAC will now load!

Except now…

Keyboard doesn’t work

Update 2022-04-13 I recently had an issue where the keyboard didn’t work despite having Java 8. I fixed it by going to Tools and checking “Pass all keystrokes to server” within the jvm window.

My system was defaulting to using JRE 11, which apparently causes the keyboard to not function at all. I found on this reddit post that you really need an older version of Java. To do so on Ubuntu 18.04 you need to install it along with the icedtea plugin and run update-alternatives

sudo apt install openjdk-8-jre icedtea-8-plugin

Edit /etc/java-8-openjdk/security/java.security and remove the restriction on the RC4 algorhythm. Then configure the system to run java 8:

sudo update-alternatives --config java
#select java 8

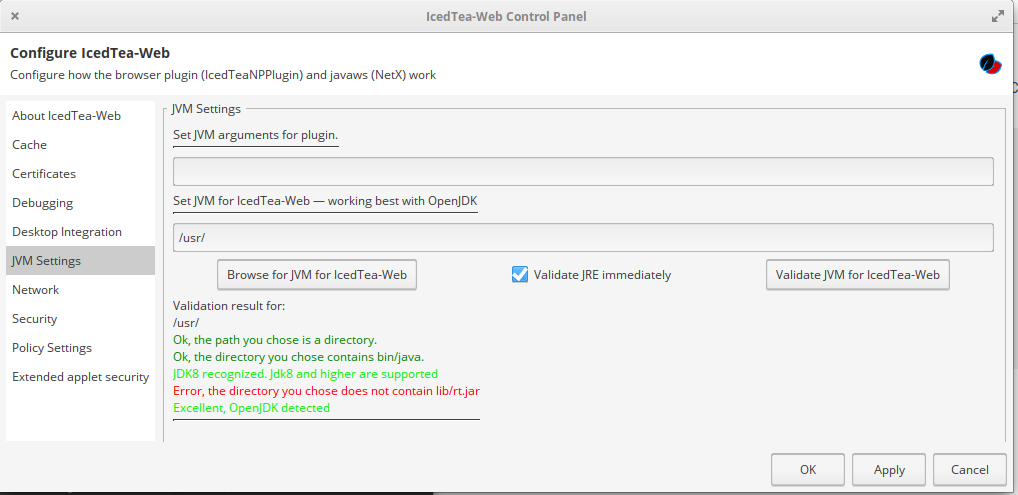
Lastly, configure the icedtea plugin to run Java 8 instead of 11, because for some reason this plugin ignores the system java settings. Launch the IcedTea Web Control panel (find it in your system menu) and then Navigate to JVM settings. Enter /usr/ in the section “Set JVM for IcedTea-Web – working best with OpenJDK” section. Then hit Apply / OK

Phew. FINALLY you should be able to use iDRAC 6 on your modern Ubuntu system.

KeePassRPC incompatible with the current KeePass version

I keep forgetting about this snag so I’ll document it. In Debian / Ubuntu distros, once you’ve added the PPA to have the latest version of KeePass installed, if you try to install the KeePassRPC plugin (Kee) it will tell you the version is incompatible, even though it is.

The following plugin is incompatible with the current KeePass version: /usr/lib/keepass2/Plugins/KeePassRPC.plgx

Have a look at the plugin's website for an appropriate version.

The fix, as found here, is to install the mono-complete package

sudo apt install mono-complete

Restart KeePass after installation. That’s it!

Add Ubuntu PPA key to Debian

Occasionally I want to install packages located at an Ubuntu PPA repository on my Debian stretch machine. There’s a bit of a trick to it, thanks to chrisjean.com for outlining what needs to be done.

Step 1 is the same as in Ubuntu, add the PPA with add-apt-repository (install if it’s not already there)

sudo add-apt-repository ppa:<contributor>/<ppa name>

This will appear to work but when you do an apt update you may get something similar to this

W: GPG error: http://ppa.launchpad.net/jonathonf/gcc-7.1/ubuntu xenial InRelease: The following signatures couldn't be verified because the public key is not available: NO_PUBKEY 8CF63AD3F06FC659
W: The repository 'http://ppa.launchpad.net/jonathonf/gcc-7.1/ubuntu xenial InRelease' is not signed.
N: Data from such a repository can't be authenticated and is therefore potentially dangerous to use.
N: See apt-secure(8) manpage for repository creation and user configuration details.

The last step is to manually import the key with the following command:

sudo apt-key adv --keyserver keyserver.ubuntu.com --recv-keys <KEY_OF_PPA>

The PPA key will be listed on the PPA’s page. Once I ran that second command everything worked swimmingly.

Simple network folder mount script for Linux

I wrote a simple little network mount script for Linux desktops. I wanted to replicate my Windows box as best as I could where a bunch of network drives are mapped upon user login. This script relies on having gvfs-mount and the cifs utilities installed (installed by default in Ubuntu.)

#!/bin/bash
#Simple script to mount network drives

#Specify network paths here, one per line
#use forward slash instead of backslash
FOLDER=(
  server1/folder1
  server1/folder2
  server2/folder2/folder3
  server3/
)

#Create a symlink to gvfs mounts in home directory
ln -s $XDG_RUNTIME_DIR/gvfs ~/Drive_Mounts

for mountpoint in "${FOLDER[@]}"
do
  gvfs-mount smb://$mountpoint
done

Mark this script as executable and place it in /usr/local/bin. Then make it a default startup application for all users:

vim /etc/xdg/autostart/drive-mount.desktop
[Desktop Entry]
Name=Mount Network Drives
Type=Application
Exec=/usr/local/bin/drive-mount.sh
Terminal=false

Voila, now you’ve got your samba mount script starting up for every user.

Install Guacamole 0.9.9 on Ubuntu 15.10

Lately I’ve been trying to upgrade my installation of Guacamole 0.9.8 to 0.9.9. You’d think it would be simple. It is not. I ended up just blowing up my 0.9.8 VM and starting over, this time with Ubuntu 15.10. I found this excellent guide which got me most of the way there, with one small hiccup that took way more time than it should have to figure out.

I will paste the guide I got from the above site for convenience with my added notes for clarification on parts that I had trouble with.

Installation

#!/bin/bash
# WORKING ON UBUNTU 15.10 WITH GUAC 0.9.9 AND TOMCAT8

#Update Everything
apt-get update && apt-get -y dist-upgrade

#Install Stuff
#You will be prompted for a mysql root password. Remember this for the configuration step; change MYSQLROOTPASSWORD to whatever you enter here.
apt-get -y install libcairo2-dev libpng12-dev libossp-uuid-dev libfreerdp-dev libpango1.0-dev libssh2-1-dev libtelnet-dev libvncserver-dev libpulse-dev libssl-dev libvorbis-dev libwebp-dev mysql-server mysql-client mysql-common mysql-utilities tomcat8

# Install libjpeg-turbo-dev
wget -O libjpeg-turbo-official_1.4.2_amd64.deb http://downloads.sourceforge.net/project/libjpeg-turbo/1.4.2/libjpeg-turbo-official_1.4.2_amd64.deb
dpkg -i libjpeg-turbo-official_1.4.2_amd64.deb

# Add GUACAMOLE_HOME to Tomcat8 ENV
echo "" >> /etc/default/tomcat8
echo "# GUACAMOLE EVN VARIABLE" >> /etc/default/tomcat8
echo "GUACAMOLE_HOME=/etc/guacamole" >> /etc/default/tomcat8

#Download Guacamole Files
wget -O guacamole-0.9.9.war http://downloads.sourceforge.net/project/guacamole/current/binary/guacamole-0.9.9.war
wget -O guacamole-server-0.9.9.tar.gz http://sourceforge.net/projects/guacamole/files/current/source/guacamole-server-0.9.9.tar.gz
wget -O guacamole-auth-jdbc-0.9.9.tar.gz http://sourceforge.net/projects/guacamole/files/current/extensions/guacamole-auth-jdbc-0.9.9.tar.gz
wget -O mysql-connector-java-5.1.38.tar.gz http://dev.mysql.com/get/Downloads/Connector/j/mysql-connector-java-5.1.38.tar.gz

#Extract Guac
tar -xzf guacamole-server-0.9.9.tar.gz
tar -xzf guacamole-auth-jdbc-0.9.9.tar.gz
tar -xzf mysql-connector-java-5.1.38.tar.gz

# MAKE DIRECTORIES
mkdir /etc/guacamole
mkdir /etc/guacamole/lib
mkdir /etc/guacamole/extensions

# Install GUACD
cd guacamole-server-0.9.9
./configure --with-init-dir=/etc/init.d
make
make install
ldconfig
systemctl enable guacd
cd ..

# Move files to correct locations
mv guacamole-0.9.9.war /etc/guacamole/guacamole.war
ln -s /etc/guacamole/guacamole.war /var/lib/tomcat8/webapps/
cp mysql-connector-java-5.1.38/mysql-connector-java-5.1.38-bin.jar /etc/guacamole/lib/
cp guacamole-auth-jdbc-0.9.9/mysql/guacamole-auth-jdbc-mysql-0.9.9.jar /etc/guacamole/extensions/

Configuration

# Configure guacamole.properties 
echo "mysql-hostname: localhost" >> /etc/guacamole/guacamole.properties 
echo "mysql-port: 3306" >> /etc/guacamole/guacamole.properties 
echo "mysql-database: guacamole_db" >> /etc/guacamole/guacamole.properties 
echo "mysql-username: guacamole_user" >> /etc/guacamole/guacamole.properties
 
# This is where you will want to change "PASSWORD" 
echo "mysql-password: PASSWORD" >> /etc/guacamole/guacamole.properties 
rm -rf /usr/share/tomcat8/.guacamole 
ln -s /etc/guacamole /usr/share/tomcat8/.guacamole 

# Restart Tomcat Service 
service tomcat8 restart

#Configure the MySQL database
#Make sure you change MYSQLROOTPASSWORD and PASSWORD
mysql -u root -pMYSQLROOTPASSWORD
create database guacamole_db;
create user 'guacamole_user'@'localhost' identified by 'PASSWORD';
GRANT SELECT,INSERT,UPDATE,DELETE ON guacamole_db.* TO 'guacamole_user'@'localhost';
flush privileges;
quit

#Populate the database
#Make sure you change MYSQLROOTPASSWORD
cat guacamole-auth-jdbc-0.9.9/mysql/schema/*.sql | mysql -u root -pMYSQLROOTPASSWORD guacamole_db

After that it should be as simple as logging into your shiny guacamale server as guacadmin/guacadmin.

It wasn’t that simple for me. When I tried to log in all I got was a blank page. Reading the log file /var/log/tomcat8/localhost.<date>.log revealed the following:

Error querying database. Cause: java.sql.SQLException: Access denied for user 'guacamole_user '@'localhost' (using password: YES)

I kept changing and double checking the password for guacamole and couldn’t figure out why it was getting access denied. I even manually logged into mysql with that username and password and it worked, yet guacamole would not load in the browser.

After staring at the log long enough I realized that there is a space before the closing tick on the username. Aha! There were pesky trailing spaces in my guacamole.properties. Removing those spaces did the trick. Always some mundane detail!

Finally I have guacamole 0.9.9 working.

Install Cinnamon on a Wily chromebook chroot

I recently installed Ubuntu Wily Werewolf 15.10 as a chroot on my Chromebook Pixel 2. The process wasn’t as straightforward as I thought it would be so I will document it here.

First, I followed my own guide on how to set up a crouton chroot. The install would not complete – it was complaining about gnome-session-manager. I had to install the chroot with no GUI. This is the command I used (I specify a specific mirror to use because it’s much faster)

sudo sh ~/Downloads/crouton -r wily -t touch,extension,keyboard,cli-extra -e -n cinnamon -m http://mirrors.xmission.com/ubuntu

Once the initial chroot was set up, I installed cinnamon:

sudo apt-get install cinnamon-desktop-environment

After all that was installed, I followed my own guide on configuring cinnamon. I placed the following script in /usr/local/bin/startcinnamon on my chromebook (not the chroot)

APPLICATION="${0##*/}"

USAGE="$APPLICATION [options]

Wraps enter-chroot to start a Mint session.
By default, it will log into the primary user on the first chroot found.

Options are directly passed to enter-chroot; run enter-chroot to list them."

exec sh -e "`dirname "$0"`/enter-chroot" "$@" xinit

And I placed this file within the chroot, in my home directory:

echo "exec cinnamon-session" > ~/.xinitrc

I started by issuing the command

sudo startcinnamon

I noticed things didn’t look quite right. It turned out I was missing some icons.  Fix this by installing them:

sudo apt-get install gnome-icon-theme-full

I then discovered gnome-terminal wouldn’t run – it would simply crash on exit error 8. I discovered that it was due to missing locale settings. The fix was found here, which involves installing the gnome language pack and setting your locale.

sudo apt-get install language-pack-gnome-en
sudo update-locale LANG="en_US.UTF-8" LANGUAGE="en_US"

To instigate the changes you must exit all chroot instances.

That was it! After that bit of tweaking I have an Ubuntu 15.10 chroot working pretty well on my Chromebook Pixel 2.