Tag Archives: Xenserver

Migrate from Sophos UTM to pfSense part 1

I’ve been using a Sophos UTM virtual appliance as my main firewall / threat manager appliance for about two years now. I’ve had some strange issues with this solution off and on but for the most part it worked. The number of odd issues has begun to build, though.

Recently it decided to randomly drop some connections even though logs showed no dropped packets. The partial connections spanned across various networks and devices. I never did figure out what was wrong. After two days of furiously investigating (including disconnecting all devices from the network), the problem went away completely on its own with no action on my part. It was maddening – enough to drive me to pfSense.

As of version 2.2 pfSense can be fully virtualized in Xen, thanks to FreeBSD 10.1. This allowed me the option to migrate. Below are the initial steps I’ve taken to move to pfSense.

Features checklist

I am currently using the following functions in Sophos UTM. My goal is to move these functions to equivalents in pfSense:

  • Network firewall
  • Web Application Firewall, also known as a reverse proxy.
  • NTP server
  • PPPOE client
  • DHCP server
  • DNS server
  • Transparent proxy for content filtering and reporting
  • E-mail server / SPAM protection
  • Intrusion Detection system
  • Anti-virus
  • SOCKS proxy
  • Remote access portal (for downloading VPN configurations, etc)
  • Citrix Xenserver support (for live migration etc)
  • Log all events to a syslog server
  • VPN server
  • Daily / weekly / monthly e-mail reports on bandwidth usage, CPU, most visited sites, etc.

I haven’t migrated all of these function over to pfSense which is why this article is only Part 1. Here is what I have done so far.

Xenserver support

Installing xen tools is fairly straightforward thanks to this article. It’s simply a matter of dropping to a shell on your pfSense VM to install and enable xen tools

pkg install xe-guest-utilities
echo "xenguest_enable=\"YES\"" >> /etc/rc.conf.local
ln -s /usr/local/etc/rc.d/xenguest /usr/local/etc/rc.d/xenguest.sh 
service xenguest start

PPPoE client

The wizard works fine for configuring PPPOE, however I experienced some very strange issues with internet speed. Downstream would be fine but upstream would be incredibly slow. Another symptom was NAT / port forwarding appearing not to work at all.

It turns out the issue was pfSense’s virtualized status. There is a bug in the virtio driver that handles virtualized networking. You have to disable all hardware offloading on both the xenserver hypervisor and the pfSense VM to work around the bug. Details on how to do this can be found here. After that fix was implemented, speed and performance went back to normal.

DNS server

To get this working like it did in Sophos you have to disable the default DNS resolver service and enable the DNS forwarder service instead. Once DNS forwarder is enabled, check the box “register DHCP leases in DNS” so that DHCP hostnames come through to clients.

Syslog

Navigate to Status / system logs / settings tab and  tick “Send log messages to remote syslog server” and fill out the appropriate settings.

Note for Splunk users: the Technology Add-on for parsing pfsense logs expects the sourcetype to equal pfsense (not syslog). Create a manual input for logs coming from pfsense so it’s tagged as pfsense and not syslog (thanks to this post for the solution on how to get the TA to work properly.)

VPN

OpenVPN – wizard ran fine. Install OpenVPN Client Export utility package for easy exporting to clients. Once package is installed go to VPN / OpenVPN and you will see a new tab – Client Export.

Note you will need to create a user and check the “create certificate” checkbox or add a user certificate to existing user by going to System / User manager, Editing the user and clicking the plus next to User Certificates. The export utility will only show users that have valid certificates attached to them. If no users have valid certificates the Client Export tab will be blank.

Firewall

One useful setting to note is to enable NAT reflection. This allows you to access NATed resources as if you were outside the network, even though you are inside it. Do this by going to System / Advanced and clicking on the Firewall / NAT tab. Scroll halfway down to find the Network Address Translation section. Change NAT reflection mode for port forwards to Enable (Pure NAT)

It’s also very helpful to configure host and port aliases by going to Firewall / Aliases. This is roughly equivalent to creating Network and Host definitions in Sophos. When you write firewall rules you can simply use the alias instead of writing out hosts IPs and ports.

So far so good

This is the end of part 1. I’ve successfully moved the following services from Sophos UTM to pfSense:

  • Network firewall
  • PPPOE client
  • Log all events to a syslog server
  • VPN server
  • NTP server
  • DHCP server
  • DNS server
  • Xenserver support

I’m still working on moving the other services over. I’ve yet to find a viable alternative to the web application firewall but I haven’t given up yet.
Fix NAT not working with pfSense in Xenserver

After a few very frustrating experiences I’ve decided I want to migrate away from Sophos UTM for my home firewall. I enjoy Sophos’ features but do not enjoy the sporadic issues it’s been giving me.

My colleagues all rave about pfSense and how awesome it is so I thought I would give it a try. I have a completely virtualized setup using Citrix Xenserver 6.5 which has prevented me from trying pfSense in the past. The latest release, version 2.2.2, is based on FreeBSD 10.1, which includes native Xen device support. Now we’re talking.

Installation was quick and painless. After some configuration, the basic internet connection function was working swimmingly. As soon as I tried to forward some ports from my WAN interface to hosts on my network, though, things did not go well at all. I began to doubt my ability to configure basic NAT.

It looks simple enough – go to Firewall / NAT, specify the necessary source and destination IPs and Ports, and click apply. Firewall rules were added automatically. Except it didn’t work. I enabled logging on everything and there were no dropped packets to be found, but they were clearly being dropped. I thought it might be something weird with Sophos being upstream so I built my own private VM network but the issue was the same. NAT simply didn’t work. Silently dropped packets. I am not a fan of them.

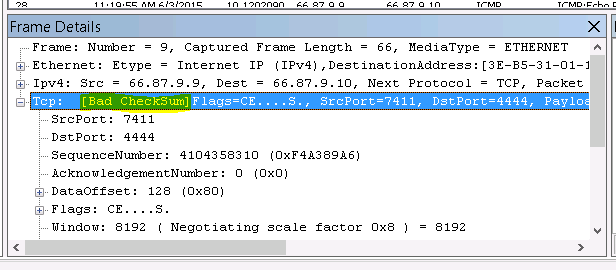
I was about to give up on pfSense but something told me it had to be a problem with my virtualization setup. I ran a packet capture via Diagnostics / Packet capture and after much sifting I found this gem:

checksumAll of my packets sent to the WAN interface returned [Bad CheckSum] that I was only able to discover via packet capture – they weren’t in the logs anywhere.

Armed with this information I stumbled on this forum post and discovered I am not alone in this. There apparently is a bug with FreeBSD 10.1 and the virtIO network drivers used by Xen, KVM, and others that causes it to miscalculate checksums, resulting in either dropped or very slow packets (I experienced both.)

The solution is to disable tx checksum offloading on both the PFsense side and the hypervisor side. In pfSense this is done by going to System / Advanced / Networking and checking “Disable hardware checksum offload”

To accomplish this on the xenserver side, follow tdslot’s instructions from the forum post linked above, replacing vm-name-label with the name of your pfSense VM:

Find your PFsense VM network VIF UUID’s:

[root@xen ~]# xe vif-list vm-name-label="RT-OPN-01"
uuid ( RO)            : 08fa59ac-14e5-f087-39bc-5cc2888cd5f8
...
...
...
uuid ( RO)            : 799fa8f4-561d-1b66-4359-18000c1c179f

Then modify those VIF UUID’s captured above with the following settings (discovered thanks to this post)

  • other-config:ethtool-gso=”off”
  • other-config:ethtool-ufo=”off”
  • other-config:ethtool-tso=”off”
  • other-config:ethtool-sg=”off”
  • other-config:ethtool-tx=”off”
  • other-config:ethtool-rx=”off”
xe vif-param-set uuid=08fa59ac-14e5-f087-39bc-5cc2888cd5f8 other-config:ethtool-tx="off"
xe vif-param-set uuid=799fa8f4-561d-1b66-4359-18000c1c179f other-config:ethtool-tx="off"

Lastly, shutdown the VM and start it again (not reboot, must be a full shutdown and power on.)

It worked! NAT worked as expected and a little bit of my sanity was restored. I can now make the switch to pfSense.

Convert xenserver 6.5 to software RAID 1

I have written previously about how to convert Citrix Xenserver 6.2 to a software RAID 1. When I upgraded to Xenserver 6.5 I found I had to re-install the xenserver instance because the upgrade didn’t recognize the software RAID. When trying to follow my own guide I found that I couldn’t create the array – it gave the following error message:

mdadm: unexpected failure opening /dev/md0

It turns out 6.5 handles RAID differently. You have to manually load the RAID kernel modules before you can create arrays. I was able to get this running successfully thanks to guidance from this site, specifically comments on it by Olli.

The majority of this can simply be copy/pasted into the command window, once drive paths have been updated for your specific setup.

# Prepare /dev/sdd
sgdisk --zap-all /dev/sdd
sgdisk --mbrtogpt --clear /dev/sdd
sgdisk -R/dev/sdd /dev/sdc # Replicate partion table from /dev/sdc to /dev/sdd with unique identifier
sleep 5 # Sleep 5 seconds here if you script this…
sgdisk --typecode=1:fd00 /dev/sdd
sgdisk --typecode=2:fd00 /dev/sdd
sgdisk --typecode=3:fd00 /dev/sdd
sleep 5 # Sleep 5 seconds here if you script this…
modprobe md_mod # load raid, because it isn't load by default (XS6.5 only)
yes|mdadm --create /dev/md0 --level=1 --raid-devices=2 --metadata=0.90 /dev/sdd1 missing # Create md0 (root)
yes|mdadm --create /dev/md1 --level=1 --raid-devices=2 --metadata=0.90 /dev/sdd2 missing # Create md0 (swap)
yes|mdadm --create /dev/md2 --level=1 --raid-devices=2 --metadata=0.90 /dev/sdd3 missing # Create md0 (storage)
sleep 5 # Sleep 5 seconds here if you script this…
mkfs.ext3 /dev/md0 # Create root FS
mount /dev/md0 /mnt # Mount root FS
cp -xR --preserve=all / /mnt # Replicate root files
mdadm --detail --scan > /mnt/etc/mdadm.conf #generate RAID configuration
sed -i 's/LABEL=[a-zA-Z\-]*/\/dev\/md0/' /mnt/etc/fstab # Update fstab for new RAID device
mount --bind /dev /mnt/dev
mount -t sysfs none /mnt/sys
mount -t proc none /mnt/proc
chroot /mnt /sbin/extlinux --install /boot
dd if=/mnt/usr/share/syslinux/gptmbr.bin of=/dev/sdd
chroot /mnt
mkinitrd -v -f --theme=/usr/share/splash --without-multipath /boot/initrd-`uname -r`.img `uname -r`
exit
sed -i 's/LABEL=[a-zA-Z\-]*/\/dev\/md0/' /mnt/boot/extlinux.conf # Update extlinux for new RAID device
cd /mnt && extlinux --raid -i boot/
sgdisk /dev/sdd --attributes=1:set:2

#Unmount filesystems and reboot
cd
umount /mnt/dev
umount /mnt/sys
umount /mnt/proc
umount /mnt
sync
reboot

Tell BIOS to use disk B
After reboot to disk B…

sgdisk -R/dev/sdc /dev/sdd # Replicate partition table from /dev/sdd to /dev/sdc with unique identifier
sgdisk /dev/sdc --attributes=1:set:2
sleep 5 # Sleep 5 seconds here if you script this…
mdadm -a /dev/md0 /dev/sdc1
mdadm -a /dev/md1 /dev/sdc2
mdadm -a /dev/md2 /dev/sdc3 # If this command gives error, you need to forget/destroy an active SR first
#This next command is the only command you have to manually update before pasting in. Find the UUID of your xenserver host and paste it between the <> below
xe sr-create content-type=user device-config:device=/dev/md2 host-uuid=<UUID of xenserver host> name-label="RAID 1" shared=false type=lvm
# Watch rebuild progress and wait until no arrays are rebuilding before proceeding with any reboot
watch “mdadm --detail /dev/md* | grep rebuild”

Done!

Reclaim lost space in Xenserver 6.5

Storage XenMotion is awesome. It allows me to spin up a second Xenserver host and live migrate VMs to it whenever I need to do maintenance on my primary xenserver host. I don’t need an intermediary storage device such as a NAS – the two hosts can exchange live, running VMs directly. No downtime!

An unfortunate side effect of using Storage XenMotion is that sometimes it doesn’t clean itself up very well. It takes several snapshots in the migration process and they sometimes get “forgotten about.” This results in inexplicable low disk space errors such as this one:

The specified storage repository has insufficient space

..despite there being plenty of space.

This article explains how to use the coalesce option to reclaim space by issuing the following command:

xe host-call-plugin host-uuid=<host-UUID> plugin=coalesce-leaf fn=leaf-coalesce args:vm_uuid=<VM-UUID>

Unfortunately that didn’t seem to do anything for me. Digging into the storage underpinnings I can see that there are a lot of logical volumes hanging out there not being used:

xe vdi-list sr-uuid=<UUID of SR without space>

This revealed a lot of disks floating around in the SR that aren’t being used (I know this by looking at that same SR inside xencenter.) Curiously there is a VDI with identical names but with different UUIDs, despite my not having any snapshots of that VM.

I was about to start using the vgscan command to look for active volume groups when I got called away. Hours later, when I got back to my task, I found that all the space had been freed up. Xenserver had done its own garbage collection, albeit slowly. So, if you’ve tried to use xenmotion and found you have no space.. give xenserver some time. You might just find out that it will clean itself up.


Update 05/20/2015

I ran into this problem once more. I read from here that simply initiating a scan of the storage repository is all you need to do to reclaim lost space. Unfortunately when I ran that the scan nothing changed. A check of /var/log/SMlog revealed the following error (thanks to ap’s blog for the guidance)

SM: [30364] ***** sr_scan: EXCEPTION XenAPI.Failure, ['INTERNAL_ERROR', 'Db_exn.Uniqueness_constraint_violation("VDI", "uuid", "3e616c49-adee-44cc-ae94-914df0489803")']
...
Raising exception [40, The SR scan failed  [opterr=['INTERNAL_ERROR', 'Db_exn.Uniqueness_constraint_violation("VDI", "uuid", "3e616c49-adee-44cc-ae94-914df0489803")']]]

For some reason one of the ISOs in one of my SRs was throwing an error – specifically a Xenserver operating system fixup iso, which was causing the coalescing process to abort. I didn’t care if I lost that VDI so I nuked it:

xe vdi-destroy uuid="3e616c49-adee-44cc-ae94-914df0489803"

That got me a little father, but I still wasn’t seeing any free space. Further inspection of the log revealed this gem:

SMGC: [7088] No space to leaf-coalesce f8f8b129[VHD](20.000G/10.043G/20.047G|ao) (free
 space: 1904214016)

I read that if there isn’t enough space, a coalesce can’t happen on a running VM. I decided to shut down one of my VMs that was hogging space and run the scan again. This time there was progress in the logs. It took a while, but eventually my space was restored!

Moral of the story: if your server isn’t automatically coalescing to free up space, check /var/log/SMlog to see what’s causing it to choke.

PCI passthrough with Xenserver 6.2

PCI passthrough is a great way to mix virtualization with bare metal hardware. It allows you to pass physical hardware to virtual machines. In order to do PCI passthrough you will need compatible hardware (a CPU and chipset that support it.) Intel’s nomenclature for this is VT-d; AMD’s is IOMMU. It’s difficult (although not impossible) to get consumer level hardware that supports this. It’s much easier to obtain with server grade hardware.

Why would you want to pass physical hardware to virtual machines? In my case, it’s to turn a single system into a super server. Instead of having separate physical systems for NAS, gaming, and TV recording (my three uses) you can have one physical system do all three. While this is possible with one single OS, it’s much easier to manage these functions if they are in their own separate OS (especially if you’re using appliance VMs such as FreeNAS.) PCI Passthrough allows you to get the best of both worlds – better security by isolating functions, easier backup/restore, and physical hardware access.

Citrix Xenserver 6.2 supports PCI passthrough beautifully. A great comprehensive guide on how to configure PCI passthrough can be found here.

Xenserver 6.2 no longer requires any configuration beforehand to get PCI passthrough to work. To pass a device to a VM all you need to do is obtain its the bus, device, function (B:D.F) via lspci, then pass that through to the VM.

lspci
<several lines deleted>
06:00.0 Ethernet controller: Atheros Communications AR8131 Gigabit Ethernet (rev c0)

The B:D.F of the above device (a network adapter) is 06:00.0. To then pass this device to a virtual machine we use the xe vm-param-set command with the other-config:pci= parameter, adding 0/0000: to the beginning of the B:D.F, then specifying the UUID of the VM in question.

xe vm-param-set other-config:pci=0/0000:06:00.0 uuid=db4c64e1-44ce-f9f3-3236-0d86df260249

If the VM is running when you issue that command, make sure to shut down (not reboot) the VM, then start it up again.

To add multiple devices to the same VM, simply separate each B:D.F with a comma, like so:

xe vm-param-set other-config:pci=0/0000:06:00.0, 0/0000:07:00.0 uuid=db4c64e1-44ce-f9f3-3236-0d86df260249

Sometimes if you pass multiple PCI devices to a single VM only one of those devices is recognized by the VM. If that is the case, try passing the B:D.F of each piece of hardware in a different order

If you ever want to remove a hardware mapping to a VM, issue the following:

xe vm-param-clear param-name=other-config uuid=<UUID of VM>

There is still a case where you want to modify Xenserver’s configuration with regard to PCI passthrough. On occasion you will have hardware that you do not want the hypervisor to ever know about (in the above example, the hypervisor can use the hardware until you power on a VM that has passthrough enabled for it.)

In my case, I don’t want the hypervisor to ever see the storage controller I’m passing to my NAS VM. I found this out the hard way. If you don’t modify your xenserver configuration to ignore storage controllers that you then pass through to a VM, the entire hypervisor will completely lock up if you happen to reboot that VM. Why? Because when that VM reboots it releases the storage controller back to the hypervisor, which promptly enumerates and re-names all of its attached drives. It often leads to a case of re-naming /dev/sda, promptly “losing” the root device, and kernel panicking.

So, if you are passing things you never want the hypervisor to see, you need to modify its boot configuration to “hide” those devices from it. Edit /boot/extlinux.conf and append pciback.hide=(B:D.F) to the Linux command line, right after the splash parameter

vi /boot/extlinux.conf 
<navigate to right after the word splash>
i
pciback.hide=(06:00.0)(01:00.0)
<esc> :wq
extlinux -i /boot

The above example excludes two devices. Multiple devices simply go next to each other in their own parenthesis, but the format is the same if you only passing a single device.

Reboot the hypervisor, and you are good to go. You can now pass hardware through to VMs to your heart’s content.

FreeNAS PCI Passthrough dev_taste error message

After getting my xenified FreeNAS up and running I noticed an oddity with disk reporting. When I pulled up the reports tab I noticed ada0 never showed any activity, despite my knowing that disk is doing plenty.

The mystery became greater when I noticed these error messages in my logs:

g_dev_taste: make_dev_p() failed (gp->name=ada0, error=17)

After some research I discovered here that disks passed through to a VM via Xen’s PCI Passthrough function present themselves to FreeBSD in a peculiar manner. In particular, the first disk in the passthrough array presents itself as ada0, despite the boot disk also having the name of ada0. With two disks named ada0 it’s a tossup on which one shows up in reporting, not to mention the strange errors above.

The fix is to add BSD parameter to not start disk numbering at ada0. For FreeNAS, you do this via the tunables section (System / Tunables / Add Tunable.) Add the following tunable:

variable: hint.ada.0.at
Value: scbus100
Comment: ada0 PCI passthrough fix
Enabled: true

Once that is configured, reboot FreeNAS. You will now have proper reporting of all your passthrough disks and the strange dev_taste errors will be gone.

Convert xenserver .xva file to raw disk image

What if you want to migrate a VM that’s been living on Citrix Xenserver to a different linux machine running vanilla Xen? The process isn’t as straightforward as you might think. Fortunately thanks to Eriklax over at github there is a fairly easy way to convert xenserver’s .xva virtual machines to other formats, via xva-img.

The first step is to download and install xva-img from github.

wget https://github.com/eriklax/xva-img/archive/master.zip
unzip master.zip
cd xva-img-master
cmake .
sudo make install

When trying to compile this on my Linux Mint Cinnamon machine I ran into the following errors:

CMake Error: your CXX compiler: "/usr/bin/c++" was not found.   Please set CMAKE_CXX_COMPILER to a valid compiler path or name.
xva-img-master/src/sha1.cpp:20:25: fatal error: openssl/sha.h: No such file or directory
 #include <openssl/sha.h>

I had to install the build-essential and libssl-dev packages in order to successfully compile and install xva-img.

Now that it’s installed, create a directory and extract your .xva file into it.

mkdir my-virtual-machine 
tar -xf <.xva file> -C my-virtual-machine 
chmod -R 755 my-virtual-machine

Once that’s finished (it might take a while – it took over an hour for me) the last step is to convert the extracted directories into a raw disk file.

Note:  when you extract your VM tar creates subfolders for each hard disk attached to the VM. You will have to run this command for each Ref folder that was generated as part of the image extraction process.

xva-img -p disk-export my-virtual-machine/Ref\:1/ disk.raw

It took a while for some reason, but it did eventually generate the desired image.

Now that I have a raw disk image I can transfer it to an LVM partition for use with xen:

sudo dd if=win8.1.img of=/dev/desktop-xen/Win8.1 bs=64M

Success.

Convert xenserver installation to software RAID-1

Update 2/28/2015:  I have a newer article explaining how to do this in Xenserver 6.5.


After having a hard drive nearly die on me and threaten to obliterate the VMs living on it I realized it would be a good idea to have my xenserver installation live on a RAID array.

Following this guide I was able to successfully migrate my running xenserver installation to a software based RAID 1, with a few tweaks. In my case I wanted to migrate from a single old drive to two newer ones.

Below are the steps I took to accomplish this.

Partition the new drives

This assumes that your current drive resides on /dev/sda, and your two new drives are /dev/sdb and /dev/sdc.

sgdisk -p /dev/sda
sgdisk --zap-all /dev/sdb
sgdisk --zap-all /dev/sdc
sgdisk --mbrtogpt --clear /dev/sdb
sgdisk --mbrtogpt --clear /dev/sdc
sgdisk --new=1:34:8388641 /dev/sdb
sgdisk --new=1:34:8388641 /dev/sdc
sgdisk --typecode=1:fd00 /dev/sdb
sgdisk --typecode=1:fd00 /dev/sdc
sgdisk --attributes=1:set:2 /dev/sdb
sgdisk --attributes=1:set:2 /dev/sdc
sgdisk --new=2:8388642:16777249 /dev/sdb
sgdisk --new=2:8388642:16777249 /dev/sdc
sgdisk --typecode=2:fd00 /dev/sdb
sgdisk --typecode=2:fd00 /dev/sdc

The third partition (VM storage) had to be tweaked a bit since these are larger drives than the current xenserver installation. I simply used gdisk instead of sgdisk for this task.

gdisk /dev/sdb
n #create new partition
<enter> #accept defaults for partition number, first, and last sectors
<enter>
<enter>
t #select partition type
3 #select partition number 3
fd00  #set for raid
w   #write changes to disk

Repeat above steps for the other disk (/dev/sdc in my case)

Create the RAID arrays for each partition

mdadm --create /dev/md0 --level=1 --raid-devices=2  /dev/sdb1 /dev/sdc1
mdadm --create /dev/md1 --level=1 --raid-devices=2 /dev/sdb2 /dev/sdc2
mdadm --create /dev/md2 --level=1 --raid-devices=2 /dev/sdb3 /dev/sdc3

Watch array build (optional)

cat /proc/mdstat

Alternatively you can use the watch command to get a real time update of the raid build:

watch -n 1 cat /proc/mdstat

Format & mount the array

mkfs.ext3 /dev/md0
mount /dev/md0 /mnt

Copy the root filesystem to the new array

cp -vxpr / /mnt

Install bootloader on the new disks

mount --bind /dev /mnt/dev
mount -t sysfs none /mnt/sys
mount -t proc none /mnt/proc
chroot /mnt /sbin/extlinux --install /boot
dd if=/mnt/usr/share/syslinux/gptmbr.bin of=/dev/sdb
dd if=/mnt/usr/share/syslinux/gptmbr.bin of=/dev/sdc

Generate new initrd image

chroot /mnt
mkinitrd -v -f --theme=/usr/share/splash --without-multipath /boot/initrd-`uname -r`.img `uname -r`
exit

Modify boot file

Edit /mnt/boot/extlinux.conf and replace every mention of the old root filesystem (root=LABEL=xxx) with root=/dev/md0.

vi /mnt/boot/extlinux.conf
:%s/LABEL=<root label>/\/dev\/md0/
:wq

Reboot

Keep the old drive in, but make sure to boot from either one of the member drives of your new array.

Create storage repository

Create new local storage repository with the new RAID array similar to here.

xe sr-create content-type=user device-config:device=/dev/md2 host-uuid=<UUID of xenserver host> name-label="RAID-1" shared=false type=lvm

Migrate VMs / disks

Migrate any disk images or VMs living on the old drive to the new array.

If these VMs / disks are not powered on or being used, it is as simple as pulling up xencenter, right clicking on the VM and clicking move then  select new storage repository.

If the VMs are online you can live migrate them to a different xenserver, then live migrate them back to the proper storage repository.

Remove old storage repository

Following instructions found here.
Note: In my case the transfer returned a strange error but was still successful. I had to restart the XAPI toolstack in order for it to let me remove the old storage repository.

xe sr-list name-label="<name of SR to remove>"
xe pbd-list sr-uuid=<UUID of SR above>
xe pbd-unplug uuid=<UUID of pbd above>
xe sr-forget uuid=<UUID of SR>

Final reboot

Shutdown, disconnect the old drive, and boot back up from the new array. Success.

Configure e-mail alerts (optional)

Now that you have a working RAID array you might want to receive e-mail alerts if there are problems with the array.

First, build an mdadm.conf

mdadm --detail --scan > /etc/mdadm.conf

Modify mdadm.conf to add your desired e-mail address for notifications

sed -i '1i MAILADDR <e-mail address>' /etc/mdadm.conf

Thanks to this site for the sed -i 1i trick.

Lastly, enable the mdadm monitoring service. I found via this site that this is fairly easy to do.  Simply enter these two commands:

service mdmonitor start
chkconfig mdmonitor on

Xenserver uses ssmtp to send e-mail. You can follow this guide on how to set it up for SSL if you happen to have an ISP that blocks port 25 (as I do.) Otherwise modify /etc/ssmtp/ssmtp.conf to suit your needs.

You can generate a test event from mdadm to make sure e-mail is configured properly:

mdadm --monitor --test /dev/md0 --oneshot

To get e-mail alerts to work right I had to ensure that FromLineOverride was NOT set to yes (default). I also had to add this line to /etc/ssmtp/revaliases:

root:<e-mail address being sent from>


Update 02/03/2015:  A commenter made me realize I forgot a step – copying the Control Domain OS to the new Raid array. I’ve added that step above, after the “Format & Mount the array” section.

Update 02/17/2015: If you are using Xenserver 6.5 you might come across the following error message when trying to create RAID arrays:

mdadm: unexpected failure opening /dev/md0

If this happens, load the md kernel driver like so:

modprobe md

It should then let you create your arrays.

Xenserver – The uploaded patch file is invalid

It has been six months since I’ve applied any patches to my Citrix Xenserver hypervisor. Shame on me for not checking for updates. The thing has been humming along without any issues so it was easy to forget about.

In trying to install xenserver patches today I kept getting this error message no matter what I tried:

The uploaded patch file is invalid

After deleting everything I could (including files hanging out in /var/patch) I realized that I was simply Doing It Wrong™. D’oh!

When applying xenserver updates, the expected file extension is .xsupdate. I had been trying to xe patch-upload the downloaded zip file, whereas I was supposed to have extracted those zips before trying to upload them.  This quick little line unzipped all my patch ZIP files for me in one swoop:

find *.zip -exec unzip {} \;

Once everything was unzipped I was able to upload and apply the resulting .xsupdate files without issue.

FreeNAS on Xenserver with PVHVM support

In my current home setup I have a single server performing many functions thanks to Citrix Xenserver 6.2 and PCI Passthrough. This single box is my firewall, webservers, and NAS. My primary motivation for this is power savings – I didn’t want to have more than one box up 24/7 but still wanted all those separate services, some of which are software appliances that aren’t very customizable.

My current NAS setup is a simple Debian Wheezy virtual machine with the on-board SATA controller from the motherboard passed through to it. The VM runs a six drive software RAID 6 using mdadm and LVM volume management on top of it. Lately, though, I have become concerned with data integrity and my use of commodity drives. It prompted me to investigate ZFS as a replacement for my current setup. ZFS has many features, but the one I’m most interested in is its ability to detect and correct any and all corrupted files / blocks. This will put my mind at ease when it comes to the thousands of files that I have which are accessed infrequently.

I decided to try out FreeNAS, a NAS appliance which utilizes ZFS. After searching on forums it quickly became clear that the people at FreeNAS are not too keen on virtualizing their software. There is very little help to be had there in getting it to work in virtual environments. In the case of Xenserver, FreeNAS does work out of the box but it is considerably slower than bare metal due to its lack of support of Xen HVM drivers.

Fortunately, a friendly FreeNAS user posted a link to his blog outlining how he compiled FreeNAS to work with Xen. Since Xenserver uses Xen (it’s in the name, after all) I was able to use his re-compiled ISO (I was too lazy to compile my own) to test in Xenserver.

There are some bugs to get around to get this to work, though. Wired dad’s xenified FreeNAS doesn’t appear to like to boot in Xenserver, at least out of the box. It begins to boot but then hangs indefinitely on the following error:

run_interrupt_drive_hooks: still waiting after 60 seconds for xenbusb_nop_confighook_cb

This is the result of a bug in the version of qemu Xenserver uses. The bug causes BSD kernels to really not like the DVD virtual device in the VM and refuse to boot. The solution is to remove the virtual DVD drive. How, then, do you install FreeNAS without a DVD drive?

It turns out that all the FreeNAS installer does is extract an image file to your target drive. That file is an .xz file inside the ISO. To get wired dad’s FreeNAS Xen image to work in Xenserver, one must extract that .xz file from the ISO, expand it to an .img file, and then apply that .img file to the Xenserver virtual machine’s hard disk. The following commands can be run on the Xenserver host machine to accomplish this.

  1. Create a virtual machine with a 2GB hard drive.
  2. Mount the FreeNAS-xen ISO in loopback mode to get at the necessary file
    mkdir temp
    mount -o loop FreeNAS-9.2.1.5-RELEASE-xen-x64.iso temp/
  3. Extract the IMG file from the freeNAS ISO
    xzcat ~/temp/FreeNAS-x64.img.xz | dd of=FreeNAS_x64.img bs=64k
    

    Note that the IMG file is 2GB in size, which is larger than can sit in the root drive of a default install Xenserver. Make sure you extract this file somewhere that has enough space.

  4. Import that IMG file into the virtual disk you created with your VM in step 1.
    cd ..
    xe vdi-import uuid=<UUID of the 2GB disk created in step 1> filename=FreeNAS_x64.img
    

    This results in an error:

    The server failed to handle your request, due to an internal error.  The given message may give details useful for debugging the problem.
    message: Caught exception: VDI_IO_ERROR: [ Device I/O errors ]
    

    This error can be safely ignored – it did indeed copy the necessary files.
    Note: To obtain the UUID of the 2GB disk you created in step 1, run the “xe vdi-list” command and look for the name of the disk.

  5. Remove the DVD drive from the virtual machine. From Xencenter:
    Shutdown the VM
    Mount xs-toos.iso
    Run this command in a command prompt:

    xe vm-cd-remove uuid=<UUID of VM> cd-name=xs-tools.iso
  6. Profit!

There is one aspect I haven’t gotten to work yet, and that is Xenserver Tools integration. The important bit – paravirtualized networking – has been achieved so once I get more time I will investigate xenserver tools further.