I’ve been wanting to have an out of band (OOB) way to manage my home servers for some time now. Why OOB? Sometimes the regular band fails you, like when the internet connection goes down or when I remote into my firewall and fat finger a setting causing the WAN link to go down. Everything is still up, I just can’t get to it remotely. I then have to drive home to fix it all like a luser. This is especially difficult if I’m out of town.
Enter Freedompop. Freedompop is as Sprint MVNO that offers data-only 4g access for cheap – in this case, completely free if you stay under 500 MB of data a month. I got a freedompop phone so my wife could play Ingress before the iOS client came out. Once the iOS Ingress client was released, the freedompop phone began collecting dust.
Note that this would all be a lot simpler if I just did things the “proper” way, such as purchasing a freedompop access point or paying for a tethering plan.. but what’s the fun in that? My solution is quite convoluted and silly – it uses all three types of SSH tunnels – but it works.. and it was fun!
Hardware
- Local, out of band server: An old laptop with a broken screen running Xubuntu 14.04
- Ethernet cable attached to my local network
- Remote, regularly banded SSH server: My parents’ dd-wrt powered router (any remote ssh server you have access to will do.)
- Phone: Sprint Samsung Galaxy S3 activated on the Freedompop network
- Attached to the out of band server via USB
Software
- openssh-server: Install this on your out of band server so you can SSH into it
- ssh-keygen: used to generate RSA private/public key pair to allow for passwordless SSH logins
- screen: Allows programs to keep running even if SSH is disconnected (optional)
- autossh: Monitors the state of your ssh connection and will continually attempt to re-connect if the connection is lost, effectively creating a persistent tunnel.
- tsocks: Allows you to tunnel all traffic for a specified command through a SOCKS proxy
- Android SSH Server (I use SSH server by Icecold apps.) This is an SSH server for android devices, no root required.
Procedure
My strategy uses a system of tunnels through the intertubes to accomplish what I want.
- Install the OS, openssh-server, autossh, and tsocks on your OOB server, then disconnect it from the internet while keeping it on your local network (I manually configured the IP to not have a default gateway.)
- Install an ssh server on your phone
- Tether your phone to the computer via USB
- Create a dynamic SOCKS proxy tunnel between the OOB server and your phone (Freedompop appears to block internet traffic through USB tethers unless you have a tethering plan, so I had to get creative.)
- Configure tsocks on your OOB server to point to the socks proxy established in step 4
- Use autossh in conjuction with tsocks to initiate a reverse tunnel between your OOB server and the remote SSH server over the 4G connection from your freedompop phone
- (From some other network) SSH into your remote SSH server and create a local tunnel pointing to the remote tunnel created in step 6.
- SSH into your locally created tunnel, and… profit?
Adventure, here we come.
Create private / public keys
First, since we’re going to be creating a persistent tunnel, passwordless login is required. We do this by generating an RSA private/public key pair. Create the key pair on your server as per these instructions:
cd ~/.ssh
ssh-keygen -t rsa

Generating public/private rsa key pair.
Enter file in which to save the key (/home/nicholas/.ssh/id_rsa): oob
Enter passphrase (empty for no passphrase):
Enter same passphrase again:
Your identification has been saved in oob.
Your public key has been saved in oob.pub.
Copy the public key generated (oob.pub in my case) to your phone.
Configure phone SSH server
Create an SSH server on your phone. Configure the user you created to use the public key generated above. Once that’s configured, start the ssh server on the phone, plug the phone into USB cable and plug the other end into server, and activate USB tethering in Android settings.
On the OOB server, find out IP address of tether by issuing the route command. Look for the gateway on the usb0 interface.
route
Destination Gateway Genmask Flags Metric Ref Use Iface
default 192.168.42.129 0.0.0.0 UG 0 0 0 usb0
In my case the gateway IP is 192.168.42.129.
Configure OOB server
Initiate an autossh connection to the usb0 gateway, creating a dynamic (socks) proxy in the process.
autossh 192.168.42.129 -l nicholas -i ~/.ssh/oob -p 34097 -D9999
Argument breakdown:
- -l username to log in as
- -i keyfile to use (passwordless login, optional but recommended)
- -p port to ssh to. This will be random and told to you by the android ssh server on the phone.
- -D port for your dynamic (socks) proxy to bind to. This can be anything of your choosing.
The phone <-> OOB server tunnel is now established. This tunnel will be used to provide 4G internet access to your server.
Next, configure tsocks to use our newly created tunnel. The options we want to modify are Local Networks, server, and server_port.
sudo vi /etc/tsocks.conf

local = 192.168.0.0/255.255.0.0
server = 127.0.0.1
server_port = 9999
You can now use the 4G internet if you prepend tsocks in front of the program you want to use the internet.
Update 07/01/2015 I discovered my off site router changes SSH host keys every reboot. This was causing SSH to fail due to host key mismatches. Disable strict SSH host key checking per this post to get around this:
vi ~/.ssh/config

Host *
    StrictHostKeyChecking no
Update 08/04/2015
I found an even better way than the one above to avoid SSH key changing errors. Simply add the following options to your ssh command:
-o StrictHostKeyChecking=no -o UserKnownHostsFile=/dev/null
That takes care of changing ssh keys for good. Thanks to this site for the info.
Establish tunnel with external server
Now that we have 4g internet we can use autossh to call out to an external SSH server (my parent’s router in my case.) This time we will be initiating a reverse tunnel. It will cause the remote server to listen on a specified port and tunnel all traffic on that port through the SSH tunnel to your local server. Note that you will have to copy your public key generated earlier to this remote host as well.
tsocks autossh <remote server IP/DNS> -p <remote port> -l<remote user> -i <remote keyfile> -R5448:localhost:22
The local <-> remote server tunnel is now established. The remote port to listen on (-R argument) can be anything of your choosing. Remember what port you used for the last step.
Automating connections
Since the SSH connections are interactive I’ve found it easier to run these commands via screen as I outline in this post. To have these tunnels form automatically on startup we will have to make a quick and dirty upstart script as detailed here and further clarified here.
vi /etc/init/tunnel.conf
author "Your name goes here - optional"
description "What your daemon does shortly - optional"

start on started dbus
stop on stopping dbus

# console output # if you want daemon to spit its output to console... ick
# respawn # it will respawn if crashed/killed

script
 screen -dm bash -c "autossh 192.168.42.129 -l nicholas -i /home/nicholas/.ssh/oob -p34097 -D9999"
 sleep 5
 screen -dm bash -c "tsocks autossh dana.jeppson.org -l root -p 443 -i /home/nicholas/.ssh/oob -R5448:localhost:22"
end script
sudo initctl reload-configuration
Accessing your server out of band
Now that we have a tunnel established between our local and remote servers, we can access our local server through the remote server. On the remote server:
ssh localhost -p5448
The -p command of ssh specifies which port to connect to. Since we have a reverse tunnel listening on port 5448, the server will take the ssh connection you’ve initiated and send it through the intertubes to your OOB server over its 4G connection.
If you would rather SSH into your OOB server directly from your laptop instead of through your remote SSH server, you will need to create more tunnels, this time regular local port forwarding tunnels. Why would you possibly want more tunnels? If you want to access things like SSH, VNC or RDP for servers on your network through your OOB tunnel directly to your laptop, it will be necessary to create even more tunnels through the tubes.
First tunnel (to expose the OOB server’s SSH port to your laptop)
ssh <remote server> -L2222:localhost:5448
-L specifies which port your laptop will listen on. The other two parts specify where your laptop will send traffic it sees on that port (from the perspective of the remote SSH server.)
Second tunnel (to expose ports of servers of your choosing to your laptop as well as give you shell access to your local OOB server) You can add as many -L arguments as you wish, one for each address/port combination you wish to access.
ssh localhost -p2222 -L3333:192.168.1.10:3389 ... ...
Why?
If you’ve made it this far, congratulations. This was an exercise in accessing my home network even if the internet connection goes down. You could bypass half of these tunnels if you set up an openvpn server on your out of band server, but that’s a tutorial for another time.
If you followed this madness you would have the following tunnels through the tubes:
- SOCKS proxy tunnel from server to phone
- Remote port forward tunnel from OOB server to remote server
- Local port forward from remote server to your computer
- Local port forward(s) from your computer to anything on your local network through the tunnel created above
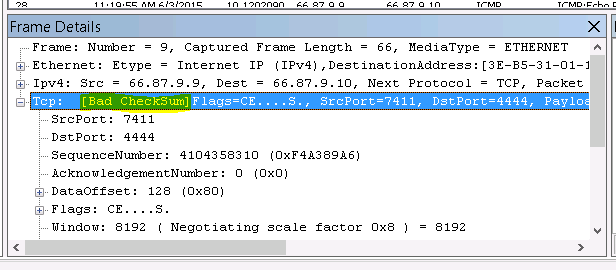 All of my packets sent to the WAN interface returned [Bad CheckSum] that I was only able to discover via packet capture – they weren’t in the logs anywhere.