Category Archives: OS

Delete windows.old folder

Some time ago I upgraded my Windows Server 2012 machine to Windows Server 2012 R2. The upgrade was seamless and the server has hummed along just fine until recently, when it began running out of space.

Windirstat, a great little disk space usage reporting program, reported that the largest hog of space was the windows.old folder. Upon upgrade of the OS, the old Windows folder was renamed to Windows.old to make room for the new OS files and has sat there, untouched, ever since.

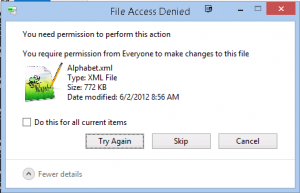
I tried to remove this folder with hilarious results. The folder is owned by TrustedInstaller. Easy enough, I’ll just replace the owner with my own user account, right? Wrong. Even after becoming the owner of the folder and everything inside it, I was prompted that I needed permission from… myself.. to delete the folder. I then tried changing the owner to “Everyone” and receive a rother comical message that I needed permission from Everyone to remove the folder. That would take some time!

everyone
You need permission from everyone.

That’s when I decided to throw in the towel and google. The solution to this problem involves the command line (thanks to here for the information.) Open an administrator command prompt and issue the following commands:

takeown /F c:\Windows.old\* /R /A /D Y
cacls c:\Windows.old\*.* /T /grant administrators:F
rmdir /S /Q c:\Windows.old

That did the trick! No more full disk.

Install ventrilo on Ubuntu 14.04 64bit

Ventrilo is a voice communication server which is popular in the gaming community. It allows teams of people to get together and have voice chats. I recently tried to install vent on a 64bit instance of Ubuntu 14.04. When I tried to execute the server binary, I was greeted with this lovely error message:

bash: ./ventrilo_srv: No such file or directory

It’s a pretty cryptic error message that had me chasing my tail for a while until I came across this post which shed further light on the issue. This error stems from trying to run a 32bit binary on a 64bit system without the proper libraries installed.

A simple

sudo apt-get install lib32z1

Resolved this issue. After those 32bit libraries were installed, vent ran without issue.

Re-enable Windows Defender in Windows 8.1

I recently underwent an exercise in frustration – taking a stock Lenovo G50 laptop and trying to get it into a workable state. Like many lower end laptops it came with a lot of bloatware, not the least of which was Mcafee Antivirus-premium-whatever garbage.

When I removed Mcafee and rebooted, I got a notice that Windows Defender was not enabled. When I clicked to enable it… nothing happened. I tried several times to no avail. I tried manually starting the service and it failed. I tried hard core things like running sfc /scannow and even editing the registry per here, but the issue remained.

Finally I came across this article which showed me how to fix it – simply launch windows defender by hitting start and searching for Windows Defender. Click the big red “Turn On” button. That’s all it takes! Why you can’t do that through the action center or by manually starting services is beyond me. Amazing.

Note: it’s possible that the combination of editing the registry, rebooting, and then launching the Windows Defender program fixed the issue. Whatever – it works now 🙂

Fix tiny text in Windows 8.1

I really enjoy my new Microsoft Surface Pro 3. It has a high DPI screen which makes things very clear and sharp. Unfortunately, when you plug it into an external monitor, many Windows applications don’t deal with the DPI setting properly and thus appear blurry and/or the text is very tiny.

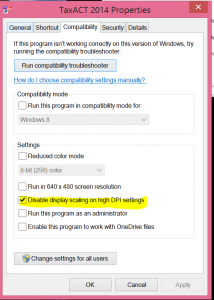
The workaround for this issue is a new compatibility mode setting in Windows 8 – Disable display scaling on high DPI settings. Simply right click on the shortcut of the problem application and go to properties, then go to the Compatibility tab, then check the box.

dpi

Success. Thanks to Microsoft for the information.

Fix sudo being slow after changing hostname

Recently I changed the hostname of one of my machines. Ever since I did this there has been a five second pause from when I enter a command and when it actually executes. I was perplexed about this until I came across this post explaining that the /etc/hosts file was probably still pointing to the old hostname. It turns out it was!

So, to recap, if you want to change the hostname of your machine you have to make sure you do these three things:

  • issue the hostname command to change the hostname while running
  • update /etc/hostname with your new hostname
  • update /etc/hosts to reflect your new hostname after 127.0.0.1 (get rid of the old hostname.)

Update 2/24/2015: If you happen to have a Splunk forwarder installed on the machine, make sure you update its config to reflect the new hostname. Thanks to Splunk Answers for the information.  To do this, update  $SPLUNK_HOME/etc/system/local/server.conf and change the serverName= field to your new hostname.


Install Magic Lantern on Canon EOS 6D

My wife has a fancy new camera – the Canon EOS 6D. It’s an amazing camera with many features, but it is missing one important feature that her old Rebel T2i had – the ability to take multiple shots on a timer. Fortunately, there is a way to add that feature and many more to her camera with a custom firmware known as Magic Lantern.  Magic Lantern works alongside the camera firmware and boots from the SD card. It’s pretty neat.

To install Magic Lantern on my wife’s 6D I had to jump through a few minor hoops. Her camera came with a newer firmware than what Magic Lantern supports, so I had to downgrade it. Once that was done I had to wipe her SD card and install the necessary files, then reboot the camera.

Downgrade firmware

My wife’s camera shipped with firmware version 1.1.4, which is a revision too new. It was difficult to hunt down an old version of the firmware but I eventually found it here. In case that link breaks, I’ve uploaded it here.  The steps to downgrade are as follows:

  1. Copy the FIR file into the root directory of the card.
  2. Move the dial to set the camera into P mode
  3. Insert the SD card and turn the camera on
  4. Press the Multi-controller to select the “Firmware Ver.x.x.x” item at the bottom of the “Set-up 4 (Yellow)”, and then press the <SET> button.
  5. Select [OK] and press <set> and follow the instructions on the screen.
  6. Once it’s complete, power off and remove the battery for 2 seconds

Install Magic Lantern

  1. Copy the necessary magic lantern files to the root of the card. (alternate link)
  2. Go back to the firmware upload screen and initiate another update. This time magic lantern will load and tell you when it’s OK to restart the camera.
  3. Turn the camera off and pull the battery for two seconds.
  4. Tun the camera back on and press the trash can button to access additional features (thanks to this youtube video for helping me figure that last critical part out.)

Done! My wife’s amazing camera just got a lot more amazing.

Speaking of my wife, she’s using the camera I modded with Magic Lantern to take AMAZING pictures! Check out her work at https://emilyjeppson.com

Add folders to libraries in Windows 8.1

I recently purchased a shiny new Microsoft Surface Pro 3. I must say so far I am quite impressed with it. I love the form factor. It’s a laptop or tablet depending on what I want to do with it.

When I’m in tablet mode using “Metro” apps I noticed that many of them require the use of Libraries. It took me longer than I care to admit to figure out how to add folders to libraries so I’m including that here.

In Windows 7 it was pretty easy – right click on the library and do properties, go to folders and add. The default explorer view in Windows 8.1 does not have a Libraries option.. so how do you do it?

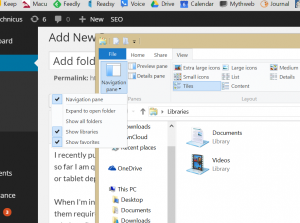
Thanks to this guide I discovered it’s a simple matter of telling Explorer to show Libraries again. Open Explorer, go to the View tab, then click on Navigation Pane (top left), then select Libraries.

libraries

Note: There is no Print Screen key on the surface, press Fn + Space instead.

Once that’s done you can the the Library in the Navigation pane just like you can in Windows 7, and you can add folders to those libraries to your heart’s content.

Mythweb broken after upgrading to Ubuntu 14.04

I recently upgraded my mythbuntu installation from 12.04 to 14.04. For some reason the distribution upgrade tool failed on me. I had to upgrade manually by updating everything in /etc/apt/sources* to point to trusty instead of precise.

After a reboot I was surprised to find out that everything upgraded beautifully except for one thing – mythweb. When I tried to start Apache I was greeted with this lovely message:

* The apache2 configtest failed.
Output of config test was:
AH00526: Syntax error on line 30 of /etc/apache2/sites-enabled/mythweb.conf:
Illegal option AllowAll
Action 'configtest' failed.
The Apache error log may have more information.

It turns out Ubuntu 14.04 uses a different version of Apache with different syntax, which breaks the configuration. Thanks to this post I found the fix to be relatively easy:

sudo rm /etc/apache2/sites-available/mythweb.conf
sudo dpkg-reconfigure mythweb
sudo /etc/init.d/apache2 start

After that was done, all was well and upgraded.

Troubleshooting high CPU usage in Windows 7

My mother’s laptop has been behaving very strangely lately. CPU usage suddenly would spike to 100% usage inexplicably. It seemed to happen more often when Firefox / Thunderbird were launched, but that wasn’t necessarily the case. The issue would often persist across reboots.

My first thought, of course, was malware. An extensive scan via rootkit scanner, malware scanner, spyware scanner, and anti-virus revealed nothing. Observing running processes with process explorer and startup programs with autoruns revealed nothing suspicious. I installed all Windows updates, updated all typical applications with the help of ninite, and even ran sfc /scannow for good measure. The issue remained!

Even more confusing is that when running task manager, process explorer, or performance monitor they all reported 100% CPU usage and with a single process hogging the CPU – themselves! It seemed that whatever was the last process to execute was taking all CPU. It was truly baffling.

A suggestion on superuser.com was to remove the laptop battery and try again. They reported that as the magic bullet for their problem. I had my father remove and re-seat the battery (I was doing all of this remotely.) Magic! Everything worked normally again. Perhaps there was some sort of static electricity buildup causing problems. Truly bizarre.


Fix DNS issues after Yosemite upgrade

My wife’s macbook pro started behaving strangely after upgrading to Yosemite from Mavericks. The initial upgrade went smoothly but over time certain applications began to quit working. The Pandora desktop client suddenly could never connect. Tunnelbick completely broke no matter what I did. Dnslookups all were fine but pings hung forever, eventually saying they couldn’t resolve a hostname.

It turns out that Yosemite changed the way Mac OSX resolves DNS records from mDNSresponder to dnsdiscoveryd. The issue I had only happened from and upgrade – clean installs didn’t have the issue

The fix for this madness, taken from here, is to remove a few network configuration files and reboot.

First, disconnect from any networks you’re connected to. Then, go to /Library/Preferences/SystemConfiguration/ and remove the following files (if they exist)

com.apple.airport.preferences.plist

com.apple.network.identification.plist
com.apple.wifi.message-tracer.plist

NetworkInterfaces.plist

preferences.plist

After removing those files, reboot. That should fix your problem! (At least, it did for me.)