Category Archives: OS

Install Cinnamon on a Wily chromebook chroot

I recently installed Ubuntu Wily Werewolf 15.10 as a chroot on my Chromebook Pixel 2. The process wasn’t as straightforward as I thought it would be so I will document it here.

First, I followed my own guide on how to set up a crouton chroot. The install would not complete – it was complaining about gnome-session-manager. I had to install the chroot with no GUI. This is the command I used (I specify a specific mirror to use because it’s much faster)

sudo sh ~/Downloads/crouton -r wily -t touch,extension,keyboard,cli-extra -e -n cinnamon -m http://mirrors.xmission.com/ubuntu

Once the initial chroot was set up, I installed cinnamon:

sudo apt-get install cinnamon-desktop-environment

After all that was installed, I followed my own guide on configuring cinnamon. I placed the following script in /usr/local/bin/startcinnamon on my chromebook (not the chroot)

APPLICATION="${0##*/}"

USAGE="$APPLICATION [options]

Wraps enter-chroot to start a Mint session.
By default, it will log into the primary user on the first chroot found.

Options are directly passed to enter-chroot; run enter-chroot to list them."

exec sh -e "`dirname "$0"`/enter-chroot" "$@" xinit

And I placed this file within the chroot, in my home directory:

echo "exec cinnamon-session" > ~/.xinitrc

I started by issuing the command

sudo startcinnamon

I noticed things didn’t look quite right. It turned out I was missing some icons.  Fix this by installing them:

sudo apt-get install gnome-icon-theme-full

I then discovered gnome-terminal wouldn’t run – it would simply crash on exit error 8. I discovered that it was due to missing locale settings. The fix was found here, which involves installing the gnome language pack and setting your locale.

sudo apt-get install language-pack-gnome-en
sudo update-locale LANG="en_US.UTF-8" LANGUAGE="en_US"

To instigate the changes you must exit all chroot instances.

That was it! After that bit of tweaking I have an Ubuntu 15.10 chroot working pretty well on my Chromebook Pixel 2.


Fix openVPN on chromebooks

Edit: I’ve updated the script due to more updates in ChromeOS. Find the update here.


Around October of 2015 an update came out to Google Chromebooks that had an unfortunate side effect for me: openvpn no longer worked. Despite my having created a tunnel device seconds earlier, openvpn complained that a tunnel device didn’t exist.

I finally found a fix for this here. It turns out that the update caused the “shill” process to aggressively kill the tun0 interface. The clever workaround as posted by pippo0312 works flawlessly. It involves creating the openvpn tunnel in chromium itself rather than in a crouton chroot as I had previously done.

The original script took an argument for an ovpn file to use. Since I only have one VPN profile I just modified it to specify the ovpn file I use.

Place the script in /usr/local/bin on your chrome install (not a chroot) and mark it executable by issuing chmod +x

#!/bin/sh -e
trap '' 2
# Stop shill and restart it with a nicer attitude towards tun0
sudo stop shill
sudo start shill BLACKLISTED_DEVICES=tun0
# Sleep 10 seconds to allow chromebook to reconnect to the network
sudo sleep 10
sudo openvpn --mktun --dev tun0
sudo sleep 3
# Add google DNS on top of current ones, since openvpn command does not do it
sudo sed -i '1s/^/# new DNS\nnameserver 8.8.8.8\nnameserver 8.8.4.4\n# old DNS\n/' /var/run/shill/resolv.conf
# Lauch openvpn, finally...
sudo openvpn --config $1 --dev tun0
# When ctrl-c is hit remove tun0 and cleanup the DNS
sudo openvpn --rmtun --dev tun0
sudo sed -i '/# new DNS/,/# old DNS/d' /var/run/shill/resolv.conf
trap 2

Now you can just issue the command of the name of your script and vpn works again! hooray.

Linux two factor user exception

Two factor authentication is much more security than simply password authentication. There are times, though, that you will want to create an exception for a specific user. In my case, I wanted to allow a vulnerability scanner to scan my systems. Rather than turn  two factor off for the duration of the scan, I set out to learn how to add an exception for a specific user. I accomplished this on CentOS 6 Linux, but it works an any Linux version using PAM.

The solution to my problem is the pam_listfile PAM module. Pam_listfile allows you to specify a text file that contains a list of either users or groups. You then tell PAM what to do with the file (allow, deny) as well as how to handle what to do if it can’t read the file for some reason.

Thanks to this site I learned the details of what to do. In my case I want a single username to not be prompted for a 2nd authentication factor. All other users must use two factors. I created the file /etc/scan_user and added the username I wanted to have the exception:

echo "scanuser" > /etc/scanuser

Then I modified /etc/pam.d/password-auth and placed it after the first authentication factor, but before the second.

vi /etc/pam.d/password-auth
#First authentication factor
auth        required    pam_unix.so

#pam_listfile to check username and see if it's allowed with only one factor or must provide a second
auth        sufficient  pam_listfile.so onerr=fail item=user sense=allow file=/etc/qualys_user

#Second authentication factor. This is only reached if the user is not on the list provided in pam_listfile.
auth        required   pam_google_authenticator.so

The PAM configuration is as follows:

  • First factor required for everyone (pam_unix)
  • pam_listfile sufficient for anyone who matches the provided list.
  • Second factor required for everyone else (anyone who wasn’t on the pam_listfile list

My vulnerability scanner is now happy and I still have two factor authentication enabled for every other user in the system. Success.


Configure ARC welder to access local folder

ARC Welder is an amazing tool. It’s a chrome extension that allows you to take an android APK file and convert it into a chrome extension. This means you can run android apps on any device with Chrome installed. Sweet!

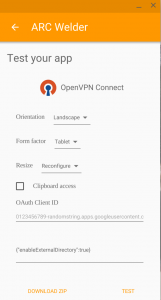
I came across a need for an arc welder app to access my local filesystem. I wanted to share a file that was on my host system with the android app. After some digging I came across this forum post which details what you need to do.

The solution is specify a certain option when using arc welder:

{"enableExternalDirectory": true}

You do this on the final screen before you click test app / download zip.

Screenshot 2016-01-28 at 1.24.25 PM

Arc welder will prompt you to pick a folder. Once that’s done, you can navigate to the Downloads folder in your app and your linked folder will be there. Pretty slick.

(No, OpenVPN ended up not working, but I wanted to save this knowledge in case I want to try a different app that needs / creates files.)

Configure HDHR Viewer XMLTV in CentOS Linux

Recently I’ve accomplished the herculean task of setting up my parents’ cable connection to stream through Plex using a HD Homerun 3 cablecard network tuner. It works! This is how I got XMLTV guide working for the HDHR Viewer plugin for Plex on CentOS 7 Linux.

Required reading: http://hdhrviewer.zynine.net/hdhrviewerv2-initial-setup/xmltv-zap2xml/

First, install and configure the required perl and java packages

sudo yum install perl-Compress-Zlib perl-HTML-Parser perl-HTTP-Cookies perl-LWP-Protocol-https perl-JSON gcc cpan java-1.7.0-openjdk-headless 
sudo cpan JSON::XS 
#accept all defaults when prompted

Download the zap2xml perl module (zap2xml.pl) Place it somewhere it can be easily accessed.

Test to make sure the script will run properly:

perl zap2xml.pl -u <zap2it username> -p <zap2it password>

If you get an error like this:

Can't locate Compress/Zlib.pm in @INC (@INC contains: /usr/local/lib64/perl5 /usr/local/share/perl5 /usr/lib64/perl5/vendor_perl /usr/share/perl5/vendor_perl /usr/lib64/perl5 /usr/share/perl5 .) at zap2xml.pl line 26.

It means you haven’t installed the correct perl modules. Double check that you installed them all.

Once we know it runs properly e need to configure a cron job to run zap2xml daily (to make sure the guide data is always up to date.)

crontab -e
#press i to begin inserting
0 0 * * * perl <full path to where you downloaded zap2xml>/zap2xml.pl -u <zap2it e-mail> -p <zap2it password>
#ESC :wq to save and exit


Next download and unzip the Channel Guide app. I placed it in the same place I downloaded zap2xml to keep things simple.

Test it out to make sure it works:

java -jar channel-guide-app-0.0.3.jar server app-config.yml

If it starts and doesn’t crash, you know it’s working.

Now we want to configure the channel guide app to run on startup

sudo vi /etc/systemd/system/channelguide.service
[Unit]
Description=Plex Channel Guide

[Service]
TimeoutStartSec=0
ExecStart=/usr/bin/java -jar <full path to channel-guide dir>/channel-guide-app-0.0.3.jar server <full path to channel-guide dir>/app-config.yml

[Install]
WantedBy=multi-user.target

Make sure this systemd service is enabled:

sudo systemctl enable /etc/systemd/system/channelguide.service

Lastly make sure you’ve configured the HDHRViewer plugin in Plex to use xmltv and rest API as per the how-to on their site.

Success!

Change the hostname on a Splunk Indexer

Recently I set about to change the hostname on a Splunk indexer. It should be pretty easy, right? Beware. It can be pretty nasty! Below is my experience.

I started with the basics.

  • hostname command
    hostname <newhostname>
  • Modify /etc/system/network to make it persistent (CentOS specific)
    sed -i 's/<old hostname>/<new hostname>/g' /etc/system/network
  • Inform Splunk of the hostname change
    sed -i 's/<old hostname>/<new hostname>/g' $SPLUNK_HOME/etc/system/local/server.conf
  • Restart Splunk

Sadly, that wasn’t the end of it. I noticed right away Splunk complained of a few things:

TcpOutputProc - Forwarding to indexer group default-autolb-group blocked for 300 seconds.
WARN TcpOutputFd - Connect to 10.0.0.10:9997 failed. Connection refused

Running

netstat -an | grep LISTEN

revealed that the server was not even listening on 9997 like it should be. I found this answer indicating it could be an issue with DNS tripping up on that server. I edited $SPLUNK_HOME/etc/system/local/inputs.conf with the following:

[splunktcp://9997]
connection_host = none

but I also noticed that after I ran the command a short time later it was no longer listening on 9997. Attempting to telnet from the forwarder to the indexer in question revealed the same results – works at first, then quit working. Meanwhile no events are getting stored on that indexer.

I was pulling my hair out trying to figure out what was happening. Finally I discovered this gem on Splunk Answers:

Are you using the deployment server in your environment? Is it possible your forwarders’ outputs.conf got deployed to your indexer?

On the indexer:
./splunk cmd btool outputs list –debug

Sure enough! after running

./splunk cmd btool outputs list --debug

I discovered this little gem of a stanza:

/opt/splunk/etc/apps/APP_Forwarders/default/outputs.conf [tcpout]

That shouldn’t’ have been there! Digging into my deployment server I discovered that I had a server class with a blacklist, that is, it included all deployment clients except some that I had listed. The blacklist had the old hostname, which meant when I changed the indexer’s hostname it no longer matched the blacklist and thus was deployed a forwarder’s configuration, causing a forwarding loop. My indexer was forwarding back to the forwarder everything it was getting from the forwarder, causing Splunk to shut down port 9997 on the offending indexer completely.

After getting all that set up I noticed Splunk was only returning searches from the indexers whose hostnames I had not changed. Everything looked good in the distributed search arena – status was OK on all indexers; yet I still was not getting any results from the indexer whose name I had changed, even though it was receiving events! This was turning into a problem. It was creating a blind spot.

Connections great, search status great, deployment status good.. I didn’t know what else to do. I finally thought to reload Splunk on the search head that had been talking to the server whose name I changed. Success! Something in the search head must have made it blind to the indexer once its name had changed. Simply restarting Splunk on the search head fixed it.

In short, if you’re crazy enough to change the name of one of your indexers in a distributed Splunk environment, make sure you do the following:

  • Change hostname on the OS
  • Change ServerName in Splunk config files
    • Add connection_host = none in inputs.conf (optional?)
  • Clean up your deployment server
    • Delete old hostname from clients phoning home
    • MAKE SURE the new hostname won’t be sucked up into an unwanted server class
  • Clean up your search head
    • Delete old hostname search peer
    • Add new hostname search peer
    • Restart search head
  • Profit

Configure VMWare View Smartcard in Ubuntu

Recently I’ve been required to use a smart card to log into some servers I manage. Configuring my Linux Mint 17.2 machine to pass my smartcard through to those machines via VMWare View has not been straightforward. This guide will walk you through how to get Smartcard redirection to work with VMWare View in Ubuntu 14.04 Trusty Tahr, which Linux Mint 17.2 is based off of. Enjoy.

Procedure

  1. Install the latest version of the VMWare View client (distro versions are often quite out of date) from here
    chmod +x VMware-Horizon-Client-3.5.0-2999900.x64.bundle 
    sudo ./VMware-Horizon-Client-3.5.0-2999900.x64.bundle
  2. Install necessary packages for CommonAccessCard (thanks to this helpful ubuntu writeup)
    sudo apt-get install libpcsclite1 pcscd pcsc-tools
  3. (re)Start the pcscd daemon
    sudo /etc/init.d/pcscd restart
  4. Ensure your smartcard reader is properly identified by running this command:
    pcsc_scan

    If that command is stuck on “Waiting for the first reader…” then you need to install your smartcard drivers. If it sees your smartcard, skip this next step and proceed to step 6.

  5. Install your smartcard driver. This process is different for each card. For the card reader I have (the Identive SCR3500 A Contact Reader), I was able to obtain the drivers after much difficulty from here. The link to the drivers itself are here (alternate link). In my case I was able to untar and run the install script, which worked beautifully.
  6. Install 32 bit compatibility libraries (only applicable for 64 bit installations) thanks to this site for the answer and this one for clarification
    sudo dpkg --add-architecture i386
    sudo apt-get update
    sudo apt-get install -y libxml2:i386 libssl1.0.0:i386 libXtst6:i386 libudev1:i386 libpcsclite1:i386 libtheora0:i386 libv4l-0:i386 libpulse0:i386
    sudo ln -sf /lib/i386-linux-gnu/libudev.so.1 /lib/i386-linux-gnu/libudev.so.0
    sudo ln -sf /lib/i386-linux-gnu/libssl.so.1.0.0 /lib/i386-linux-gnu/libssl.so.1.0.1
    sudo ln -sf /lib/i386-linux-gnu/libcrypto.so.1.0.0 /lib/i386-linux-gnu/libcrypto.so.1 
    sudo ln -sf /lib/$(arch)-linux-gnu/libudev.so.1 /lib/$(arch)-linux-gnu/libudev.so.0
  7. (re)Start the vmware-USBArbitrator and vmware-view-USBD services
    sudo /etc/init.d/vmware-USBArbitrator start
    sudo /etc/init.d/vmware-view-USBD start

    For some reason after I did all of this the vmware-view binary was nowhere to be found. It was quite strange. I fixed this issue by removing and re-installing the view client:

    sudo ./VMware-Horizon-Client-3.5.0-2999900.x64.bundle -u vmware-horizon-client
    sudo ./VMware-Horizon-Client-3.5.0-2999900.x64.bundle

    After doing this the binary was there as expected.

  8. Create a config file to instruct the view client to redirect your smartcard reader.
    echo 'viewusb.IncludeFamily = "smart-card"' >> /etc/vmware/config
    echo 'viewusb.AllowSmartcard = "true"' >> /etc/vmware/config

    There is no graphical option to pass devices through like there is in the Windows client. I spent more time than I’d like to admit on this step. It turns out the name of the file is important – it has to simply be called “config.” Place this config file in ~/.vmware (it can also be placed in /etc/vmware/config and/or /usr/lib/vmware/config)

  9. Start vmware-view and enjoy your new smartcard capabilities
    vmware-view

Troubleshooting

If it’s not working, make sure that these services are started

  • pcscd
  • vmware-USBArbitrator
  • vmware-view-USBD

One of these services have been known to crash if you attempt to connect while your smartcard is plugged in. The dance to get around this is to unplug your card reader, re-launch the above services, launch vmware-view, connect to your view server, and then only after you’ve logged in, plug in your card reader.


Update 2/25/2016: Here is the script I use to make my chromebook work beautifully for remoting into work:

sudo /etc/init.d/pcscd restart
sudo /etc/init.d/vmware-USBArbitrator restart
sudo /etc/init.d/vmware-view-USBD restart
setres 1600 1024
vmware-view
setres 2560 1700

Manually update firmware on Nexus devices

The release of Android 6.0.1 had me excited because it enables LTE band 12 for my phone, the Nexus 5X, which currently uses T-mobile. Band 12 is in the 700mhz range which should greatly increase speed and coverage. I’m too impatient to wait for the OTA!

This tutorial will walk you through how to manually backup, unlock, flash, re-lock, and restore a Google Nexus 5X, but the procedure is pretty much the same for any Nexus device.

First, obtain two necessary Android development tools: adb and fastboot. Do not use your distribution’s versions of these tools – they are likely out of date. Instead, download the Android SDK directly from Google by going here and scrolling to the bottom of the page. Java is required for the sdk to install – install it if you haven’t already. Thanks to this site for explaining how to only obtain platform-tools.

sudo apt-get install openjdk-7-jre
tar zxvf android-sdk_r24.4.1-linux.tgz
android-sdk-linux/tools/android update sdk --no-ui --filter 1,platform-tools

Once you have platform-tools you need to add them to your PATH to make scripts run adb successfully (thanks to this site for the information). When you run the command below make sure to update /path/to/… to the folder where you extracted the android-sdk.

echo "export PATH=$PATH{}:/path/to/android-sdk/tools:/path/to/android/platform-tools" >> ~/.bashrc
source ~/.bashrc

Next, obtain the latest firmware for your device from the google developers site. Extract it somewhere you will remember for later.

Now, enable USB debugging on your phone if you haven’t already (thanks to this site for the info.) To do this, go to Settings / About phone, scroll to the bottom and press on the build number 7 times. Press back and go to developer options, and enable USB debugging and enable OEM unlocking. Then plug in your phone to the computer with adb installed and run this command (thanks to xda for the information)

adb backup -apk -shared -all -f <backup_filename>

Confirm the on-screen prompt on your phone. Make sure you specify a password for encryption. The above command should backup everything, but in my case it did not backup files in the flash partition (downloads, pictures, etc). Make sure you manually copy any important files from your phone before you proceed.

My first attempt at the above command didn’t work for me. I received the error message:

adb: unable to connect for backup

When I ran adb devices it showed this:

List of devices attached 
00c739918fbf4e2a offline

It turns out I had an old version of adb installed. Make sure you download Google’s official SDK instead of relying on your distribution’s version.

Once the backup is complete, you then need to reboot your phone into fastboot mode:

adb reboot bootloader

Wait for the reboot, then run the following command. Warning: this command will wipe your device. Make sure you have a reliable backup and confirm the message on your phone screen.

fastboot oem unlock

Now, navigate to the directory where you extracted your latest firmware and execute the flash-all script:

cd bullhead-mmb29k
./flash-all.sh

After some time your phone will reboot into your shiny new updated OS. Skip everything setup-wise. Re-enable developer mode and android debugging, and then re-lock your bootloader:

adb reboot bootloader
fastboot oem lock

Lastly, we need to restore everything from the backup we made and re-lock the bootloader for security. Once again skip everything setup-wise on the phone, re-enable developer mode and android debugging, and then restore your stuff:

adb restore <filename>

Don’t forget to manually copy back any flash files you manually backed up earlier.

The very last (optional) step is to go into developer options settings and disable OEM unlocking.

Success!

Fix No USB devices connected in Virtualbox

Recently on my Linux Mint 13.2 system I was playing with Virtualbox. I wanted to pass through a USB device to a virtualbox VM but despite installing the appropriate extension pack, I was greeted with this lovely message in the USB menu:

No USB devices connected

I discovered here that you need to be a member of the vboxusers group. One quick command solved this:

sudo usermod -a -G vboxusers <username>

Once I did that I logged out and logged back in. Voila! USB passthrough worked.

Fix POP/SMTP not working in Sophos UTM

It all started with an innocent enough e-mail:

Data Disk is filling up - please check. Current usage: 100%

I couldn’t find any clear information about what to do about this on Sophos’ forums. My data disk was full. What to do?

I can tell you what not to do – delete random files. I thought my solution would be to log into the UTM’s console and run a du -hsx /* to see where the space was. I found a large folder inside /var/storage – /var/storage/cores/httpd.16438. I removed it, because why not?

It turns out that did some weird things to my UTM. After removing that folder I kept getting spammed with these e-mails, once every hour:

Pop3 proxy not running - restarted

It took me a while to realize, but this also meant all e-mails relayed to the UTM were not being delivered. The entire POP/SMTP subsystem of the Sophos UTM was hosed. I could not find anything on the Sophos forums. After scratching my head I decided to have a deeper look at the logs. From the command line I issued

ls -ltr /var/log

and began reading the most recent logs.

pop3.log let me know what the problem was:

pop3proxy[9270]: Can't connect to database, retrying in 10 seconds: could not connect to server: Connection refused

I could not find any useful fixes for this error. I kept digging.

selfmon.log wasn’t much help other than to confirm that pop3 was having some serious issues. It was an endless abyss of repeated error messages:

selfmonng[3818]: W NOTIFYEVENT Name=pop3proxy_running Level=INFO Id=117 suppressed
...
selfmonng[3818]: W actionCmd(+): '/var/mdw/scripts/pop3 restart'

system.log put me on the right track:

ulogd[5107]: pg1: connect: could not connect to server: No such file or directory


Finally, we’re getting somewhere! After some searching I learned that pg1 is the postgresql database Sophos uses. I found a way to rebuild from this forum post.

One simple command did the trick:

/etc/init.d/postgresql92 rebuild

This rebuilt the postgresql database that I apparently corrupted when I removed files with reckless abandon. My e-mails work again!