Lately I’ve become interested in the LEMP stack (as opposed to the LAMP stack.) As such I’ve decided to set up a wordpress site running CentOS 7, nginx, mariadb, php-fpm, zend-opcache, apc, and varnish. This writeup will borrow heavily from two of my other writeups, Install Wordpress on CentOS 7 with SELinux and Speed up WordPress in CentOS7 using caching. This will be a mashup of those two with an nginx twist with guidance from digitalocean. Let’s begin.
Repositories
To install the required addons we will need to have the epel repository enabled:
yum -y install epel-release
nginx
Install necessary packages:
sudo yum -y install nginx
sudo systemctl enable nginx
Optional: symlink /usr/share/nginx/ to /var/www/ (for those of us who are used to apache)
sudo ln -s /usr/share/nginx/ /var/www
Open necessary firewall ports:
sudo firewall-cmd --add-service=http --permanent
sudo systemctl restart firewalld
start nginx:
sudo systemctl start nginx
Navigate to your new site to make sure it brings up the default page properly.
MariaDB
Install:
sudo yum -y install mariadb-server mariadb
sudo systemctl enable mariadb
Run initial mysql configuration to set database root password
sudo systemctl start mariadb
sudo mysql_secure_installation
Configure:
Create a wordpress database and user:
mysql -u root -p
#enter your mysql root password here
create user wordpress;
create database wordpress;
GRANT ALL PRIVILEGES ON wordpress.* To 'wordpress'@'localhost' IDENTIFIED BY 'password';
quit;
php-fpm
Install:
sudo yum -y install php-fpm php-mysql php-pclzip
sudo systemctl enable php-fpm
Configure:
Uncomment cgi.fix_pathinfo and change value to 0:
sudo sed -i 's/\;\(cgi.fix_pathinfo=\)1/\10/g' /etc/php.ini
Modify the listen= parameter to listen to UNIX socket instead of TCP:
sudo sed -i 's/\(listen =\).*/\1 \/var\/run\/php-fpm\/php-fpm.sock/g' /etc/php-fpm.d/www.conf
Change listen.owner and listen.group to nobody:
sudo sed -i 's/\(listen.owner = \).*/\1nobody/g; s/\(listen.group = \).*/\1nobody/g' /etc/php-fpm.d/www.conf
Change running user & group from apache to nginx:
sudo sed -i 's/\(^user = \).*/\1nginx/g; s/\(^group = \).*/\1nginx/g' /etc/php-fpm.d/www.conf
Start php-fpm:
sudo systemctl start php-fpm
Caching
To speed up wordpress further we need to install a few bits of caching software. Accept defaults when prompted.
zend-opcache & apc:
Install necessary packages:
sudo yum -y install php-pecl-zendopcache php-pecl-apcu php-devel gcc
sudo pecl install apc
Add apc extension to php configuration:
sudo sh -c "echo '\

#Add apc extension
extension=apc.so' >> /etc/php.ini"
Restart php-fpm:
sudo systemctl restart php-fpm
Varnish
Install:
sudo yum -y install varnish
sudo systemctl enable varnish
Configure nginx to listen on port 8080 instead of port 80:
sudo sed -i /etc/nginx/nginx.conf -e 's/listen.*80/&80 /'
Change varnish to listen on port 80 instead of port 6081:
sudo sed -i /etc/varnish/varnish.params -e 's/\(VARNISH_LISTEN_PORT=\).*/\180/g'
Optional: change varnish to cache files in memory with a limit of 256M (caching to memory is much faster than caching to disk)
sudo sed -i /etc/varnish/varnish.params -e 's/\(VARNISH_STORAGE=\).*/\1\"malloc,256M\"/g'
Add varnish configuration to work with caching wordpress sites:
Update 2/25/2018 added section to allow facebook to properly scrape varnish cached sites.
sudo sh -c 'echo "/* SET THE HOST AND PORT OF WORDPRESS
 * *********************************************************/
vcl 4.0;
import std;

backend default {
 .host = \"127.0.0.1\";
 .port = \"8080\";
 .first_byte_timeout = 60s;
 .connect_timeout = 300s;
}

# SET THE ALLOWED IP OF PURGE REQUESTS
# ##########################################################
acl purge {
 \"localhost\";
 \"127.0.0.1\";
}

#THE RECV FUNCTION
# ##########################################################
sub vcl_recv {

#Facebook workaround to allow proper shares
if (req.http.user-agent ~ \"facebookexternalhit\")
        {
        return(pipe);
        }

# set realIP by trimming CloudFlare IP which will be used for various checks
set req.http.X-Actual-IP = regsub(req.http.X-Forwarded-For, \"[, ].*$\", \"\");

 # FORWARD THE IP OF THE REQUEST
 if (req.restarts == 0) {
 if (req.http.x-forwarded-for) {
 set req.http.X-Forwarded-For =
 req.http.X-Forwarded-For + \", \" + client.ip;
 } else {
 set req.http.X-Forwarded-For = client.ip;
 }
 }

 # Purge request check sections for hash_always_miss, purge and ban
 # BLOCK IF NOT IP is not in purge acl
 # ##########################################################

 # Enable smart refreshing using hash_always_miss
if (req.http.Cache-Control ~ \"no-cache\") {
 if (client.ip ~ purge) {
 set req.hash_always_miss = true;
 }
}

if (req.method == \"PURGE\") {
 if (!client.ip ~ purge) {
 return(synth(405,\"Not allowed.\"));
 }

 ban (\"req.url ~ \"+req.url);
 return(synth(200,\"Purged.\"));

}

if (req.method == \"BAN\") {
 # Same ACL check as above:
 if (!client.ip ~ purge) {
 return(synth(403, \"Not allowed.\"));
 }
 ban(\"req.http.host == \" + req.http.host +
 \" && req.url == \" + req.url);

 # Throw a synthetic page so the
 # request wont go to the backend.
 return(synth(200, \"Ban added\"));
}

# Unset cloudflare cookies
# Remove has_js and CloudFlare/Google Analytics __* cookies.
 set req.http.Cookie = regsuball(req.http.Cookie, \"(^|;\s*)(_[_a-z]+|has_js)=[^;]*\", \"\");
 # Remove a \";\" prefix, if present.
 set req.http.Cookie = regsub(req.http.Cookie, \"^;\s*\", \"\");

 # For Testing: If you want to test with Varnish passing (not caching) uncomment
 # return( pass );

# DO NOT CACHE RSS FEED
 if (req.url ~ \"/feed(/)?\") {
 return ( pass );
}

#Pass wp-cron

if (req.url ~ \"wp-cron\.php.*\") {
 return ( pass );
}

## Do not cache search results, comment these 3 lines if you do want to cache them

if (req.url ~ \"/\?s\=\") {
 return ( pass );
}

# CLEAN UP THE ENCODING HEADER.
 # SET TO GZIP, DEFLATE, OR REMOVE ENTIRELY. WITH VARY ACCEPT-ENCODING
 # VARNISH WILL CREATE SEPARATE CACHES FOR EACH
 # DO NOT ACCEPT-ENCODING IMAGES, ZIPPED FILES, AUDIO, ETC.
 # ##########################################################
 if (req.http.Accept-Encoding) {
 if (req.url ~ \"\.(jpg|png|gif|gz|tgz|bz2|tbz|mp3|ogg)$\") {
 # No point in compressing these
 unset req.http.Accept-Encoding;
 } elsif (req.http.Accept-Encoding ~ \"gzip\") {
 set req.http.Accept-Encoding = \"gzip\";
 } elsif (req.http.Accept-Encoding ~ \"deflate\") {
 set req.http.Accept-Encoding = \"deflate\";
 } else {
 # unknown algorithm
 unset req.http.Accept-Encoding;
 }
 }

 # PIPE ALL NON-STANDARD REQUESTS
 # ##########################################################
 if (req.method != \"GET\" &&
 req.method != \"HEAD\" &&
 req.method != \"PUT\" &&
 req.method != \"POST\" &&
 req.method != \"TRACE\" &&
 req.method != \"OPTIONS\" &&
 req.method != \"DELETE\") {
 return (pipe);
 }

 # ONLY CACHE GET AND HEAD REQUESTS
 # ##########################################################
 if (req.method != \"GET\" && req.method != \"HEAD\") {
 return (pass);
 }

 # OPTIONAL: DO NOT CACHE LOGGED IN USERS (THIS OCCURS IN FETCH TOO, EITHER
 # COMMENT OR UNCOMMENT BOTH
 # ##########################################################
 if ( req.http.cookie ~ \"wordpress_logged_in|resetpass\" ) {
 return( pass );
 }

 #fix CloudFlare Mixed Content with Flexible SSL
 if (req.http.X-Forwarded-Proto) {
 return(hash);
 }

 # IF THE REQUEST IS NOT FOR A PREVIEW, WP-ADMIN OR WP-LOGIN
 # THEN UNSET THE COOKIES
 # ##########################################################
 if (!(req.url ~ \"wp-(login|admin)\")
 && !(req.url ~ \"&preview=true\" )
 ){
 unset req.http.cookie;
 }

 # IF BASIC AUTH IS ON THEN DO NOT CACHE
 # ##########################################################
 if (req.http.Authorization || req.http.Cookie) {
 return (pass);
 }

 # IF YOU GET HERE THEN THIS REQUEST SHOULD BE CACHED
 # ##########################################################
 return (hash);
 # This is for phpmyadmin
if (req.http.Host == \"pmadomain.com\") {
return (pass);
}
}

sub vcl_hash {

if (req.http.X-Forwarded-Proto) {
 hash_data(req.http.X-Forwarded-Proto);
 }
}


# HIT FUNCTION
# ##########################################################
sub vcl_hit {
 return (deliver);
}

# MISS FUNCTION
# ##########################################################
sub vcl_miss {
 return (fetch);
}

# FETCH FUNCTION
# ##########################################################
sub vcl_backend_response {
 # I SET THE VARY TO ACCEPT-ENCODING, THIS OVERRIDES W3TC
 # TENDANCY TO SET VARY USER-AGENT. YOU MAY OR MAY NOT WANT
 # TO DO THIS
 # ##########################################################
 set beresp.http.Vary = \"Accept-Encoding\";

 # IF NOT WP-ADMIN THEN UNSET COOKIES AND SET THE AMOUNT OF
 # TIME THIS PAGE WILL STAY CACHED (TTL), add other locations or subdomains you do not want to cache here in case they set cookies
 # ##########################################################
 if (!(bereq.url ~ \"wp-(login|admin)\") && !bereq.http.cookie ~ \"wordpress_logged_in|resetpass\" ) {
 unset beresp.http.set-cookie;
 set beresp.ttl = 1w;
 set beresp.grace =3d;
 }

 if (beresp.ttl <= 0s ||
 beresp.http.Set-Cookie ||
 beresp.http.Vary == \"*\") {
 set beresp.ttl = 120 s;
 # set beresp.ttl = 120s;
 set beresp.uncacheable = true;
 return (deliver);
 }

 return (deliver);
}

# DELIVER FUNCTION
# ##########################################################
sub vcl_deliver {
 # IF THIS PAGE IS ALREADY CACHED THEN RETURN A HIT TEXT
 # IN THE HEADER (GREAT FOR DEBUGGING)
 # ##########################################################
 if (obj.hits > 0) {
 set resp.http.X-Cache = \"HIT\";
 # IF THIS IS A MISS RETURN THAT IN THE HEADER
 # ##########################################################
 } else {
 set resp.http.X-Cache = \"MISS\";
 }
}" > /etc/varnish/default.vcl'
Restart varnish & nginx:
sudo systemctl restart nginx varnish
Logging
By default varnish does not log its traffic. This means that your apache log will only log things varnish does not cache. We have to configure varnish to log traffic so you don’t lose insight into who is visiting your site.
Update 2/14/2017: I’ve discovered a better way to do this. The old way is still included below, but you really should use this other way.
New way:
CentOS ships with some systemd scripts for you. You can use them out of the box by simply issuing
systemctl start varnishncsa
systemctl enable varnishncsa
If you are behind a reverse proxy then you will want to tweak the varnishncsa output a bit to reflect x-forwarded-for header values (thanks to this github discussion for the guidance.) Accomplish this by appending a modified log output format string to /lib/systemd/system/varnishncsa.service:
sudo sed -i /lib/systemd/system/varnishncsa.service -e "s/ExecStart.*/& -F \'%%{X-Forwarded-For}i %%l %%u %%t \"%%r\" %%s %%b \"%%{Referer}i\" \"%%{User-agent}i\"\' /g"
Lastly, reload systemd configuration, enable, and start the varnishncsa service:
sudo systemctl daemon-reload
sudo systemctl enable varnishncsa
sudo systemctl start varnishncsa
Old way:
First, enable rc.local
sudo chmod +x /etc/rc.local
sudo systemctl enable rc-local
Next, add this entry to the rc.local file:
sudo sh -c 'echo "varnishncsa -a -w /var/log/varnish/access.log -D -P /var/run/varnishncsa.pid" >> /etc/rc.local'
If your varnish server is behind a reverse proxy (like a web application firewall) then modify the above code slightly (thanks to this site for the information on how to do so)
sudo sh -c "echo varnishncsa -a -F \'%{X-Forwarded-For}i %l %u %t \"%r\" %s %b \"%{Referer}i\" \"%{User-agent}i\"\' -w /var/log/varnish/access.log -D -P /var/run/varnishncsa.pid >> /etc/rc.local"
Once configuration is in place, start the rc-local service
sudo systemctl start rc-local
WordPress
Download, extract, and set permissions for your wordpress installation (this assumes your wordpress site is the only site on the server)
wget https://wordpress.org/latest.zip
sudo unzip latest.zip -d /usr/share/nginx/html/
sudo chown nginx:nginx -R /usr/share/nginx/html/
Configure nginx
Follow best practice for nginx by creating a new configuration file for your wordpress site. In this example I’ve created a file wordpress.conf inside the /etc/nginx/conf.d directory.
Create the file:
sudo vim /etc/nginx/conf.d/wordpress.conf
Insert the following, making sure to modify the server_name directive:
server {
    listen 8080;
    listen [::]:8080;
    server_name wordpress;
    root /usr/share/nginx/html/wordpress;
    port_in_redirect off;


    location / {
        index index.php;
        try_files $uri $uri/ /index.php?q=$uri&$args;
    }

    location ~ \.php$ {
        fastcgi_pass unix:/var/run/php-fpm/php-fpm.sock;
        fastcgi_index index.php;
        fastcgi_param SCRIPT_FILENAME $document_root$fastcgi_script_name;
        include fastcgi_params;
    }

    error_page 404 /404.html;
    location = /40x.html {
     }

    error_page 500 502 503 504 /50x.html;
    location = /50x.html {
    }
}
Restart nginx
sudo systemctl restart nginx
Configure upload directory
If you want users to upload content, then you will want to assign the http_sys_rw_content_t selinux security context for the wp-uploads directory (create it if it doesn’t exist)
sudo mkdir /usr/share/nginx/html/wordpress/wp-content/uploads
sudo chown nginx:nginx /usr/share/nginx/html/wordpress/wp-content/uploads
sudo semanage fcontext -a -t httpd_sys_rw_content_t "/usr/share/nginx/html/wordpress/wp-content/uploads(/.*)?"
sudo restorecon -Rv /usr/share/nginx/html/wordpress/wp-content/uploads
Run the wizard
In order for the wizard to run properly we need to temporarily give the wordpress directory httpd_sys_rw_content_t selinux context
sudo chcon -t httpd_sys_rw_content_t /usr/share/nginx/html/wordpress/
Now navigate to your new website in a browser and follow the wizard, which will create a wp-config.php file inside the wordpress directory.
W3 Total Cache
Once your wordpress site is set up you will want to configure it to communicate with varnish. This will make sure the cache is always up to date when changes are made.
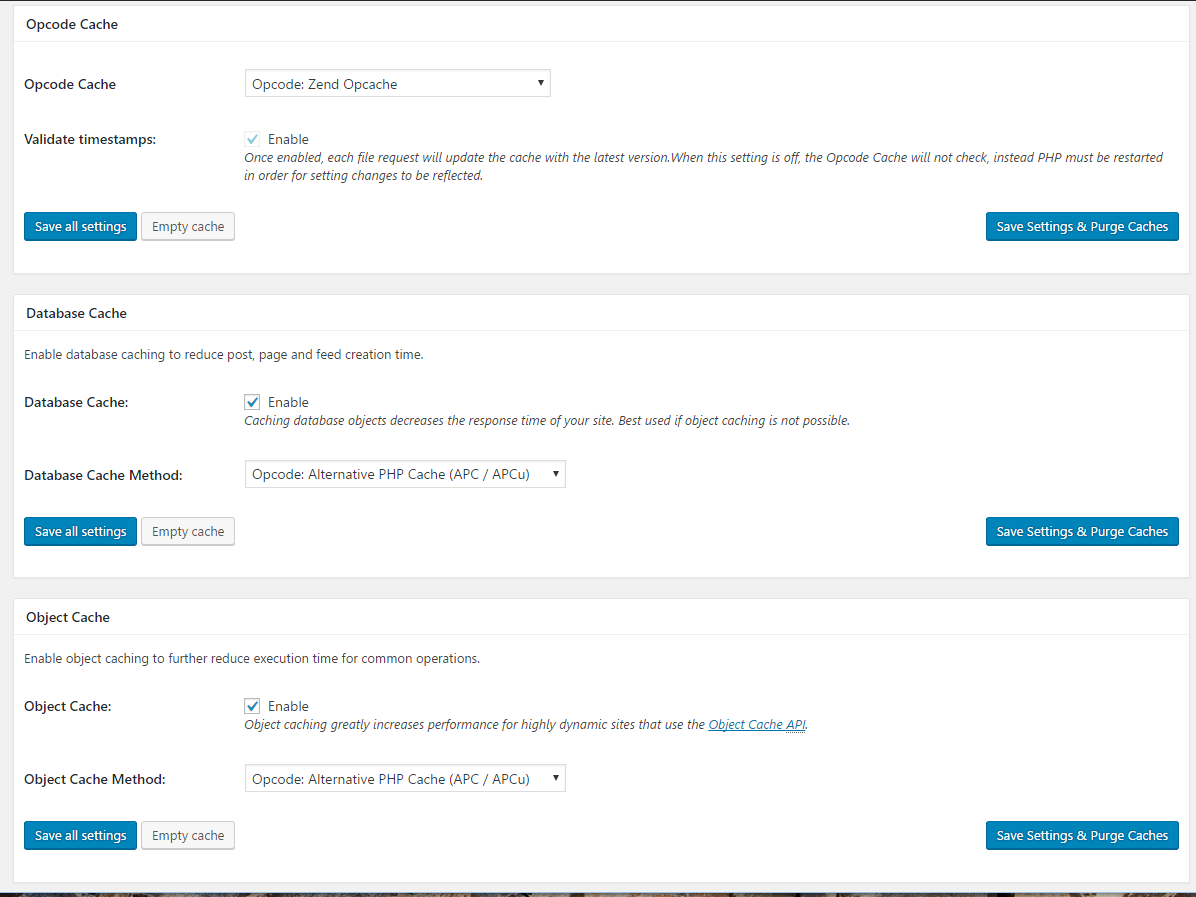
Install the W3 Total Cache wordpress plugin and configure it as follows:

Opcode cache: Opcode:Zend Opcache
Database cache: Check enable, select Opcode: Alternative PHP Cache (APC / APCu)
Object cache: Check enable, select Opcode: Alternative PHP Cache (APC / APCu)
Fragment cache: Opcode: Alternative PHP cache (APC / APCu)

Reverse Proxy: Check “Enable reverse proxy caching via varnish”
Specify 127.0.0.1 in the varnish servers box. Click save all settings.
Wrapping up
Once your site is properly set up, restore the original security context for the wordpress directory:
sudo restorecon -v /usr/share/nginx/html/wordpress/
Lastly restart nginx and varnish:
sudo systemctl restart nginx varnish
Success! Everything is working within the proper SELinux contexts and caching configuration.
Troubleshooting
403 forbidden
I received this error after setting everything up. After some digging I came across this site which explained what could be happening.
For me this meant that nginx couldn’t find an index file and was trying to default to a directory listing, which is not allowed by default. This is fixed by inserting a proper directive to find index files, in my case, index.php. Make sure you have “index index.php” in your nginx.conf inside the location / block:
    location / {
        index index.php;
    }
Accessing wp-admin redirects you to port 8080, times out
If you find going to /wp-admin redirects you to a wrong port and times out, it’s because nginx is forwarding the portnumber. We want to turn that off (thanks to this site for the help.) Add this to your nginx.conf:
port_in_redirect off;