Category Archives: Virtualization

Posts about hypervisors and virtualization

Fix NAT not working with pfSense in Xenserver

After a few very frustrating experiences I’ve decided I want to migrate away from Sophos UTM for my home firewall. I enjoy Sophos’ features but do not enjoy the sporadic issues it’s been giving me.

My colleagues all rave about pfSense and how awesome it is so I thought I would give it a try. I have a completely virtualized setup using Citrix Xenserver 6.5 which has prevented me from trying pfSense in the past. The latest release, version 2.2.2, is based on FreeBSD 10.1, which includes native Xen device support. Now we’re talking.

Installation was quick and painless. After some configuration, the basic internet connection function was working swimmingly. As soon as I tried to forward some ports from my WAN interface to hosts on my network, though, things did not go well at all. I began to doubt my ability to configure basic NAT.

It looks simple enough – go to Firewall / NAT, specify the necessary source and destination IPs and Ports, and click apply. Firewall rules were added automatically. Except it didn’t work. I enabled logging on everything and there were no dropped packets to be found, but they were clearly being dropped. I thought it might be something weird with Sophos being upstream so I built my own private VM network but the issue was the same. NAT simply didn’t work. Silently dropped packets. I am not a fan of them.

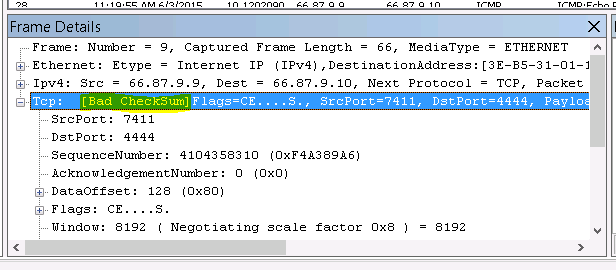
I was about to give up on pfSense but something told me it had to be a problem with my virtualization setup. I ran a packet capture via Diagnostics / Packet capture and after much sifting I found this gem:

checksumAll of my packets sent to the WAN interface returned [Bad CheckSum] that I was only able to discover via packet capture – they weren’t in the logs anywhere.

Armed with this information I stumbled on this forum post and discovered I am not alone in this. There apparently is a bug with FreeBSD 10.1 and the virtIO network drivers used by Xen, KVM, and others that causes it to miscalculate checksums, resulting in either dropped or very slow packets (I experienced both.)

The solution is to disable tx checksum offloading on both the PFsense side and the hypervisor side. In pfSense this is done by going to System / Advanced / Networking and checking “Disable hardware checksum offload”

To accomplish this on the xenserver side, follow tdslot’s instructions from the forum post linked above, replacing vm-name-label with the name of your pfSense VM:

Find your PFsense VM network VIF UUID’s:

[root@xen ~]# xe vif-list vm-name-label="RT-OPN-01"
uuid ( RO)            : 08fa59ac-14e5-f087-39bc-5cc2888cd5f8
...
...
...
uuid ( RO)            : 799fa8f4-561d-1b66-4359-18000c1c179f

Then modify those VIF UUID’s captured above with the following settings (discovered thanks to this post)

  • other-config:ethtool-gso=”off”
  • other-config:ethtool-ufo=”off”
  • other-config:ethtool-tso=”off”
  • other-config:ethtool-sg=”off”
  • other-config:ethtool-tx=”off”
  • other-config:ethtool-rx=”off”
xe vif-param-set uuid=08fa59ac-14e5-f087-39bc-5cc2888cd5f8 other-config:ethtool-tx="off"
xe vif-param-set uuid=799fa8f4-561d-1b66-4359-18000c1c179f other-config:ethtool-tx="off"

Lastly, shutdown the VM and start it again (not reboot, must be a full shutdown and power on.)

It worked! NAT worked as expected and a little bit of my sanity was restored. I can now make the switch to pfSense.

Fix Xen VGA Passthrough in Linux Mint 17.1

I wrote in my last post about how I upgraded from Linux Mint 16 to 17.1. I thought everything went smoothly, but it turns out one feature did break: VGA passthrough via Xen. For the past year or so I’ve had a Windows 8.1 gaming VM with direct access to my video card. It’s worked out nicely in Linux Mint 16 but broke completely in 17.1.

I followed the advice of powerhouse on the Linux Mint forums on how to get things up and running, but it wasn’t quite enough. After much banging of my head against the wall I read on the Xen mailing list that there was a regression in VGA passthrough functionality with Xen 4.4.1, which is the version of Xen Mint 17.1 uses.

I finally came to a solution to my problem today – upgrade to Xen 4.5. I couldn’t find any pre-built packages for Ubuntu 14.04 (the base of Mint 17.1) so I ended up compiling Xen 4.5 from source. Below is what I did to make it all work.

Fix broken symlink for /usr/lib/xen-default

sudo rm /usr/lib/xen-default
sudo ln -s /usr/lib/xen-4.4/ /usr/lib/xen-default

Update the DomU CFG file

A couple things needed tweaking. Here is my working cfg:

builder='hvm'
memory = '8192'
name = 'win8.1'
vcpus=6
cpus="2-7"
pae=1
acpi=1
apic=1
vif = [ 'mac=3a:82:47:2a:51:20,bridge=xenbr0,model=virtio' ]
disk = [ 'phy:/dev/mapper/desktop--xen-Win8.1,xvda,w' ]
device_model_version = 'qemu-xen-traditional'
boot='c'
sdl=0
vnc=1
vncpasswd=''
stdvga=0
serial='pty'
tsc_mode=0
viridian=1
usb=1
usbdevice='tablet'
gfx_passthru=0
pci=[ '01:00.0', '01:00.1' , '00:1d.0' ]
localtime=1
pci_power_mgmt=1
on_xend_stop = "shutdown"
xen_platform_pci=1
pci_power_mgmt=1

For some, that’s all they had to do. For me, I had to do a few more things.

Compile Xen 4.5

This step was thanks to two different sites, this one and this one.

Install necessary packages

sudo apt-get install build-essential bcc bin86 gawk bridge-utils iproute libcurl3 libcurl4-openssl-dev bzip2 module-init-tools transfig tgif texinfo texlive-latex-base texlive-latex-recommended texlive-fonts-extra texlive-fonts-recommended pciutils-dev mercurial libjpeg-dev make gcc libc6-dev-i386 zlib1g-dev python python-dev python-twisted libncurses5-dev patch libvncserver-dev libsdl-dev libpixman-1-dev iasl libbz2-dev e2fslibs-dev git-core uuid-dev ocaml ocaml-findlib libx11-dev bison flex xz-utils libyajl-dev gettext markdown libaio-dev pandoc

Checkout Xen source

git clone git://xenbits.xen.org/xen.git xen-4.5.0
cd xen-4.5.0
git checkout RELEASE-4.5.0

Build from source

./configure --libdir=/usr/lib
 make world -j8

When I tried this the make failed with this error:

/usr/include/linux/errno.h:1:23: fatal error: asm/errno.h: No such file or directory
 #include <asm/errno.h>

The fix (thanks to askubuntu)  was to install linux-libc-dev and make a symlink for it:

sudo apt-get install linux-libc-dev
sudo ln -s /usr/include/asm-generic /usr/include/asm

It then compiled successfully.

Install freshly compiled Xen 4.5

sudo make install
sudo update-rc.d xencommons defaults
sudo update-rc.d xendomains defaults
sudo ldconifg

Set grub to boot from new Xen kernel

sudo update-grub
sudo vim /etc/default/grub

Edit GRUB_DEFAULT to match wherever update-grub put your new Xen kernel (in my case it was the second entry, so my GRUB_DEFAULT=1), then run update-grub again

sudo update-grub

Reboot

Success at last. Enjoy your VM gaming once more with Xen 4.5.

Slow Linux VM performance in VMware vSphere

Recently I’ve been scratching my head over a particular performance issue with Linux VMs hosted on VMWare vSphere. Everything seemed to move at a glacial pace.

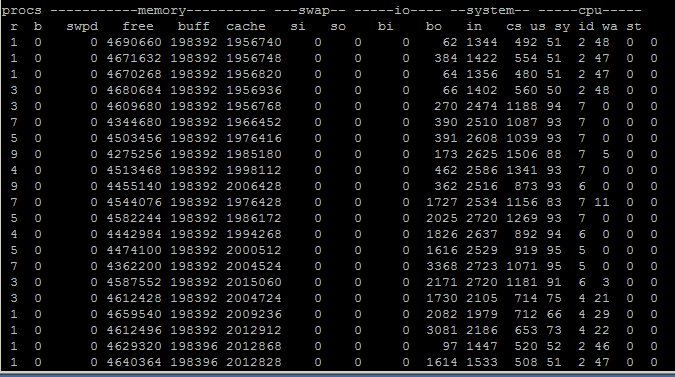
vmstat gave a few clues as to what was happening, although depending on what I read it still wasn’t clear:

vmstat

It became apparent that I was suffering from some kind of queuing problem. I wasn’t sure if it was CPU or disk related. I came across this post which has a lot of good performance tuning guides.This tip caught my eye:


7. Set your disk scheduling algorithm to ‘noop’

The Linux kernel has different ways to schedule disk I/O, using schedulers like deadline, cfq, and noop. The ‘noop’ — No Op — scheduler does nothing to optimize disk I/O. So why is this a good thing? Because ESX is also doing I/O optimization and queuing! It’s better for a guest OS to just hand over all the I/O requests to the hypervisor to sort out than to try optimizing them itself and potentially defeating the more global optimizations.

You can change the kernel’s disk scheduler at boot time by appending:

elevator=noop

to the kernel parameters in /etc/grub.conf.


Sure enough, I modified /boot/grub/grub.conf on my Centos 6 boxes and appended elevator=noop to the kernel line, then rebooted. It helped a lot! Performance no longer was pitiful. I’m not nearly as familiar with vmware as I am with Xenserver so this was a good hint.

Convert xenserver 6.5 to software RAID 1

I have written previously about how to convert Citrix Xenserver 6.2 to a software RAID 1. When I upgraded to Xenserver 6.5 I found I had to re-install the xenserver instance because the upgrade didn’t recognize the software RAID. When trying to follow my own guide I found that I couldn’t create the array – it gave the following error message:

mdadm: unexpected failure opening /dev/md0

It turns out 6.5 handles RAID differently. You have to manually load the RAID kernel modules before you can create arrays. I was able to get this running successfully thanks to guidance from this site, specifically comments on it by Olli.

The majority of this can simply be copy/pasted into the command window, once drive paths have been updated for your specific setup.

# Prepare /dev/sdd
sgdisk --zap-all /dev/sdd
sgdisk --mbrtogpt --clear /dev/sdd
sgdisk -R/dev/sdd /dev/sdc # Replicate partion table from /dev/sdc to /dev/sdd with unique identifier
sleep 5 # Sleep 5 seconds here if you script this…
sgdisk --typecode=1:fd00 /dev/sdd
sgdisk --typecode=2:fd00 /dev/sdd
sgdisk --typecode=3:fd00 /dev/sdd
sleep 5 # Sleep 5 seconds here if you script this…
modprobe md_mod # load raid, because it isn't load by default (XS6.5 only)
yes|mdadm --create /dev/md0 --level=1 --raid-devices=2 --metadata=0.90 /dev/sdd1 missing # Create md0 (root)
yes|mdadm --create /dev/md1 --level=1 --raid-devices=2 --metadata=0.90 /dev/sdd2 missing # Create md0 (swap)
yes|mdadm --create /dev/md2 --level=1 --raid-devices=2 --metadata=0.90 /dev/sdd3 missing # Create md0 (storage)
sleep 5 # Sleep 5 seconds here if you script this…
mkfs.ext3 /dev/md0 # Create root FS
mount /dev/md0 /mnt # Mount root FS
cp -xR --preserve=all / /mnt # Replicate root files
mdadm --detail --scan > /mnt/etc/mdadm.conf #generate RAID configuration
sed -i 's/LABEL=[a-zA-Z\-]*/\/dev\/md0/' /mnt/etc/fstab # Update fstab for new RAID device
mount --bind /dev /mnt/dev
mount -t sysfs none /mnt/sys
mount -t proc none /mnt/proc
chroot /mnt /sbin/extlinux --install /boot
dd if=/mnt/usr/share/syslinux/gptmbr.bin of=/dev/sdd
chroot /mnt
mkinitrd -v -f --theme=/usr/share/splash --without-multipath /boot/initrd-`uname -r`.img `uname -r`
exit
sed -i 's/LABEL=[a-zA-Z\-]*/\/dev\/md0/' /mnt/boot/extlinux.conf # Update extlinux for new RAID device
cd /mnt && extlinux --raid -i boot/
sgdisk /dev/sdd --attributes=1:set:2

#Unmount filesystems and reboot
cd
umount /mnt/dev
umount /mnt/sys
umount /mnt/proc
umount /mnt
sync
reboot

Tell BIOS to use disk B
After reboot to disk B…

sgdisk -R/dev/sdc /dev/sdd # Replicate partition table from /dev/sdd to /dev/sdc with unique identifier
sgdisk /dev/sdc --attributes=1:set:2
sleep 5 # Sleep 5 seconds here if you script this…
mdadm -a /dev/md0 /dev/sdc1
mdadm -a /dev/md1 /dev/sdc2
mdadm -a /dev/md2 /dev/sdc3 # If this command gives error, you need to forget/destroy an active SR first
#This next command is the only command you have to manually update before pasting in. Find the UUID of your xenserver host and paste it between the <> below
xe sr-create content-type=user device-config:device=/dev/md2 host-uuid=<UUID of xenserver host> name-label="RAID 1" shared=false type=lvm
# Watch rebuild progress and wait until no arrays are rebuilding before proceeding with any reboot
watch “mdadm --detail /dev/md* | grep rebuild”

Done!

Reclaim lost space in Xenserver 6.5

Storage XenMotion is awesome. It allows me to spin up a second Xenserver host and live migrate VMs to it whenever I need to do maintenance on my primary xenserver host. I don’t need an intermediary storage device such as a NAS – the two hosts can exchange live, running VMs directly. No downtime!

An unfortunate side effect of using Storage XenMotion is that sometimes it doesn’t clean itself up very well. It takes several snapshots in the migration process and they sometimes get “forgotten about.” This results in inexplicable low disk space errors such as this one:

The specified storage repository has insufficient space

..despite there being plenty of space.

This article explains how to use the coalesce option to reclaim space by issuing the following command:

xe host-call-plugin host-uuid=<host-UUID> plugin=coalesce-leaf fn=leaf-coalesce args:vm_uuid=<VM-UUID>

Unfortunately that didn’t seem to do anything for me. Digging into the storage underpinnings I can see that there are a lot of logical volumes hanging out there not being used:

xe vdi-list sr-uuid=<UUID of SR without space>

This revealed a lot of disks floating around in the SR that aren’t being used (I know this by looking at that same SR inside xencenter.) Curiously there is a VDI with identical names but with different UUIDs, despite my not having any snapshots of that VM.

I was about to start using the vgscan command to look for active volume groups when I got called away. Hours later, when I got back to my task, I found that all the space had been freed up. Xenserver had done its own garbage collection, albeit slowly. So, if you’ve tried to use xenmotion and found you have no space.. give xenserver some time. You might just find out that it will clean itself up.


Update 05/20/2015

I ran into this problem once more. I read from here that simply initiating a scan of the storage repository is all you need to do to reclaim lost space. Unfortunately when I ran that the scan nothing changed. A check of /var/log/SMlog revealed the following error (thanks to ap’s blog for the guidance)

SM: [30364] ***** sr_scan: EXCEPTION XenAPI.Failure, ['INTERNAL_ERROR', 'Db_exn.Uniqueness_constraint_violation("VDI", "uuid", "3e616c49-adee-44cc-ae94-914df0489803")']
...
Raising exception [40, The SR scan failed  [opterr=['INTERNAL_ERROR', 'Db_exn.Uniqueness_constraint_violation("VDI", "uuid", "3e616c49-adee-44cc-ae94-914df0489803")']]]

For some reason one of the ISOs in one of my SRs was throwing an error – specifically a Xenserver operating system fixup iso, which was causing the coalescing process to abort. I didn’t care if I lost that VDI so I nuked it:

xe vdi-destroy uuid="3e616c49-adee-44cc-ae94-914df0489803"

That got me a little father, but I still wasn’t seeing any free space. Further inspection of the log revealed this gem:

SMGC: [7088] No space to leaf-coalesce f8f8b129[VHD](20.000G/10.043G/20.047G|ao) (free
 space: 1904214016)

I read that if there isn’t enough space, a coalesce can’t happen on a running VM. I decided to shut down one of my VMs that was hogging space and run the scan again. This time there was progress in the logs. It took a while, but eventually my space was restored!

Moral of the story: if your server isn’t automatically coalescing to free up space, check /var/log/SMlog to see what’s causing it to choke.

PCI passthrough with Xenserver 6.2

PCI passthrough is a great way to mix virtualization with bare metal hardware. It allows you to pass physical hardware to virtual machines. In order to do PCI passthrough you will need compatible hardware (a CPU and chipset that support it.) Intel’s nomenclature for this is VT-d; AMD’s is IOMMU. It’s difficult (although not impossible) to get consumer level hardware that supports this. It’s much easier to obtain with server grade hardware.

Why would you want to pass physical hardware to virtual machines? In my case, it’s to turn a single system into a super server. Instead of having separate physical systems for NAS, gaming, and TV recording (my three uses) you can have one physical system do all three. While this is possible with one single OS, it’s much easier to manage these functions if they are in their own separate OS (especially if you’re using appliance VMs such as FreeNAS.) PCI Passthrough allows you to get the best of both worlds – better security by isolating functions, easier backup/restore, and physical hardware access.

Citrix Xenserver 6.2 supports PCI passthrough beautifully. A great comprehensive guide on how to configure PCI passthrough can be found here.

Xenserver 6.2 no longer requires any configuration beforehand to get PCI passthrough to work. To pass a device to a VM all you need to do is obtain its the bus, device, function (B:D.F) via lspci, then pass that through to the VM.

lspci
<several lines deleted>
06:00.0 Ethernet controller: Atheros Communications AR8131 Gigabit Ethernet (rev c0)

The B:D.F of the above device (a network adapter) is 06:00.0. To then pass this device to a virtual machine we use the xe vm-param-set command with the other-config:pci= parameter, adding 0/0000: to the beginning of the B:D.F, then specifying the UUID of the VM in question.

xe vm-param-set other-config:pci=0/0000:06:00.0 uuid=db4c64e1-44ce-f9f3-3236-0d86df260249

If the VM is running when you issue that command, make sure to shut down (not reboot) the VM, then start it up again.

To add multiple devices to the same VM, simply separate each B:D.F with a comma, like so:

xe vm-param-set other-config:pci=0/0000:06:00.0, 0/0000:07:00.0 uuid=db4c64e1-44ce-f9f3-3236-0d86df260249

Sometimes if you pass multiple PCI devices to a single VM only one of those devices is recognized by the VM. If that is the case, try passing the B:D.F of each piece of hardware in a different order

If you ever want to remove a hardware mapping to a VM, issue the following:

xe vm-param-clear param-name=other-config uuid=<UUID of VM>

There is still a case where you want to modify Xenserver’s configuration with regard to PCI passthrough. On occasion you will have hardware that you do not want the hypervisor to ever know about (in the above example, the hypervisor can use the hardware until you power on a VM that has passthrough enabled for it.)

In my case, I don’t want the hypervisor to ever see the storage controller I’m passing to my NAS VM. I found this out the hard way. If you don’t modify your xenserver configuration to ignore storage controllers that you then pass through to a VM, the entire hypervisor will completely lock up if you happen to reboot that VM. Why? Because when that VM reboots it releases the storage controller back to the hypervisor, which promptly enumerates and re-names all of its attached drives. It often leads to a case of re-naming /dev/sda, promptly “losing” the root device, and kernel panicking.

So, if you are passing things you never want the hypervisor to see, you need to modify its boot configuration to “hide” those devices from it. Edit /boot/extlinux.conf and append pciback.hide=(B:D.F) to the Linux command line, right after the splash parameter

vi /boot/extlinux.conf 
<navigate to right after the word splash>
i
pciback.hide=(06:00.0)(01:00.0)
<esc> :wq
extlinux -i /boot

The above example excludes two devices. Multiple devices simply go next to each other in their own parenthesis, but the format is the same if you only passing a single device.

Reboot the hypervisor, and you are good to go. You can now pass hardware through to VMs to your heart’s content.

FreeNAS PCI Passthrough dev_taste error message

After getting my xenified FreeNAS up and running I noticed an oddity with disk reporting. When I pulled up the reports tab I noticed ada0 never showed any activity, despite my knowing that disk is doing plenty.

The mystery became greater when I noticed these error messages in my logs:

g_dev_taste: make_dev_p() failed (gp->name=ada0, error=17)

After some research I discovered here that disks passed through to a VM via Xen’s PCI Passthrough function present themselves to FreeBSD in a peculiar manner. In particular, the first disk in the passthrough array presents itself as ada0, despite the boot disk also having the name of ada0. With two disks named ada0 it’s a tossup on which one shows up in reporting, not to mention the strange errors above.

The fix is to add BSD parameter to not start disk numbering at ada0. For FreeNAS, you do this via the tunables section (System / Tunables / Add Tunable.) Add the following tunable:

variable: hint.ada.0.at
Value: scbus100
Comment: ada0 PCI passthrough fix
Enabled: true

Once that is configured, reboot FreeNAS. You will now have proper reporting of all your passthrough disks and the strange dev_taste errors will be gone.

Convert xenserver .xva file to raw disk image

What if you want to migrate a VM that’s been living on Citrix Xenserver to a different linux machine running vanilla Xen? The process isn’t as straightforward as you might think. Fortunately thanks to Eriklax over at github there is a fairly easy way to convert xenserver’s .xva virtual machines to other formats, via xva-img.

The first step is to download and install xva-img from github.

wget https://github.com/eriklax/xva-img/archive/master.zip
unzip master.zip
cd xva-img-master
cmake .
sudo make install

When trying to compile this on my Linux Mint Cinnamon machine I ran into the following errors:

CMake Error: your CXX compiler: "/usr/bin/c++" was not found.   Please set CMAKE_CXX_COMPILER to a valid compiler path or name.
xva-img-master/src/sha1.cpp:20:25: fatal error: openssl/sha.h: No such file or directory
 #include <openssl/sha.h>

I had to install the build-essential and libssl-dev packages in order to successfully compile and install xva-img.

Now that it’s installed, create a directory and extract your .xva file into it.

mkdir my-virtual-machine 
tar -xf <.xva file> -C my-virtual-machine 
chmod -R 755 my-virtual-machine

Once that’s finished (it might take a while – it took over an hour for me) the last step is to convert the extracted directories into a raw disk file.

Note:  when you extract your VM tar creates subfolders for each hard disk attached to the VM. You will have to run this command for each Ref folder that was generated as part of the image extraction process.

xva-img -p disk-export my-virtual-machine/Ref\:1/ disk.raw

It took a while for some reason, but it did eventually generate the desired image.

Now that I have a raw disk image I can transfer it to an LVM partition for use with xen:

sudo dd if=win8.1.img of=/dev/desktop-xen/Win8.1 bs=64M

Success.

Convert xenserver installation to software RAID-1

Update 2/28/2015:  I have a newer article explaining how to do this in Xenserver 6.5.


After having a hard drive nearly die on me and threaten to obliterate the VMs living on it I realized it would be a good idea to have my xenserver installation live on a RAID array.

Following this guide I was able to successfully migrate my running xenserver installation to a software based RAID 1, with a few tweaks. In my case I wanted to migrate from a single old drive to two newer ones.

Below are the steps I took to accomplish this.

Partition the new drives

This assumes that your current drive resides on /dev/sda, and your two new drives are /dev/sdb and /dev/sdc.

sgdisk -p /dev/sda
sgdisk --zap-all /dev/sdb
sgdisk --zap-all /dev/sdc
sgdisk --mbrtogpt --clear /dev/sdb
sgdisk --mbrtogpt --clear /dev/sdc
sgdisk --new=1:34:8388641 /dev/sdb
sgdisk --new=1:34:8388641 /dev/sdc
sgdisk --typecode=1:fd00 /dev/sdb
sgdisk --typecode=1:fd00 /dev/sdc
sgdisk --attributes=1:set:2 /dev/sdb
sgdisk --attributes=1:set:2 /dev/sdc
sgdisk --new=2:8388642:16777249 /dev/sdb
sgdisk --new=2:8388642:16777249 /dev/sdc
sgdisk --typecode=2:fd00 /dev/sdb
sgdisk --typecode=2:fd00 /dev/sdc

The third partition (VM storage) had to be tweaked a bit since these are larger drives than the current xenserver installation. I simply used gdisk instead of sgdisk for this task.

gdisk /dev/sdb
n #create new partition
<enter> #accept defaults for partition number, first, and last sectors
<enter>
<enter>
t #select partition type
3 #select partition number 3
fd00  #set for raid
w   #write changes to disk

Repeat above steps for the other disk (/dev/sdc in my case)

Create the RAID arrays for each partition

mdadm --create /dev/md0 --level=1 --raid-devices=2  /dev/sdb1 /dev/sdc1
mdadm --create /dev/md1 --level=1 --raid-devices=2 /dev/sdb2 /dev/sdc2
mdadm --create /dev/md2 --level=1 --raid-devices=2 /dev/sdb3 /dev/sdc3

Watch array build (optional)

cat /proc/mdstat

Alternatively you can use the watch command to get a real time update of the raid build:

watch -n 1 cat /proc/mdstat

Format & mount the array

mkfs.ext3 /dev/md0
mount /dev/md0 /mnt

Copy the root filesystem to the new array

cp -vxpr / /mnt

Install bootloader on the new disks

mount --bind /dev /mnt/dev
mount -t sysfs none /mnt/sys
mount -t proc none /mnt/proc
chroot /mnt /sbin/extlinux --install /boot
dd if=/mnt/usr/share/syslinux/gptmbr.bin of=/dev/sdb
dd if=/mnt/usr/share/syslinux/gptmbr.bin of=/dev/sdc

Generate new initrd image

chroot /mnt
mkinitrd -v -f --theme=/usr/share/splash --without-multipath /boot/initrd-`uname -r`.img `uname -r`
exit

Modify boot file

Edit /mnt/boot/extlinux.conf and replace every mention of the old root filesystem (root=LABEL=xxx) with root=/dev/md0.

vi /mnt/boot/extlinux.conf
:%s/LABEL=<root label>/\/dev\/md0/
:wq

Reboot

Keep the old drive in, but make sure to boot from either one of the member drives of your new array.

Create storage repository

Create new local storage repository with the new RAID array similar to here.

xe sr-create content-type=user device-config:device=/dev/md2 host-uuid=<UUID of xenserver host> name-label="RAID-1" shared=false type=lvm

Migrate VMs / disks

Migrate any disk images or VMs living on the old drive to the new array.

If these VMs / disks are not powered on or being used, it is as simple as pulling up xencenter, right clicking on the VM and clicking move then  select new storage repository.

If the VMs are online you can live migrate them to a different xenserver, then live migrate them back to the proper storage repository.

Remove old storage repository

Following instructions found here.
Note: In my case the transfer returned a strange error but was still successful. I had to restart the XAPI toolstack in order for it to let me remove the old storage repository.

xe sr-list name-label="<name of SR to remove>"
xe pbd-list sr-uuid=<UUID of SR above>
xe pbd-unplug uuid=<UUID of pbd above>
xe sr-forget uuid=<UUID of SR>

Final reboot

Shutdown, disconnect the old drive, and boot back up from the new array. Success.

Configure e-mail alerts (optional)

Now that you have a working RAID array you might want to receive e-mail alerts if there are problems with the array.

First, build an mdadm.conf

mdadm --detail --scan > /etc/mdadm.conf

Modify mdadm.conf to add your desired e-mail address for notifications

sed -i '1i MAILADDR <e-mail address>' /etc/mdadm.conf

Thanks to this site for the sed -i 1i trick.

Lastly, enable the mdadm monitoring service. I found via this site that this is fairly easy to do.  Simply enter these two commands:

service mdmonitor start
chkconfig mdmonitor on

Xenserver uses ssmtp to send e-mail. You can follow this guide on how to set it up for SSL if you happen to have an ISP that blocks port 25 (as I do.) Otherwise modify /etc/ssmtp/ssmtp.conf to suit your needs.

You can generate a test event from mdadm to make sure e-mail is configured properly:

mdadm --monitor --test /dev/md0 --oneshot

To get e-mail alerts to work right I had to ensure that FromLineOverride was NOT set to yes (default). I also had to add this line to /etc/ssmtp/revaliases:

root:<e-mail address being sent from>


Update 02/03/2015:  A commenter made me realize I forgot a step – copying the Control Domain OS to the new Raid array. I’ve added that step above, after the “Format & Mount the array” section.

Update 02/17/2015: If you are using Xenserver 6.5 you might come across the following error message when trying to create RAID arrays:

mdadm: unexpected failure opening /dev/md0

If this happens, load the md kernel driver like so:

modprobe md

It should then let you create your arrays.

Xenserver – The uploaded patch file is invalid

It has been six months since I’ve applied any patches to my Citrix Xenserver hypervisor. Shame on me for not checking for updates. The thing has been humming along without any issues so it was easy to forget about.

In trying to install xenserver patches today I kept getting this error message no matter what I tried:

The uploaded patch file is invalid

After deleting everything I could (including files hanging out in /var/patch) I realized that I was simply Doing It Wrong™. D’oh!

When applying xenserver updates, the expected file extension is .xsupdate. I had been trying to xe patch-upload the downloaded zip file, whereas I was supposed to have extracted those zips before trying to upload them.  This quick little line unzipped all my patch ZIP files for me in one swoop:

find *.zip -exec unzip {} \;

Once everything was unzipped I was able to upload and apply the resulting .xsupdate files without issue.