I followed this guide to get NVIDIA drivers working on my Proxmox machine. However when I tried to get them working in my container I couldn’t see how to get nvidia-smi installed. Thankfully this blog had what I needed.
The step I missed was copying & installing the NVIDIA drivers into the container with this flag:
--no-kernel-module
That got me one step closer but I could not spin up open-webui in a container. I kept getting the error
Error response from daemon: could not select device driver "nvidia" with capabilities: [[gpu]]
An additional hurtle I encountered was this error:
Error response from daemon: failed to create task for container: failed to create shim task: OCI runtime create failed: runc create failed: unable to start container process: error during container init: error running prestart hook #0: exit status 1, stdout: , stderr: Auto-detected mode as 'legacy'
nvidia-container-cli: mount error: failed to add device rules: unable to find any existing device filters attached to the cgroup: bpf_prog_query(BPF_CGROUP_DEVICE) failed: operation not permitted: unknown
I found here that the fix is to change a line in /etc/nvidia-container-runtime/config.toml. Uncomment and change no-cgroups to true.
no-cgroups = true
Success.
Not working after reboot
I had a working config until I rebooted the host. It turns out that two services need to run on the host:
I encountered an error when trying to set up alltalk tts:
nvidia-container-cli: mount error: stat failed: /dev/nvidia-modeset: no such file or directory: unknown
It turns out I needed to expose /dev/nvidia-modeset to the container as well. Thanks to this reddit post for the answer. The complete container passthrough config is now this:
I upgraded to a shiny new AMD Ryzen 3rd gen processer (Threadripper 3960x.) After doing so I could not boot up my Windows 10 gaming VM (it uses VFIO / PCI Passthrough for the video card.) The message I kept getting as it tried to boot was:
The problem comes with a new speculative execution protection hardware feature in the Ryzen Gen 3 chipsets – stibp. Qemu doesn’t know how to handle it properly, thus the bluescreens.
There are two ways to fix it
Change host-model from host-passthrough to epyc
Add CPU parameters to your Virtual Machine’s XML file instructing it to not use the stibp CPU feature.
Since I have some software that checks CPU model and refuses to work if it’s not in the desktop class (Geforce Experience) I opted for route #2.
First, check the qemu logs to see which CPU parameters your VM was using (pick a time where it worked.) Replace ‘win10’ with the name of your VM.
in my case, it was -cpu host,migratable=on,topoext=on,kvmclock=on,hv-time,hv-relaxed,hv-vapic,hv-spinlocks=0x1fff,hv-vendor-id=1234567890ab,kvm=off \
Copy everything after -cpu and before the last backslash. Then edit your VM’s XML file (change last argument to the name of your VM)
sudo virsh edit win10
Scroll down to the bottom qemu:commandline section (if it doesn’t exist, create it right above the last line – </domain>. Paste the following information obtained from the above log (ignoring the qemu:commandline lines if they already exist.) In my case it looked like this:
What you’re doing is copying the CPU arguments you found in the log and adding them to the qemu:commandline section, with a twist – adding -amd-stibp which instructs qemu to remove that CPU flag.
I’ve once again switched from Proxmox to Arch Linux for my desktop machine. Both use KVM so it’s really just a matter of using the different VM manager syntax (virt-manager vs qm.) I used my notes from my previous stint with Arch, my article on GPU Passthrough in Proxmox as well as a thorough reading of the Arch wiki’s PCI Passthrough article.
Enable IOMMU
Configure GRUB to load the necessary iommu modules at boot. Append amd_iommu=on iommu=pt to the end of GRUB_CMDLINE_LINUX_DEFAULT (change accordingly if you have Intel instead of AMD)
sudo vim /etc/default/grub
...
GRUB_CMDLINE_LINUX_DEFAULT="loglevel=3 amd_iommu=on iommu=pt"
Run update-grub
sudo update-grub
Reserve GPU for VFIO
Reserve the GPU you wish to pass through to a VM for use with the vfio kernel driver (so the host OS doesn’t interfere with it)
Determine the PCI address of your GPU
Run lspci -v and look for your card. Mine was 01:00.0 & 01:00.1. You can omit the part after the decimal to include them both in one go – so in that case it would be 01:00
Run lspci -n -s <PCI address from above> to obtain vendor IDs. Example : lspci -n -s 01:00 01:00.0 0300: 10de:1b81 (rev a1) 01:00.1 0403: 10de:10f0 (rev a1)
Assign your GPU to vfio driver using the IDs obtained above. Example using above IDs: echo "options vfio-pci ids=10de:1b81,10de:10f0" >> /etc/modprobe.d/vfio.conf
Reboot the host to put the kernel / drivers into effect.
Assuming you’re using network manager for your connections, create a bridge (thanks to ciberciti.biz & the arch wiki for information on how to do so.) Replace interface names with ones corresponding to your machine:
sudo nmcli connection add type bridge ifname br0 stp no
sudo nmcli connection add type bridge-slave ifname enp4s0 master br0
sudo nmcli connection show
#Make note of the active connection name
sudo nmcli connection down "Wired connection 2" #from above
sudo nmcli connection up bridge-br0
Create a second bridge bound to lo0 for host-only communication. Change IP as desired:
sudo nmcli connection add type bridge ifname br99 stp no ip4 192.168.2.1/24
sudo nmcli connection add type bridge-slave ifname lo master br99
sudo nmcli connection up bridge-br99
Configure VM
Initial configuration
When creating the passthrough VM, make sure chipset is Q35.
Set the CPU model to host-passthrough (type it in, there is no dropdown for it.)
When adding disks / other devices, set the device model to virtio
Add your GPU by going to Add Hardware and finding it under PCI Host Device.
Windows 10 specific tweaks
If your passthrough VM is going to be windows based, some tweaks are required to get the GPU to work properly within the VM.
Ignore MSRs (blue screen fix)
Later versions of Windows 10 instantly bluescreen with kmode_exception_not_handled unless you pass an option to ignore MSRs. Add the kvm ignore_msrs=1 option in /etc/modprobe.d/kvm.conf to do so. Optionally add the report_ignored_msrs=0 option to squelch massive amounts of kernel messages every time an MSR was ignored.
Use the virsh edit command to make some tweaks to the VM configuration. We need to hide the fact that this is a VM otherwise the GPU drivers will not load and will throw Error 43. We need to add a vendor_id in the hyperv section, and create a kvm section enabling hidden state, which hides certain CPU flags that the drivers use to detect if they’re in a VM or not.
If you operate on a multi-core system such as my AMD Ryzen Threadripper the you will want to optimize your CPU core configuration in the VM per the CPU Pinning section in the Arch Wiki
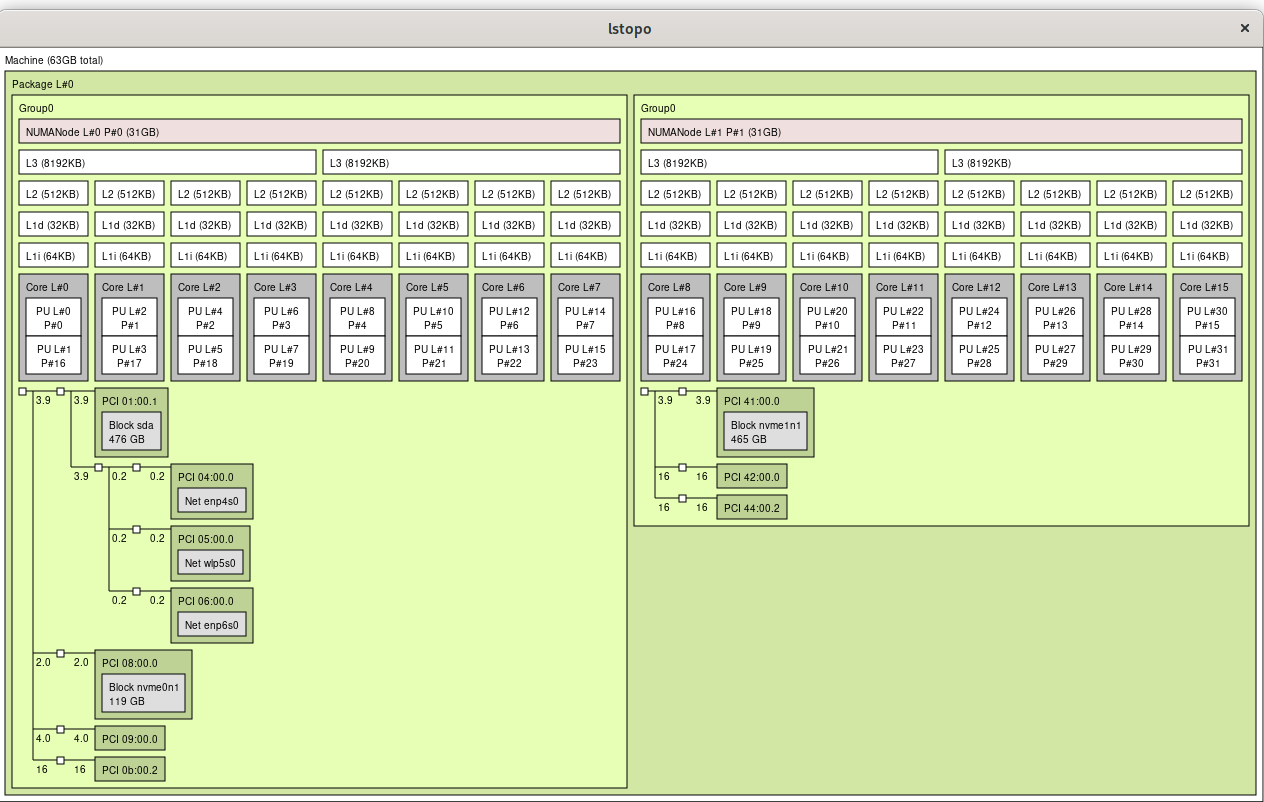
Determine your CPU topology by running lscpu -e and lstopo The important things to look for are the CPU number and core number. On my box, it looks like this:
From the above output I see my CPU core 0 is shared by CPUs 0 & 16, meaning CPU 0 and CPU 16 (as seen by the Linux kernel) are hyperthreaded to the same physical CPU core.
Especially for gaming, you want to keep all threads on the same CPU cores (for multithreading) and the same CPU die (on my threadripper, CPUs 0-7 reside on one physical die, and CPUs 8-15 reside on the other, within the same socket.)
In my case I want to dedicate one CPU die to my VM with its accompanying hyperthreads (CPUs 0-7 & hyperthreads 16-23) You can accomplish this using the virsh edit command and creating a cputune section (make sure you have a matching vcpu count for the number of cores you’re configuring.) Also edit CPU mode with the proper topology of 1 socket, 1 die, 8 cores with 2 threads. Lastly, configure memory to only be from the proper NUMA node the CPU cores your VM is using (Read here for more info.)
Non-uniform memory access is essential for 1st and 2nd gen Ryzen chips. It turns out that by default my motherboard hid the real NUMA configuration from the operating system. Remedy this by changing the BIOS setting to set Memory Interleaving = Channel (for my ASRock X399 motherboard it’s in CBS / DF options.) See here: https://www.reddit.com/r/Amd/comments/6vrcq0/psa_threadripper_umanuma_setting_in_bios/
After changing BIOS setting, lstopo now shows proper configuration:
CPU frequency
Change CPU frequency setting to use performance mode:
Append default_hugepagesz=1G hugepagesz=1G hugepages=16 to the kernel line in /etc/default/grub and re-run sudo grub-mkconfig -o /boot/grub/grub.cfg
Configure FIFO CPU scheduling
The Arch Wiki mentions to run qemu-system-x86_64 with taskset and chrt but doesn’t mention how to do so if you’re using virt-manager. Fortunately this reddit thread outlined how to accomplish it: libvirt hooks. Create the following script and place it in /etc/libvirt/hooks/qemu , change the VM variable to match the name of your VM, mark that new file as executable (chmod +x /etc/libvirt/hooks/qemu ) and restart libvirtd
#!/bin/bash
#Hook to change VM to FIFO scheduling to decrease latency
#Place this file in /etc/libvirt/hooks/qemu and mark it executable

#Change the VM variable to match the name of your VM
VM="win10"

if [ "$1" == "$VM" ] && [ "$2" == "started" ]; then
  if pid=$(pidof qemu-system-x86_64); then
     chrt -f -p 1 $pid
    echo $(date) changing CPU scheduling to FIFO for VM $1 pid $pid >> /var/log/libvirthook.log
  else
    echo $(date) Unable to acquire PID of $1 >> /var/log/libvirthook.log
  fi
fi
#Additional debug
#echo $(date) libvirt hook arg1=$1 arg2=$2 arg3=$3 arg4=$4 pid=$pid >> /var/log/libvirthook.log
Isolate CPUs
Update 7/28/20: I no longer do this in favor of the qemu hook script above, which prioritizes to p1 the qemu process for the cores it needs. I’m leaving this section here for historical/additional tweaking purposes.
Update 6/28/20: Additional tuning since I was having some stuttering and framerate issues. Also read here about the emulatorpin option
Dedicate CPUs to the VM (host will not use them) – append isolcups, nohz_full & rcu_nocbs kernel parameters into /etc/default/grub
Update 7/8/2020: I found this article and this reddit thread (and this one) on how to use pulseaudio for your guest VM to get low latency guest VM audio piped to the host machine.
Update qemu config
edit /etc/libvirt/qemu.conf: uncomment the line #user = "root" and replace “root” with your username
Update pulseaudio config
Edit /etc/pulse/daemon.conf and uncomment the following lines (remove semicolon)
In trying to passthrough some LSI SAS cards to a VM I kept receiving this error:
kvm: -device vfio-pci,host=0000:03:00.0,id=hostpci0,bus=ich9-pcie-port-1,addr=0x0,rombar=0: vfio 0000:03:00.0: failed to setup container for group 7: Failed to set iommu for container: Operation not permitted
I found on this post that the fix is to add a line to /etc/modprobe.d/vfio.conf with the following:
I upgraded to ProxMox 6.0 and to my dismay my Windows VM suddenly began receiving the dreaded Code 43 error. After much digging I finally found this post on the ProxMox forums which outlines what needs to happen.
In my case, all I needed to do was tweak my machine type. There is no GUI option to do this, so it had to be done in the command line:
qm set <VM_ID> -machine pc-q35-3.1
That was all it took!
The forum also suggested a few other things if that didn’t work. I didn’t end up needing them but I’ll put them here in case it’s helpful:
With the above settings I also discovered there is no need to have x-vga=on anymore. This allows you to have both the regular VM console and your graphics card if you so desire.
I recently decided to amplify my VFIO experience by experimenting with passing my primary display adapter to a VM in proxmox. Previously I had just run tasksel on the proxmox host itself to install a GUI. I wanted better separation from the server side of proxmox and the client side. I also wanted to be able to distro-hop while maintaining the proxmox backend.
Initially I tried following my guide for passing through a secondary graphics card but ran into a snag. It did not work with my primary card and kept outputting these errors:
device vfio-pci,host=09:00.0,id=hostdev0,bus=pci.4,addr=0x0: Failed to mmap 0000:09:00.0 BAR 1. Performance may be slow
After much digging I finally found this post which explained I needed to unbind a few things for it to work properly:
After more searching I found this post on reddit which had a nifty script for automating this when VM startup is desired. I tweaked it a bit to suit my needs.
Find your IDs for GPU by doing lspci and looking for your adapter. Find the IDs by running lspci -n -s <GPU location discovered with lspci>. Lastly VMID is the promxox ID for the VM you wish to start.
#!/bin/sh
#Script to launch Linux desktop
#Adapted from from https://www.reddit.com/r/VFIO/comments/abfjs8/cant_seem_to_get_vfio_working_with_qemu/?utm_medium=android_app&utm_source=share
GPU=09:00
GPU_ID="10de 1c82"
GPU_AUDIO="10de 0fb9"
VMID=116
# Remove the framebuffer and console
echo 0 > /sys/class/vtconsole/vtcon0/bind
echo 0 > /sys/class/vtconsole/vtcon1/bind
echo efi-framebuffer.0 > /sys/bus/platform/drivers/efi-framebuffer/unbind
# Unload the Kernel Modules that use the GPU
modprobe -r nvidia_drm
modprobe -r nvidia_modeset
modprobe -r nvidia
modprobe -r snd_hda_intel
# Load the vfio kernel module
modprobe vfio
modprobe vfio_iommu_type1
modprobe vfio-pci
#Assign card to vfio-pci
echo -n "${GPU_ID}" > /sys/bus/pci/drivers/vfio-pci/new_id
echo -n "${GPU_AUDIO}" > /sys/bus/pci/drivers/vfio-pci/new_id
#Start desktop
sudo qm start $VMID
#Wait here until the VM is turned off
while [ "$(qm status $VMID)" != "status: stopped" ]
do
sleep 5
done
#Reassign primary graphics card back to host
echo -n "0000:${GPU}.0" > /sys/bus/pci/drivers/vfio-pci/unbind
echo -n "0000:${GPU}.1" > /sys/bus/pci/drivers/vfio-pci/unbind
echo -n "${GPU_ID}" > /sys/bus/pci/drivers/vfio-pci/remove_id
echo -n "${GPU_AUDIO}" > /sys/bus/pci/drivers/vfio-pci/remove_id
rmmod vfio-pci
modprobe nvidia
modprobe nvidia_drm
modprobe nvidia_modeset
modprobe snd_hda_intel
sleep 1
echo -n "0000:${GPU}.0" > /sys/bus/pci/drivers/nvidia/bind
echo -n "0000:${GPU}.1" > /sys/bus/pci/drivers/snd_hda_intel/bind
sleep 1
echo efi-framebuffer.0 > /sys/bus/platform/drivers/efi-framebuffer/bind
echo 1 > /sys/class/vtconsole/vtcon0/bind
echo 1 > /sys/class/vtconsole/vtcon1/bind
With my primary adapter passed through I realized I also want other things passed through, mainly USB. I tried Proxmox’s USB device passthrough options but it doesn’t work well with USB audio (stutters and choppy.) I wanted to pass through my whole USB controller to the VM.
This didn’t work as well as I had planned due to IOMMU groups. A great explanation of IOMMU groups can be found here. I had to figure out which of my USB controllers were in which IOMMU group to see if I could pass the whole thing through or not (some of them were in the same IOMMU group as SATA & network controllers, which I did not want to pass through to the VM.)
Fortunately I was able to discover which USB controllers I could safely pass through first by running lspci to see the device ID, then running find to see which IOMMU group it was in, then checking against lspci to see what other devices were in that group. The whole group comes over together when you pass through to a VM.
First determine the IDs of your USB controllers
lspci | grep USB

01:00.0 USB controller: Advanced Micro Devices, Inc. [AMD] Device 43ba (rev 02)
08:00.0 USB controller: Renesas Technology Corp. uPD720201 USB 3.0 Host Controller (rev 03)
0a:00.3 USB controller: Advanced Micro Devices, Inc. [AMD] Device 145c
43:00.3 USB controller: Advanced Micro Devices, Inc. [AMD] Device 145c
Next get which IOMMU group these devices belong to
As you can see one of my USB controllers (01:00.0) has a whole bunch of stuff in its IOMMU group, so I don’t want to use it lest I bring all those other things into the VM with it. The other three, though, are isolated in their groups and thus are perfect for passthrough.
In my case I passed through 0a:00.3 & 43:00.3 as 08:00.0 is a PCI card I want passed through to my Windows VM. This passed through about 2/3 of the USB ports on my system to my guest VM.
At one point I had KVM with GPU passthrough running in Arch Linux. I have since moved away from it back to ProxMox. Here are my notes I jotted down when I did this in Arch. Sorry these are just rough notes, I didn’t end up using Arch for long enough to turn this into a polished article.
pacman -Sy qemu netctl ovmf virt-manager
When creating VM, make sure chipset is Q35
CPU model host-passthrough (write it in)
Create VirtIO SCSI controller and attach drives to it
Copy /etc/netctl/examples/bridge to /etc/netctl/bridge
/etc/netctl/bridge
Description="Example Bridge connection"
Interface=br0
Connection=bridge
BindsToInterfaces=(enp4s0)
IP=dhcp

#Optional - give your system another IP for host-only networking
ExecUpPost="ip addr add 192.168.2.1/24 dev br0"
I had a very odd issue where all sound disappeared in my Windows VM if the microphone was used. Even simply opening up audio properties and going to the Recording tab triggered this issue. Disabling / re-enabled Special Effects for the playback device brought it back until the microphone was accessed again.
I’m using USB sound card passed through to the VM for audio. It stems from the VM’s USB controller. When I had it set to USB3 the issue would occur. When set to USB2 the issue went away. Bizarre.
An unfortunate bug exists for the AMD Threadripper family of GPUs which causes VGA Passthrough not to work properly. Fortunately some very clever people have implemented a workaround to allow proper VGA passthrough until a proper Linux Kernel patch can be accepted and implemented. See here for the whole story.
Right now my Thrdearipper 1950x successfully has GPU passthrough thanks to HyenaCheeseHeads “java hack” applet. I went this route because I really didn’t want to try and recompile my ProxMox kernel to get passthrough to work. Per the description “It is a small program that runs as any user with read/write access to sysfs (this small guide assumes “root”). The program monitors any PCIe device that is connected to VFIO-PCI when the program starts, if the device disconnects due to the issues described in this post then the program tries to re-connect the device by rewriting the bridge configuration.” Instructions taken from the above Reddit post.
Go to https://pastebin.com/iYg3Dngs and hit “Download” (the MD5 sum is supposed to be 91914b021b890d778f4055bcc5f41002)
Rename the downloaded file to “ZenBridgeBaconRecovery.java” and put it in a new folder somewhere
Go to the folder in a terminal and type “javac ZenBridgeBaconRecovery.java”, this should take a short while and then complete with no errors. You may need to install the Java 8 JDK to get the javac command (use your distribution’s software manager)
In the same folder type “sudo java ZenBridgeBaconRecovery”
Make sure that the PCIe device that you intend to passthru is listed as monitored with a bridge
Now start your VM
In my case (Debian Stretch, ProxMox) I needed to install openjdk-8-jdk-headless
Next I have a little script on startup to spawn this as root in a detached tmux session, so I don’t have to remember to run it (If you try to start your VM before running this, it will hose passthrough on your system until you reboot it.) Be sure to change the script to point to wherever you compiled ZenBridgeBaconRecovery
#!/bin/bash
cd /home/nicholas  #change me to suit your needs
sudo java ZenBridgeBaconRecovery
And here is the command I use to run on startup:
tmux new -d '/home/nicholas/passthrough.sh'
Again, be sure to modify the above to point to the path of wherever you saved the above script.
So far this works pretty well for me. I hate having to run a java process as sudo, but it’s better than recompiling my kernel.
Update 6/27/2018: I’ve created a systemd service script for the ZenBaconRecovery file to run at boot. Here is my file, placed in
/etc/systemd/system/zenbridge.service: (change your working directory to match the zenbridgebaconrecovery java file location. Don’t forget to do systemctl daemon-reload.)
Per an update on the reddit thread motherboard manufactures have finally put out BIOS updates that resolve the PCI passthrough problems. I updated my X399 Tachi to the latest version of its UEFI BIOS (3.20) and indeed PCI passthrough worked without any more wonky workarounds!
I started this blog four years ago to document my highly technical adventures – mainly so I could reproduce them later. One of my first articles dealt with GPU passthrough / virtualization. It was a complicated ordeal with Xen. Now that I’ve switched to KVM (ProxMox) I thought I’d give it another go. It’s still complicated but not nearly as much this time.
To get my Nvidia GTX 1070 GPU properly passed through to a Windows VM hosted by ProxMox 5 I simply followed this excellent guide written by sshaikh. I will summarize what I took from his guide to get my setup to work.
Ensure VT-d is supported and enabled in the BIOS
Enable IOMMU on the host
append the following to the GRUB_CMDLINE_LINUX_DEFAULT line in /etc/default/grub
intel_iommu=on
Save your changes by running
update-grub
Blacklist NVIDIA & Nouveau kernel modules so they don’t get loaded at boot
and look for your card. Mine was 01:00.0 & 01:00.1. You can omit the part after the decimal to include them both in one go – so in that case it would be 01:00
Run lspci -n -s <PCI address> to obtain vendor IDs. Example :
Create your Windows VM using the UEFI bios hardware option (not the deafoult seabios) but do not start it yet. Modify /etc/pve/qemu-server/<vmid>.conf and ensure the following are in the file. Create / modify existing entries as necessary.
Update 4/9/18: Blue screening happens to Windows 10 1803 as well with the error
System Thread Exception Not Handled
The fix for this is the same – ignore_msrs=1
GPU optimization:
Give as many CPUs as the host (in my case 8) and then enable NUMA for the CPU. This appeared to make my GTX 1070 perform better in the VM – near native performance.
I was dismayed to see Citrix’s recent announcement about Xenserver 7.3 removing several key features from the free version. Xenserver’s free features are the reason I switched over to them in the first place back in 2014. Xenserver has been rock solid; I haven’t had any complaints until now. Their removal of xenmotion and migration in the free version forced me to look elsewhere for my virtualization needs.
I’ve settled on ProxMox, which is KVM based. Their documentation is excellent and it has all the features I need – for free. I’m also in love with their web based management – no more Windows fat client!
Below are my notes on how I successfully migrated all my Xenserver VMs over to the ProxMox Virtual Environment (PVE).
Any changes to network interfaces, such as bringing them up, require a reboot of the host
If you have an existing ISO share, you can create a directory called “template” in your ISO repository folder, then inside symlink “iso” back to your ISO folder. Proxmox looks inside template/iso for ISO images for whatever storage you configure.
Do not create your ProxMox host with ZFS unless you have tons of RAM. If you don’t have enough RAM you will run into huge CPU load times making the system unresponsive in cases of high disk load, such as VM copies / backups. More reading here.
If you have two node cluster, like I do, it creates some problems, though. If one goes down, the other can’t do anything to the pool (create VM, backup) until it comes back up. In my situation I have one primary host that is up all the time and I bring the secondary host up only when I want to do maintenance on the first.
In that specific situation you can still designate a “master” of sorts by increasing the number of quorum votes it gets from 1 to 2. That way when the secondary node is down, the primary node can still do cluster operations because the default number of votes to stay quorate is 2. See here for more reading on the subject.
On either host (they must both be up and in the cluster for this to work)
vi /etc/pve/corosync.conf
Find your primary server in the nodelist settings and change
quorum_votes: 2
Also find the quorum section and add expected_votes: 2
Make sure to increment config_version number (bottom of the file.) Now if your secondary is down you can still operate the primary.
Migrating VMs
I migrated my Xen VMs to KVM by creating VMs with identical specs in PVE, copying the VHD files from the Xen host to the new PVE host, running qemu-img to convert them to RAW format, and then using dd to copy the raw information over to corresponding empty VM disks. Depending on the OS of the VM there was some after-copy tweaking I also had to do.
qemu-img convert <VHD_FILE_NAME>.vhd -O raw <RAW_FILE_NAME>.raw
Create a new VM with identical configuration, especially disk size. Go to the hardware tab and take note of the name of the disk. For example, one of mine was:
local-zfs:vm-100-disk-1,discard=on,size=40G
The interesting part is between local-zfs and discard=on, namely vm-100-disk-1. This is the name of the disk we want to overwrite with data from our Xenserver VM’s disk.
Next figure out the full path of this disk on your proxmox host
find / -name vm-100-disk-1*
The result in my case was /dev/zvol/rpool/data/vm-100-disk-1
Take the name and put it in the following command to complete the process:
Once that’s done you can delete your .vhd and .raw files.
From local / LVM storage
In case your Xen VMs are stored in LVM device format instead of a VHD file, get UUID of storage by doing xe vdi-list and finding the name of the hard disk from the VM you want. It’s helpful to rename the hard disks to something easy to spot. I chose the word migrate.
then follow vhd -> raw -> dd to proxmox drive process described in the From Shared Storage section.
Post-Migration tweaks
For the most part Debian-based systems moved over perfectly without any needed tweaks; Some VMs changed interface names due to network device changes. eth0 turned into ens8. I had to modify /etc/network/interfaces to change eth0 to ens8 to get virtio networking working.
CentOS
All my CentOS VMs failed to boot after migration due to a lack of virtio disk drivers in the initial RAM disk. The fix is to change the disk hardware to IDE mode (they boot fine this way) and then modify the initrd of each affected host:
Once that’s done you can detach the hard disk and re-attach it back as SCSI (virtio) mode. Don’t forget to modify the options and change the boot order from ide0 to scsi0
Arch Linux
One of my Arch VMs had UUID configured which complicated things. The root device UUID changes in KVM virtio vs IDE mode. The easiest way to fix it is to boot this VM into an Arch install CD. Mount the root partition and then run arch-chroot /mnt/sda1. Once in the chroot runpacman -Sy kernel to reinstall the kernel and generate appropriate kernel modules.
mount /dev/sda1 /mnt
arch-chroot /mnt
pacman -Sy kernel
Also make sure to modify /etc/fstab to reflect appropriate device id or UUID (xen used /dev/xvda1, kvm /dev/sda1)
Windows
Create your Windows VM using non-virtio drivers (default settings in PVE.) Obtain the latest windows virtio drivers here and extract them somewhere memorable. Switch everything but the disk over to Virtio in the VM’s hardware config and reboot the VM. Go into device manager and point to extracted driver location for each unknown device.
To get Virtio disk to work, add a new disk to the VM of any size and SCSI (virtio) type. Boot the Windows VM and install drivers for that drive. Then shut down, remove that second drive, detach the primary drive and change to virtio SCSI. It should then come up with full virtio drivers.
All hosts
KVM has a guest agent like xenserver does called qemu-agent. Turn it on in VM options and install qemu-guest-agent in your guest. This KVM a bit more insight into your host.
If nothing is returned, it means qemu-agent is working. You can test all your VMs at once with this one-liner (change your starting and finishing VM IDs as appropriate)
for id in {100..114}; do echo $id; qm agent $id ping; done
This little one-liner will output the VM ID it’s trying to ping and will return any errors it finds. No errors means everything is working.
Disable support nag
PVE has a support model and will nag you at each login. If you don’t like this you can change it like so (the line number might be different depending on which version you’re running:
vi +850 /usr/share/pve-manager/js/pvemanagerlib.js
Modify the line if (data.status !== ‘Active’); change it to
I had a really strange issue where I was able to establish quorum with a second node, but after a reboot quorum never happened again. I re-installed that second node and re-joined it several times but I never got past the “waiting for quorum….” stage.
After much research I came across this article which explained what was happening. Corosync uses multicast to establish cluster quorum. Many switches (including mine) have a feature called IGMP snooping, which, without an IGMP querier, essentially means multicast never happens. Sure enough, after logging into my switches and disabling IGMP snooping, quorum was instantly established. The article above says this is not recommended, but in my small home lab it hasn’t produced any ill effects. Your mileage may vary. You can also configure your cluster to use unicast instead.
USB Passthrough not working properly
With Xenserver I was able to pass through the USB controller of my host to the guest (a JMICRON USB to ATAATAPI bridge holding a 4 disk bay.) I ran into issues with PVE, though. Using the GUI to pass the USB device did not work. Manually adding PCI passthrough directives (hostpci0: 00:14.1) didn’t work. I finally found on a little nugget on the PCI Passthrough page about how you can simply pass the entire device and not the function like I had in Xenserver. So instead of doing hostpci0: 00:14.1, I simply did hostpci0: 00:14 . That helped a little bit, but I was still unable to fully use these drives simultaneously.
My solution was eventually to abandon PCI passthrough altogether in favor of just passing individual disks to the guest as outlined here.
Find the ID of the desired disks by issuing ls -l /dev/disk/by-id. You only need to know the UUIDs of the disks, not the partitions. Then modify the KVM config of your desired host (mine was located at /etc/pve/qemu-server/101.conf) and a new line for each disk, adjusting scsi device numbers and UUIDs to match: