I recently got a Tacx Neo 2 smart trainer for my bike and was eager to use it on my big screen TV with Zwift. Unfortunately, despite the Nvidia Shield being a more that capable Android device, Zwift does not show up in the Google play store. I didn’t want to stream Zwift from my PC because a) the Windows app is annoying and doesn’t go full screen (title bar at the top) and b) my PC is located upstairs and the bluetooth doesn’t appear to reach from the trainer to the PC.
My solution to this was to sideload the Zwift app onto my Nvidia shield. It wasn’t as straightforward as most sideloading due to how Zwift is configured: it has an APK file, and an OBB file. The APK is small and is the application itself, the OBB file is all the map data (it’s large – over 600 MB)
Fortunately, a new Android format called xapk exists, and is an archive of both in one package. This was the process I used to successfully get my Zwift on my Nvidia Shield:
Install a file explorer app on the shield via the play store (I used FX file explorer)
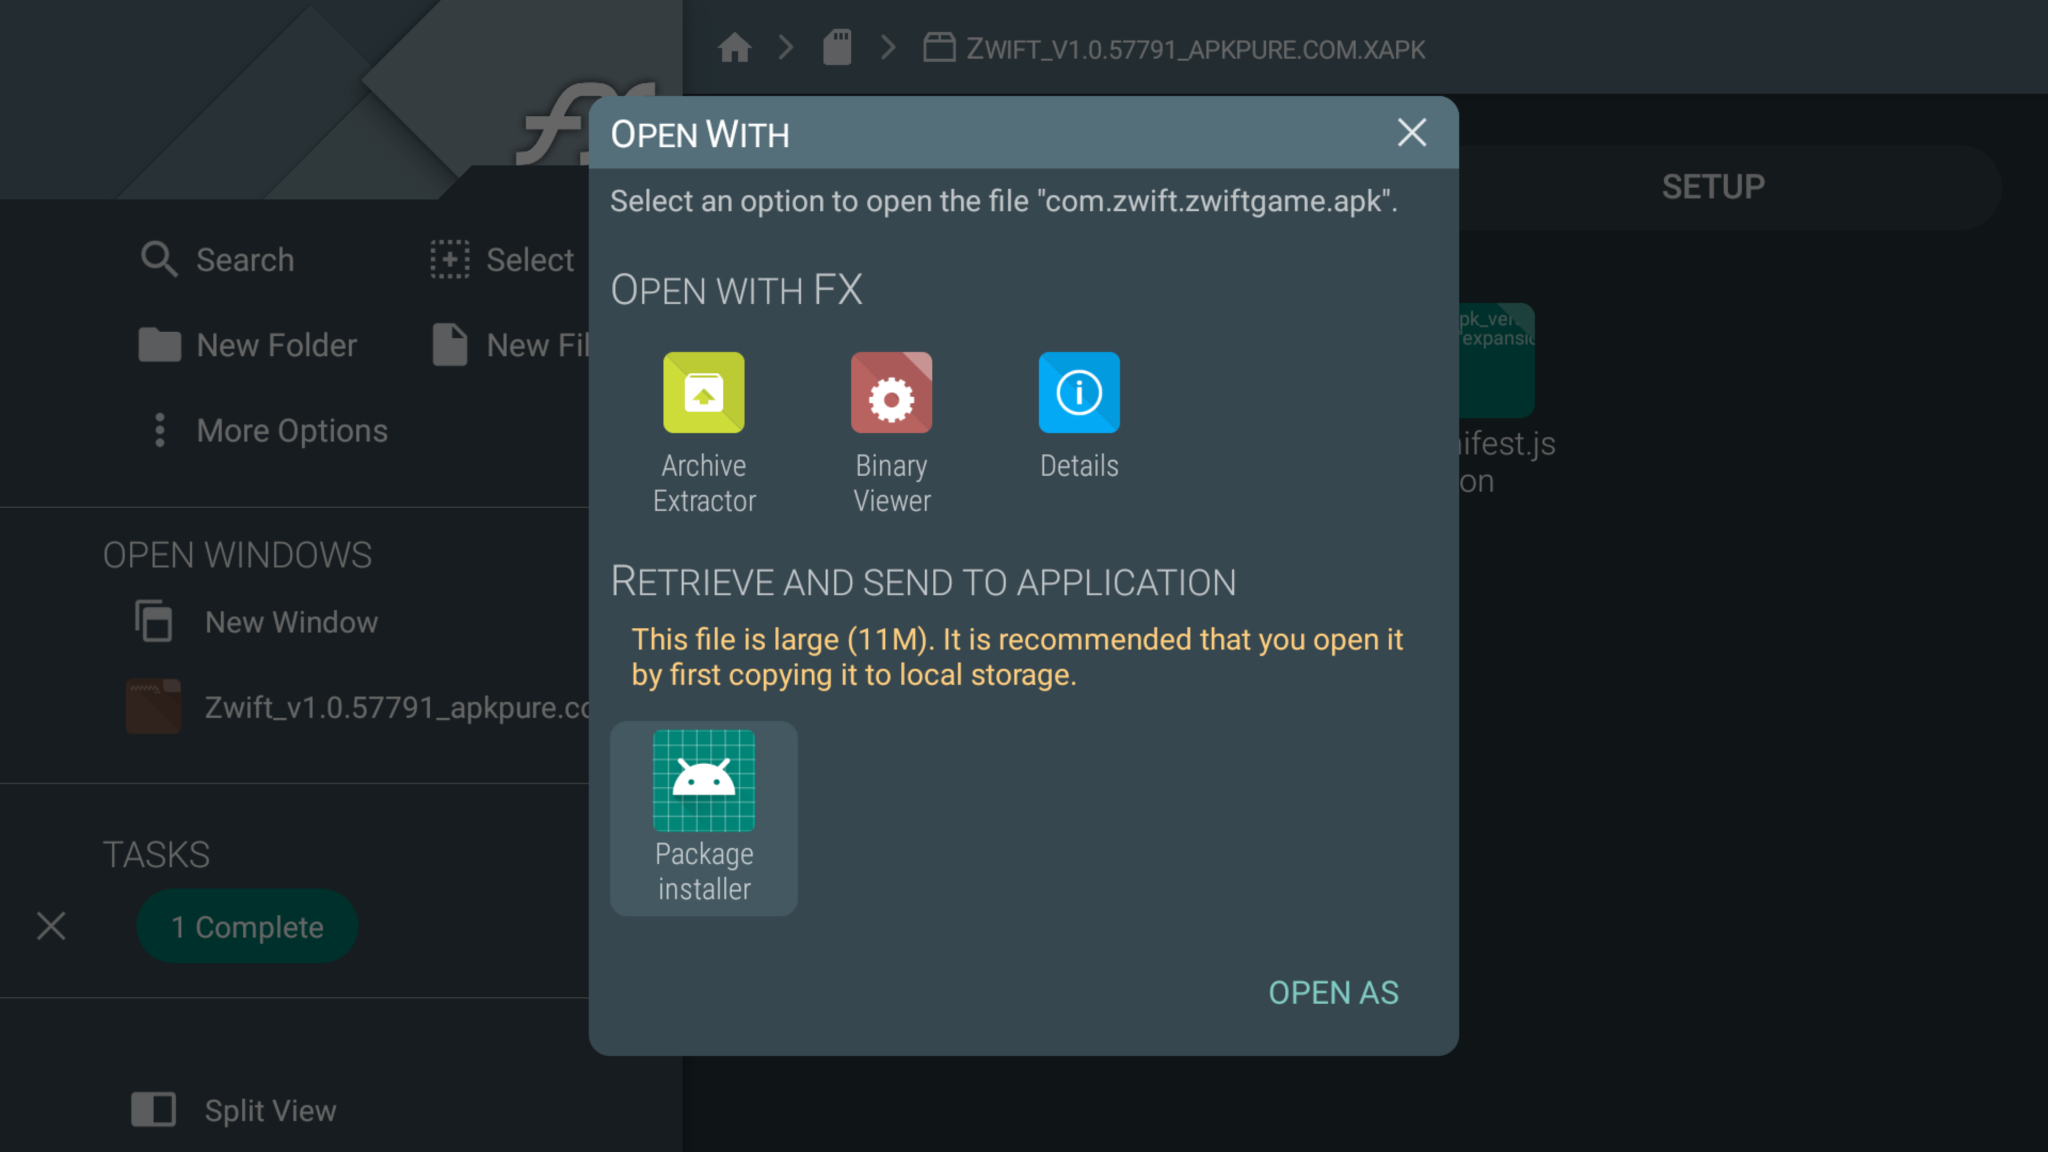
Use the file explorer app to open the xapk file as an archive (Archive Explorer)
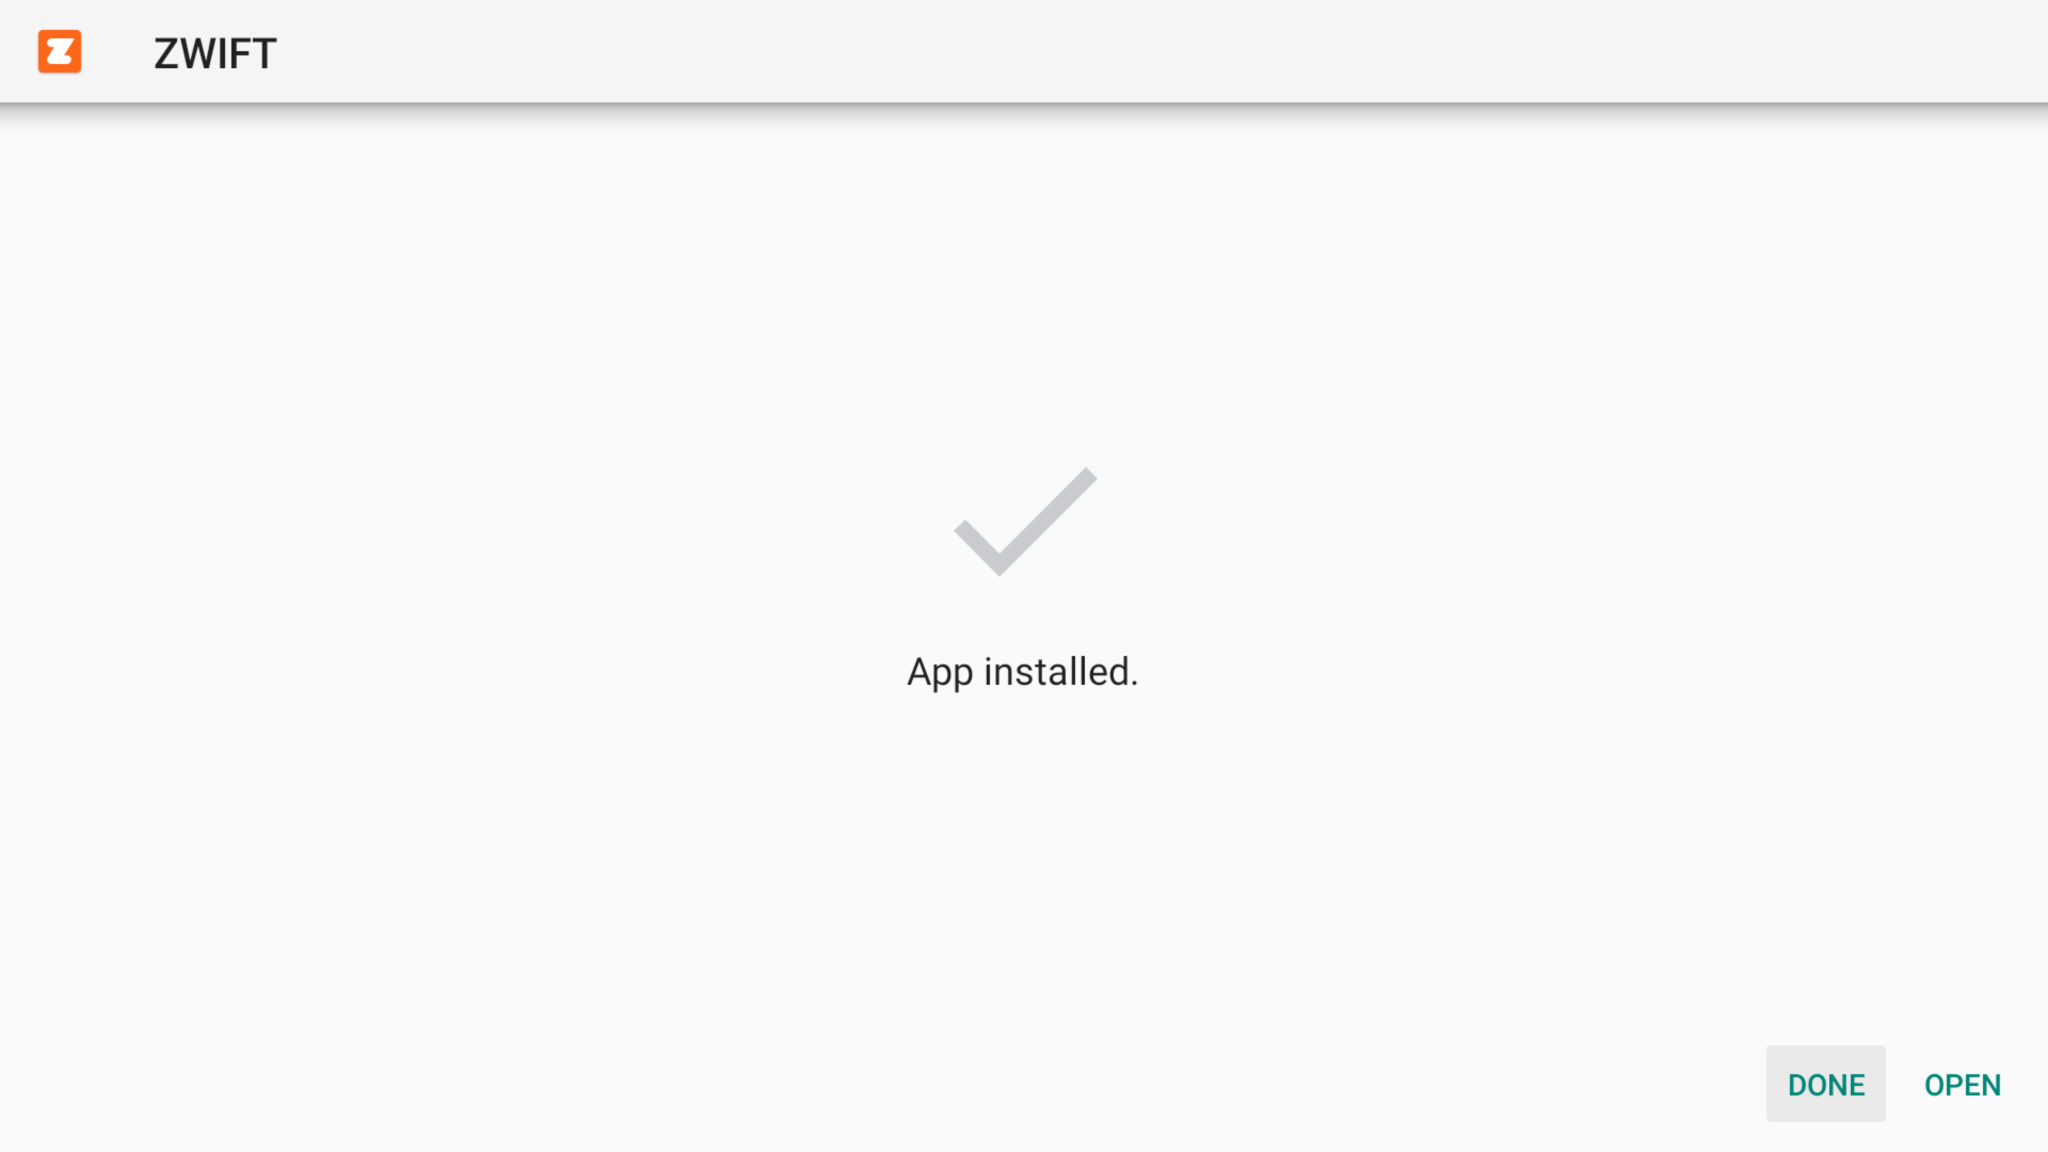
Click on APK and install it by selecting to open with Android installer (grant access to when prompted)
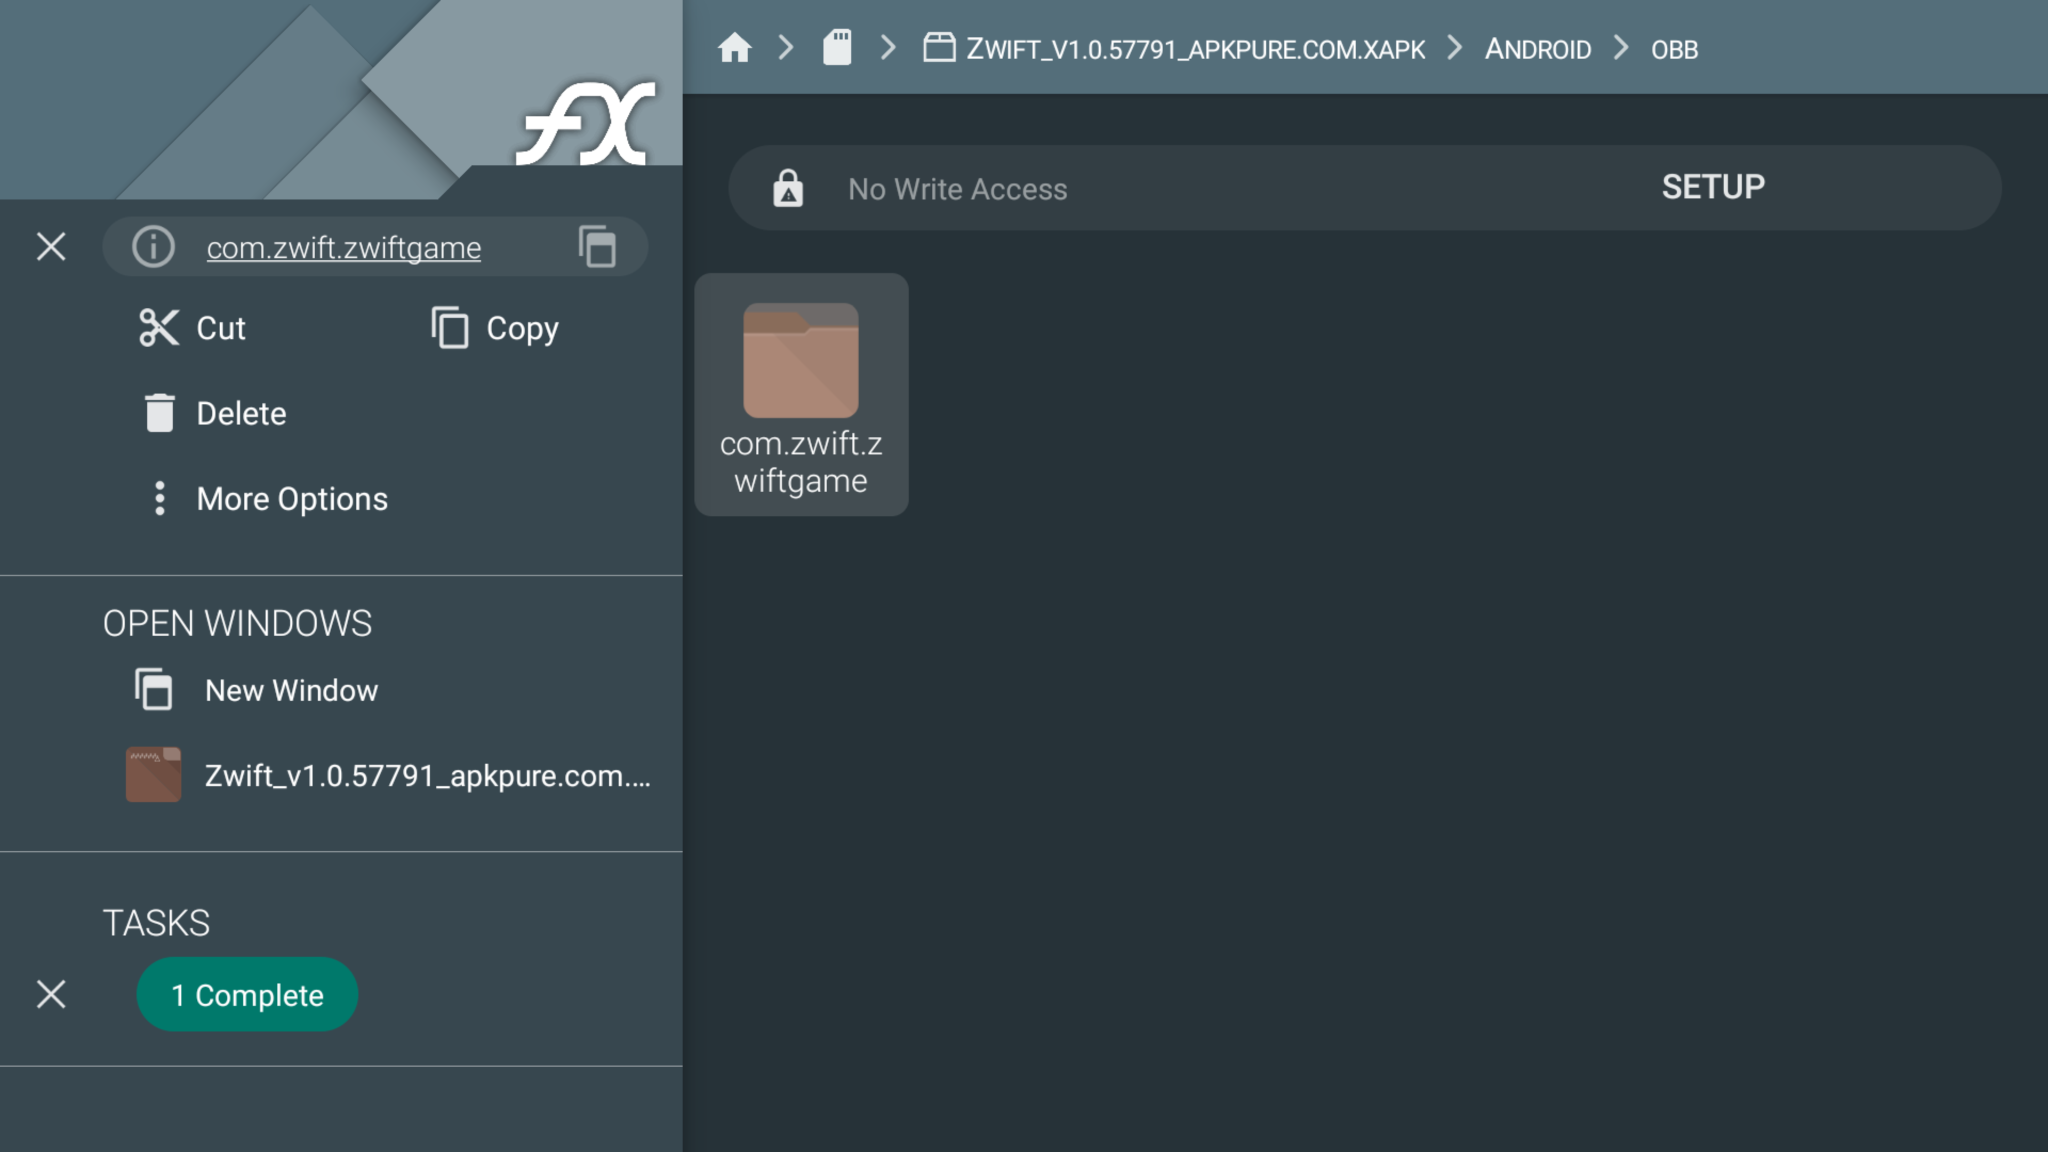
Copy the Android/obb/com.zwift.zwiftgame folder to home / Android / obb
Access Zwift by going to settings / Apps / See all apps and scroll to the bottom
Optional: Install sideload app from the play store, launch Zwift from that app instead
The shield remote doesn’t appear to control anything within the app. Plug in a mouse so you can swipe away the first run tutorial screens (hold left click and drag to the left.) Optional: plug in a keyboard while you’re at it so you can log in faster.
Success! My trainer showed up in the pairing screen and everything works! You can even have your own music playing in the background, with a caveat: if you ever switch apps away from Zwift, it will reset back to the login screen because the Shield doesn’t appear to have enough memory to keep Zwift running when switching another app to the foreground. If you want your shield to play music, start the music first, then switch to Zwift. Once you’re in Zwift, you can’t switch away to any other app without losing your progress.
In general I try to buy server-class hardware for my home lab, primarily so that I could have IPMI / Remote access console for remote OS installation & troubleshooting. I recently got a new desktop and found myself with a Threadripper 1950x that would make an excellent addition to my server cluster. The one problem being it’s a desktop-class board, so it does not have any IPMI / remote access device.
I solved my problem with pikvm. It works wonderfully! Pikvm uses a raspberry pi with some additional hardware and software to interface with a system to control power & reset capabilities, as well as KVM functions with the ability to upload OS images and do OS installations remotely. The whole project cost me about $150 since I didn’t have some of the essential items for it. It could definitely be cheaper if I didn’t buy large packs of items or already had some electronics components.
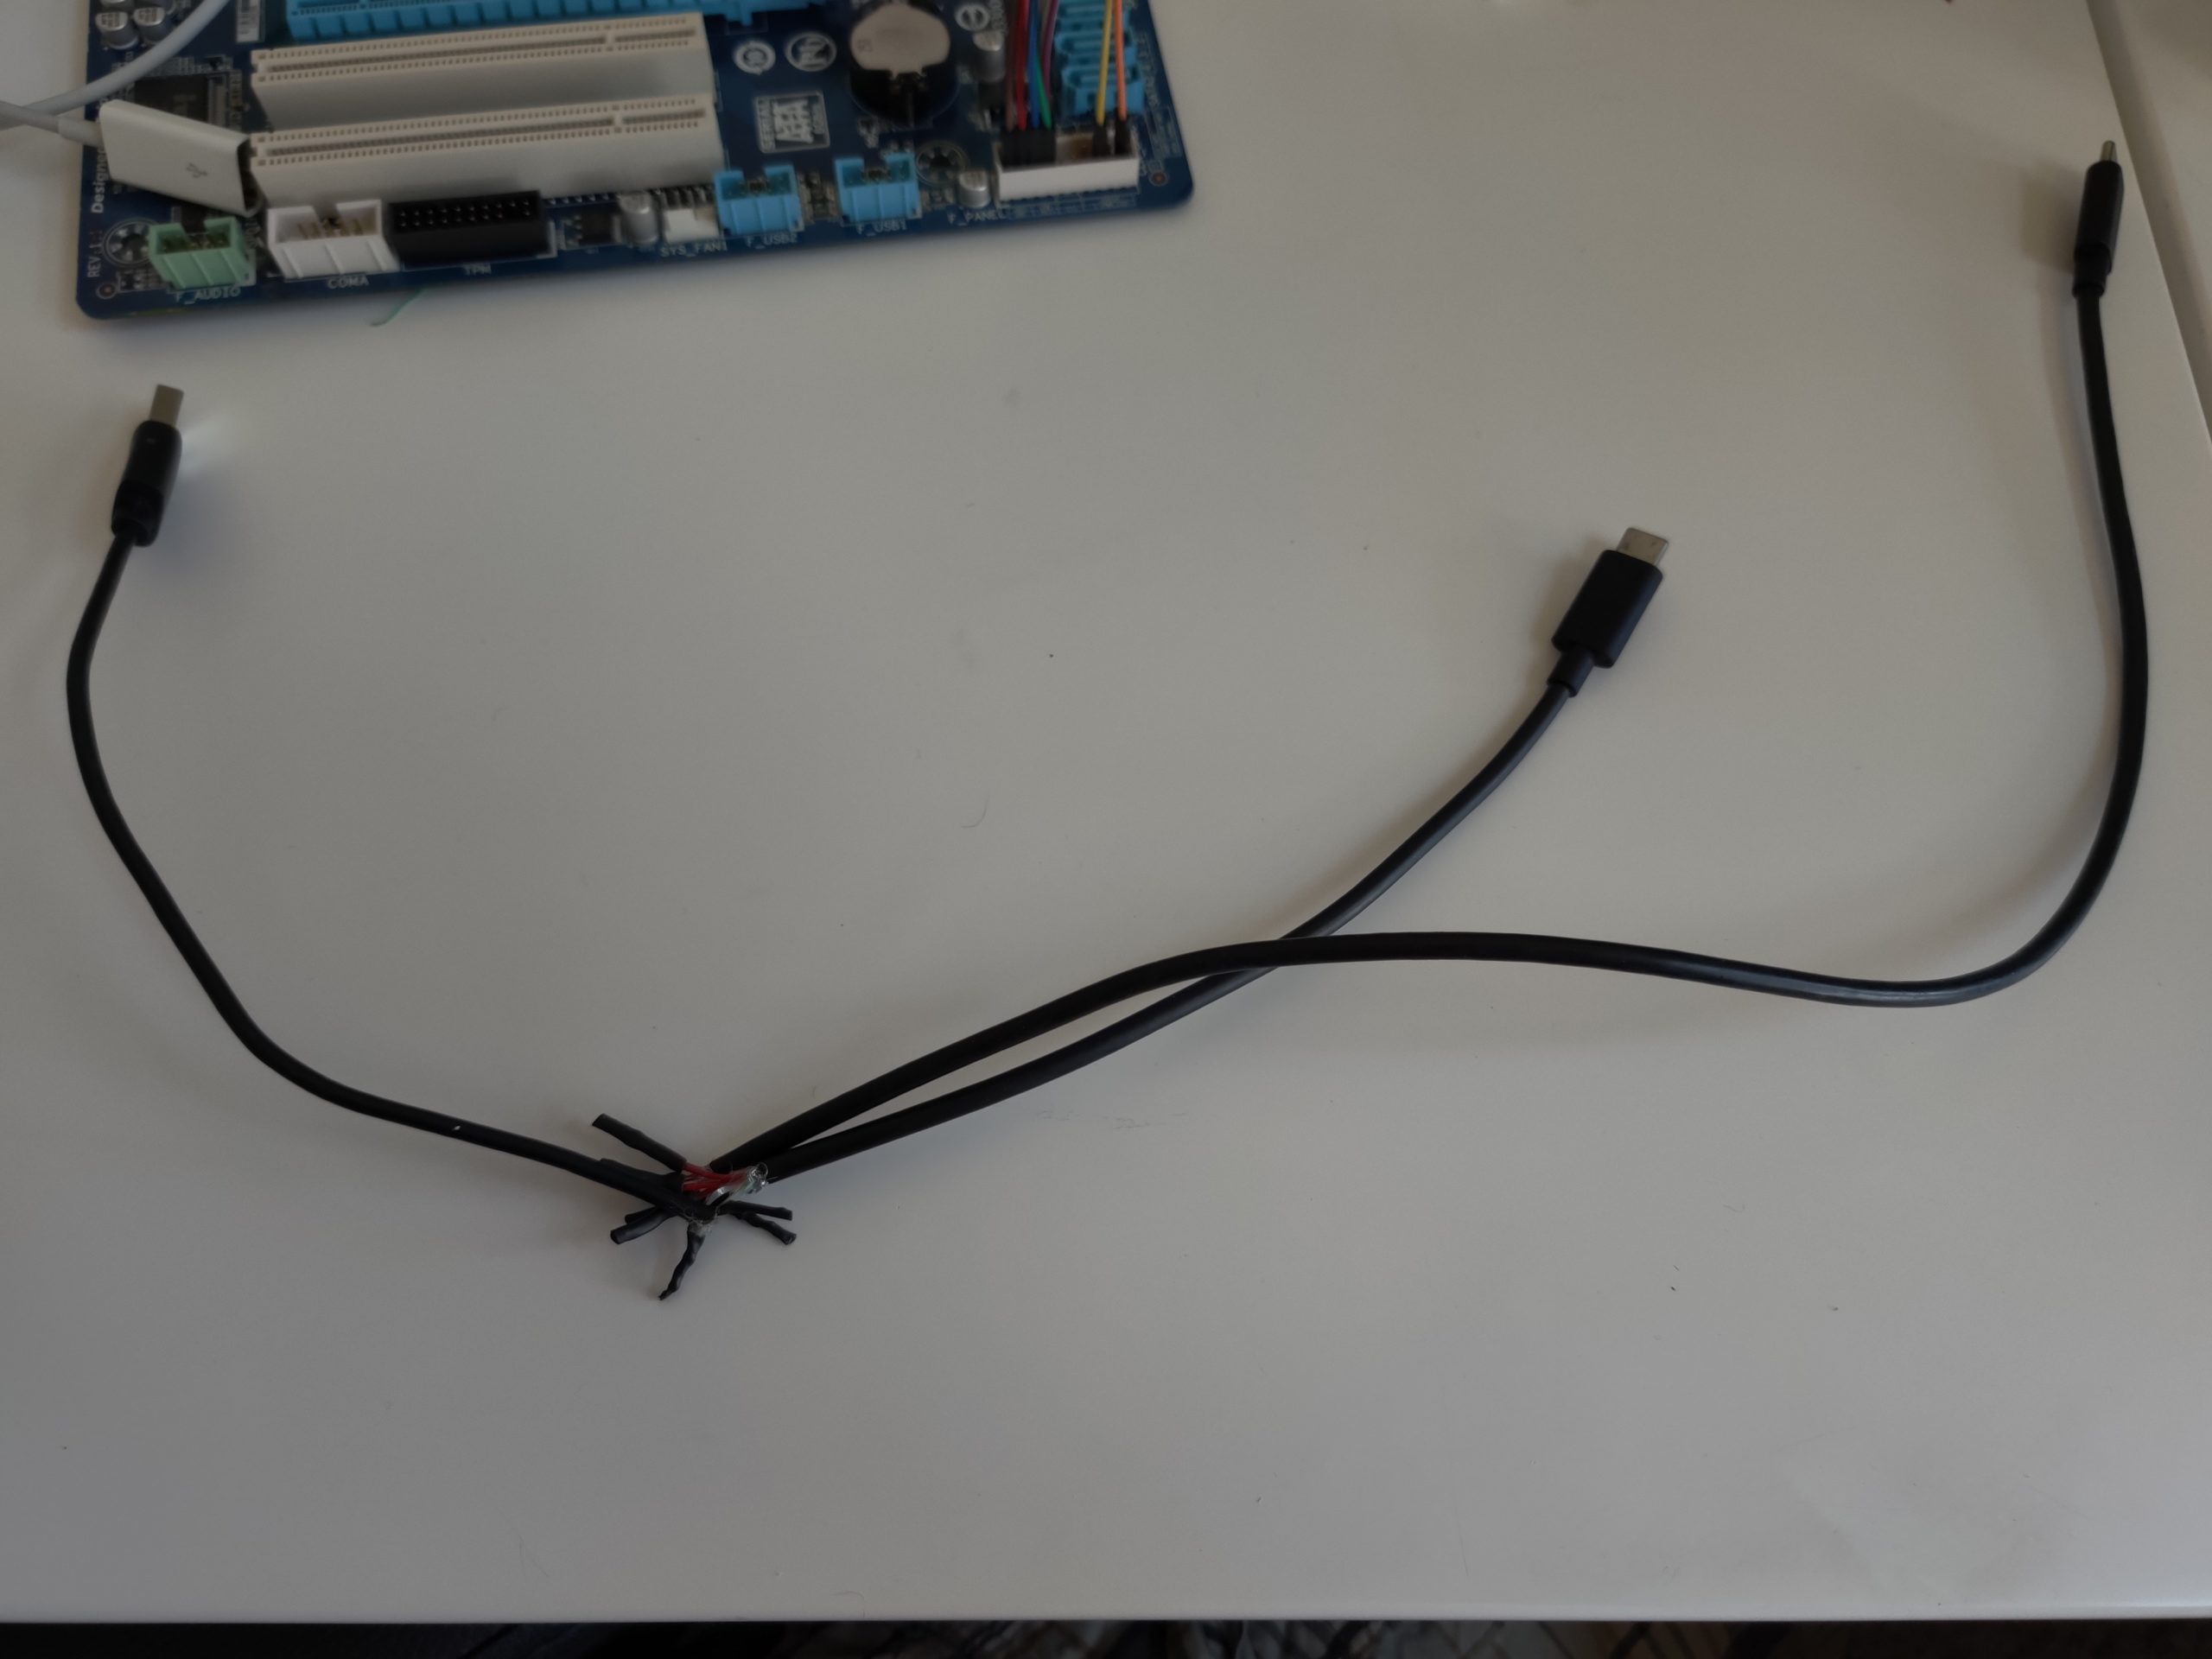
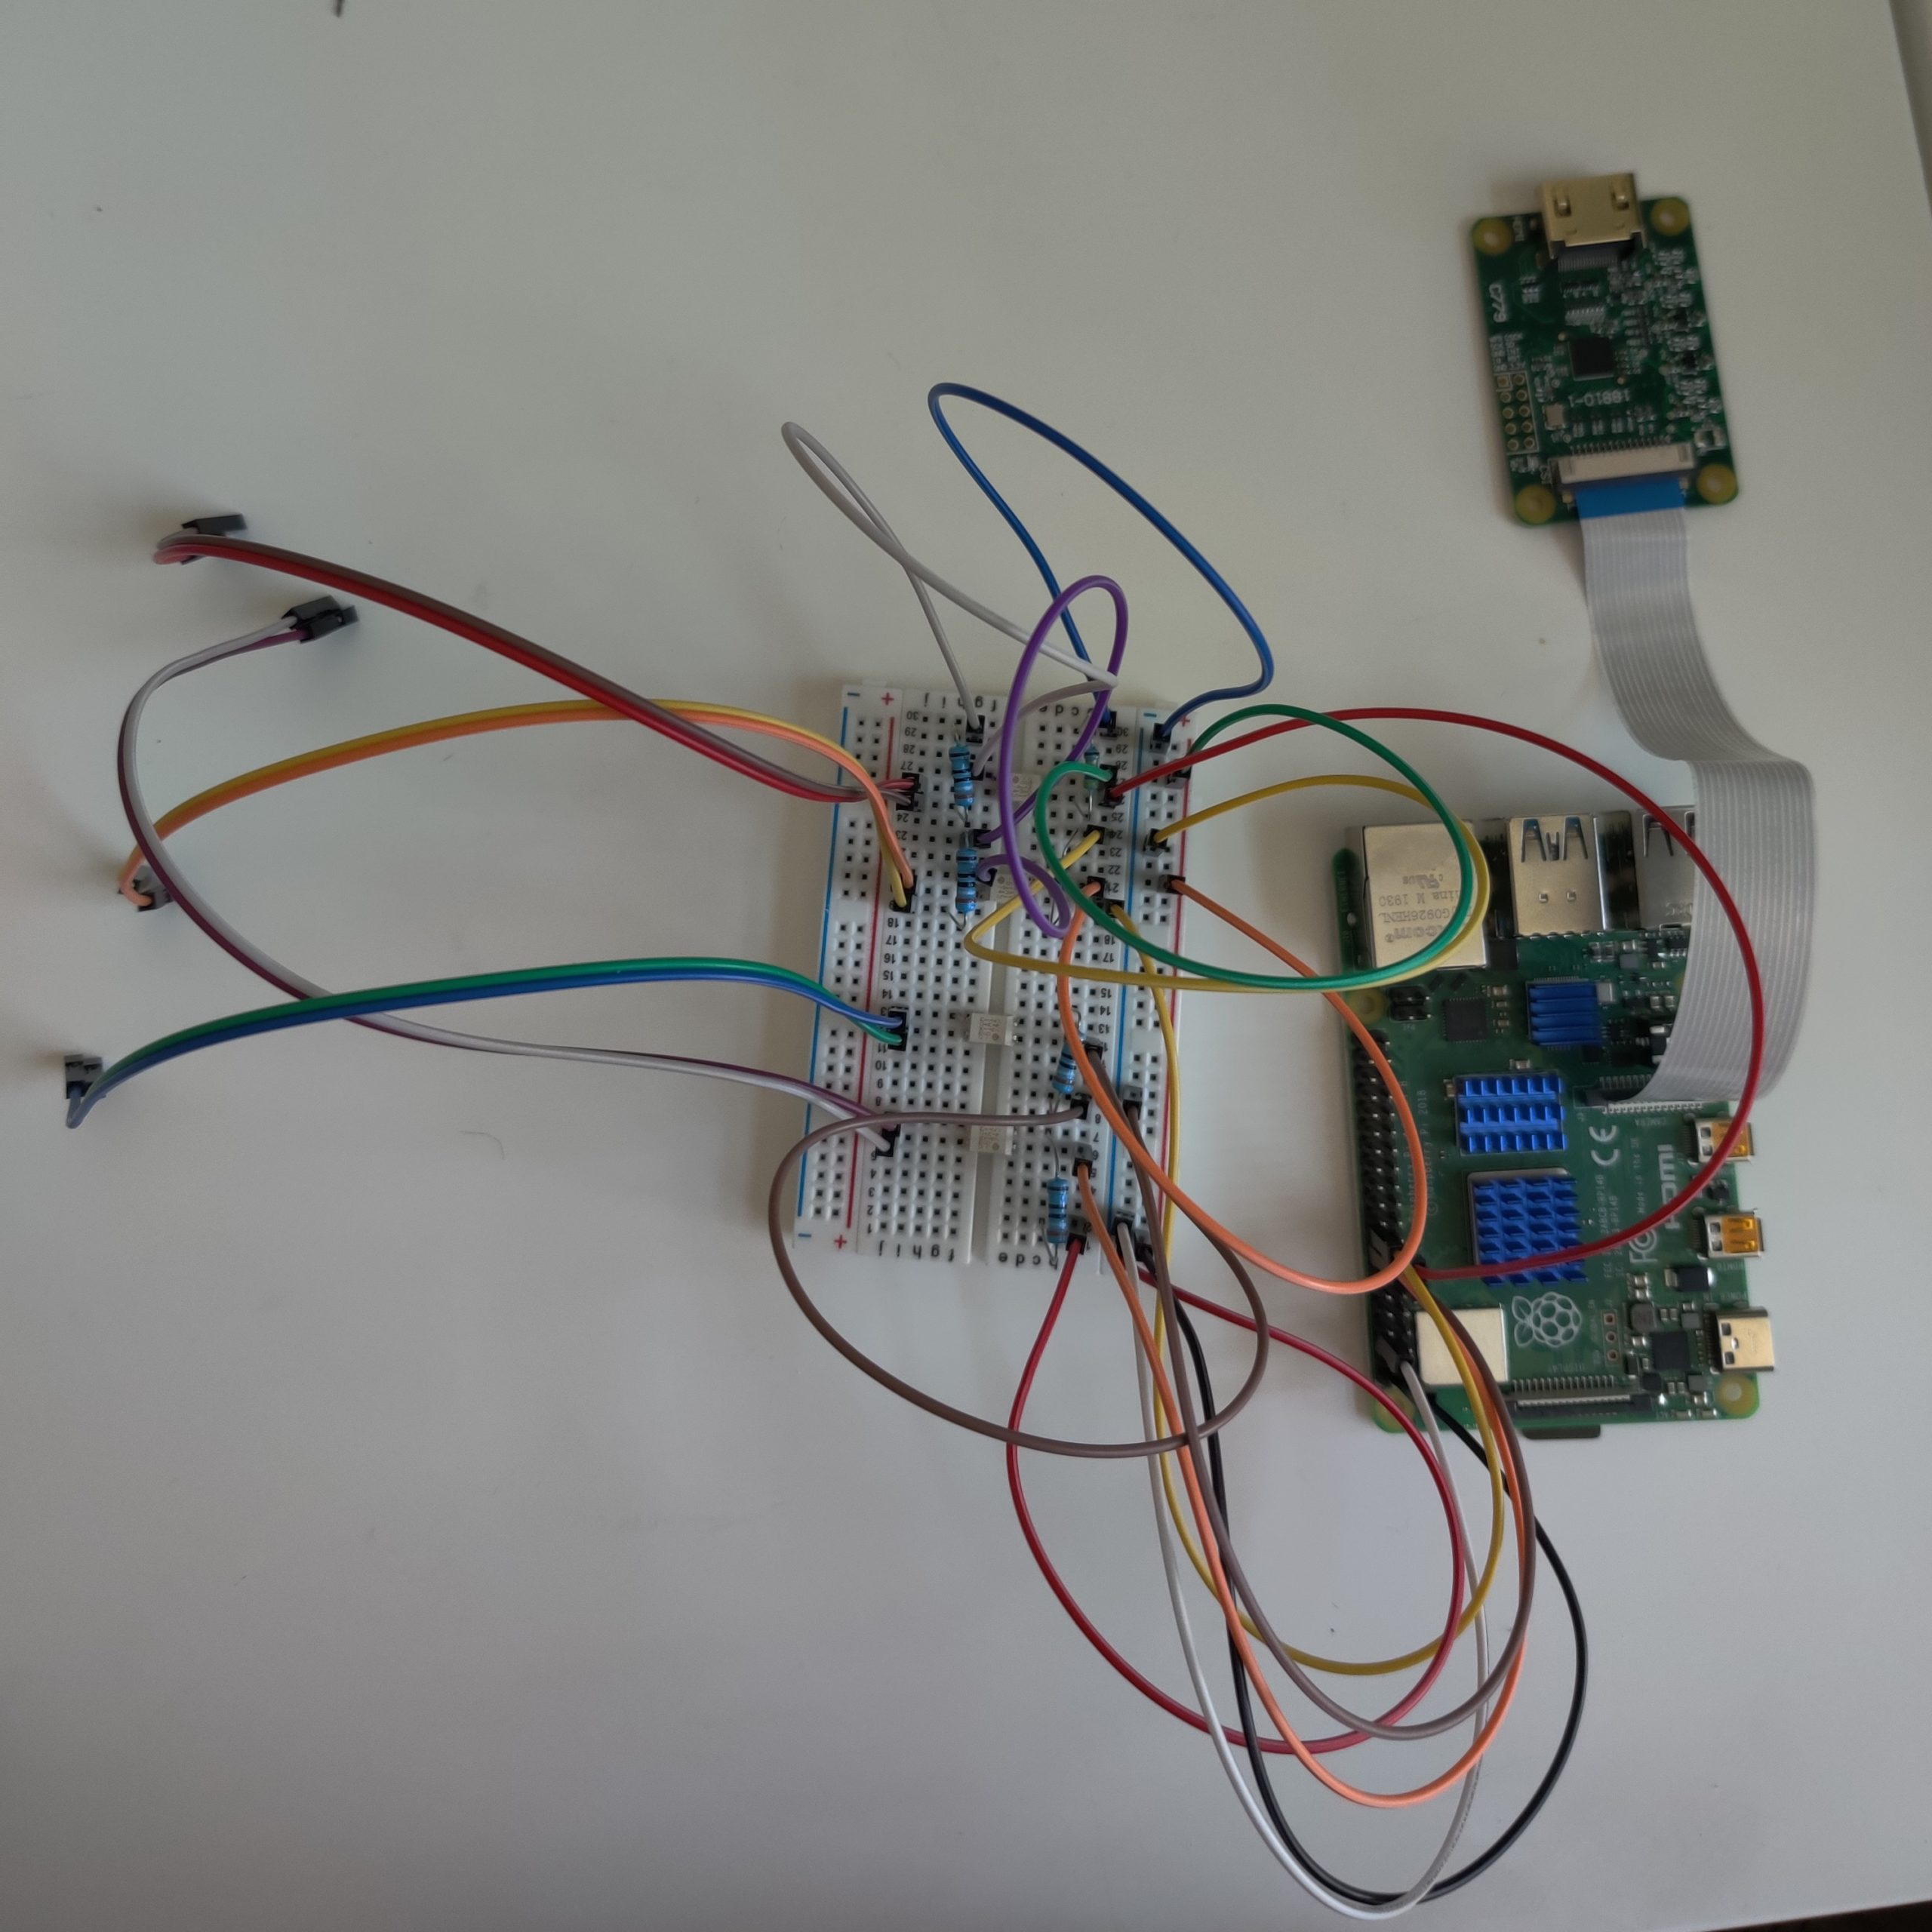
The process was straightforward as outlined on their github page. The only snag I ran into was creating the USB Y (split) cable. It did not work the first time, so I had to tear it all down and start again. One cable I used had more than 4 wires (3 red wires, 1 black, 1 green, 1 white, and 1 yellow.) When I re-assembled to include the yellow wire with the red and black, it all worked.
My custom made Y cable (made from two cables I had lying around)fully assembled and ready to testAttached to a test motherboard
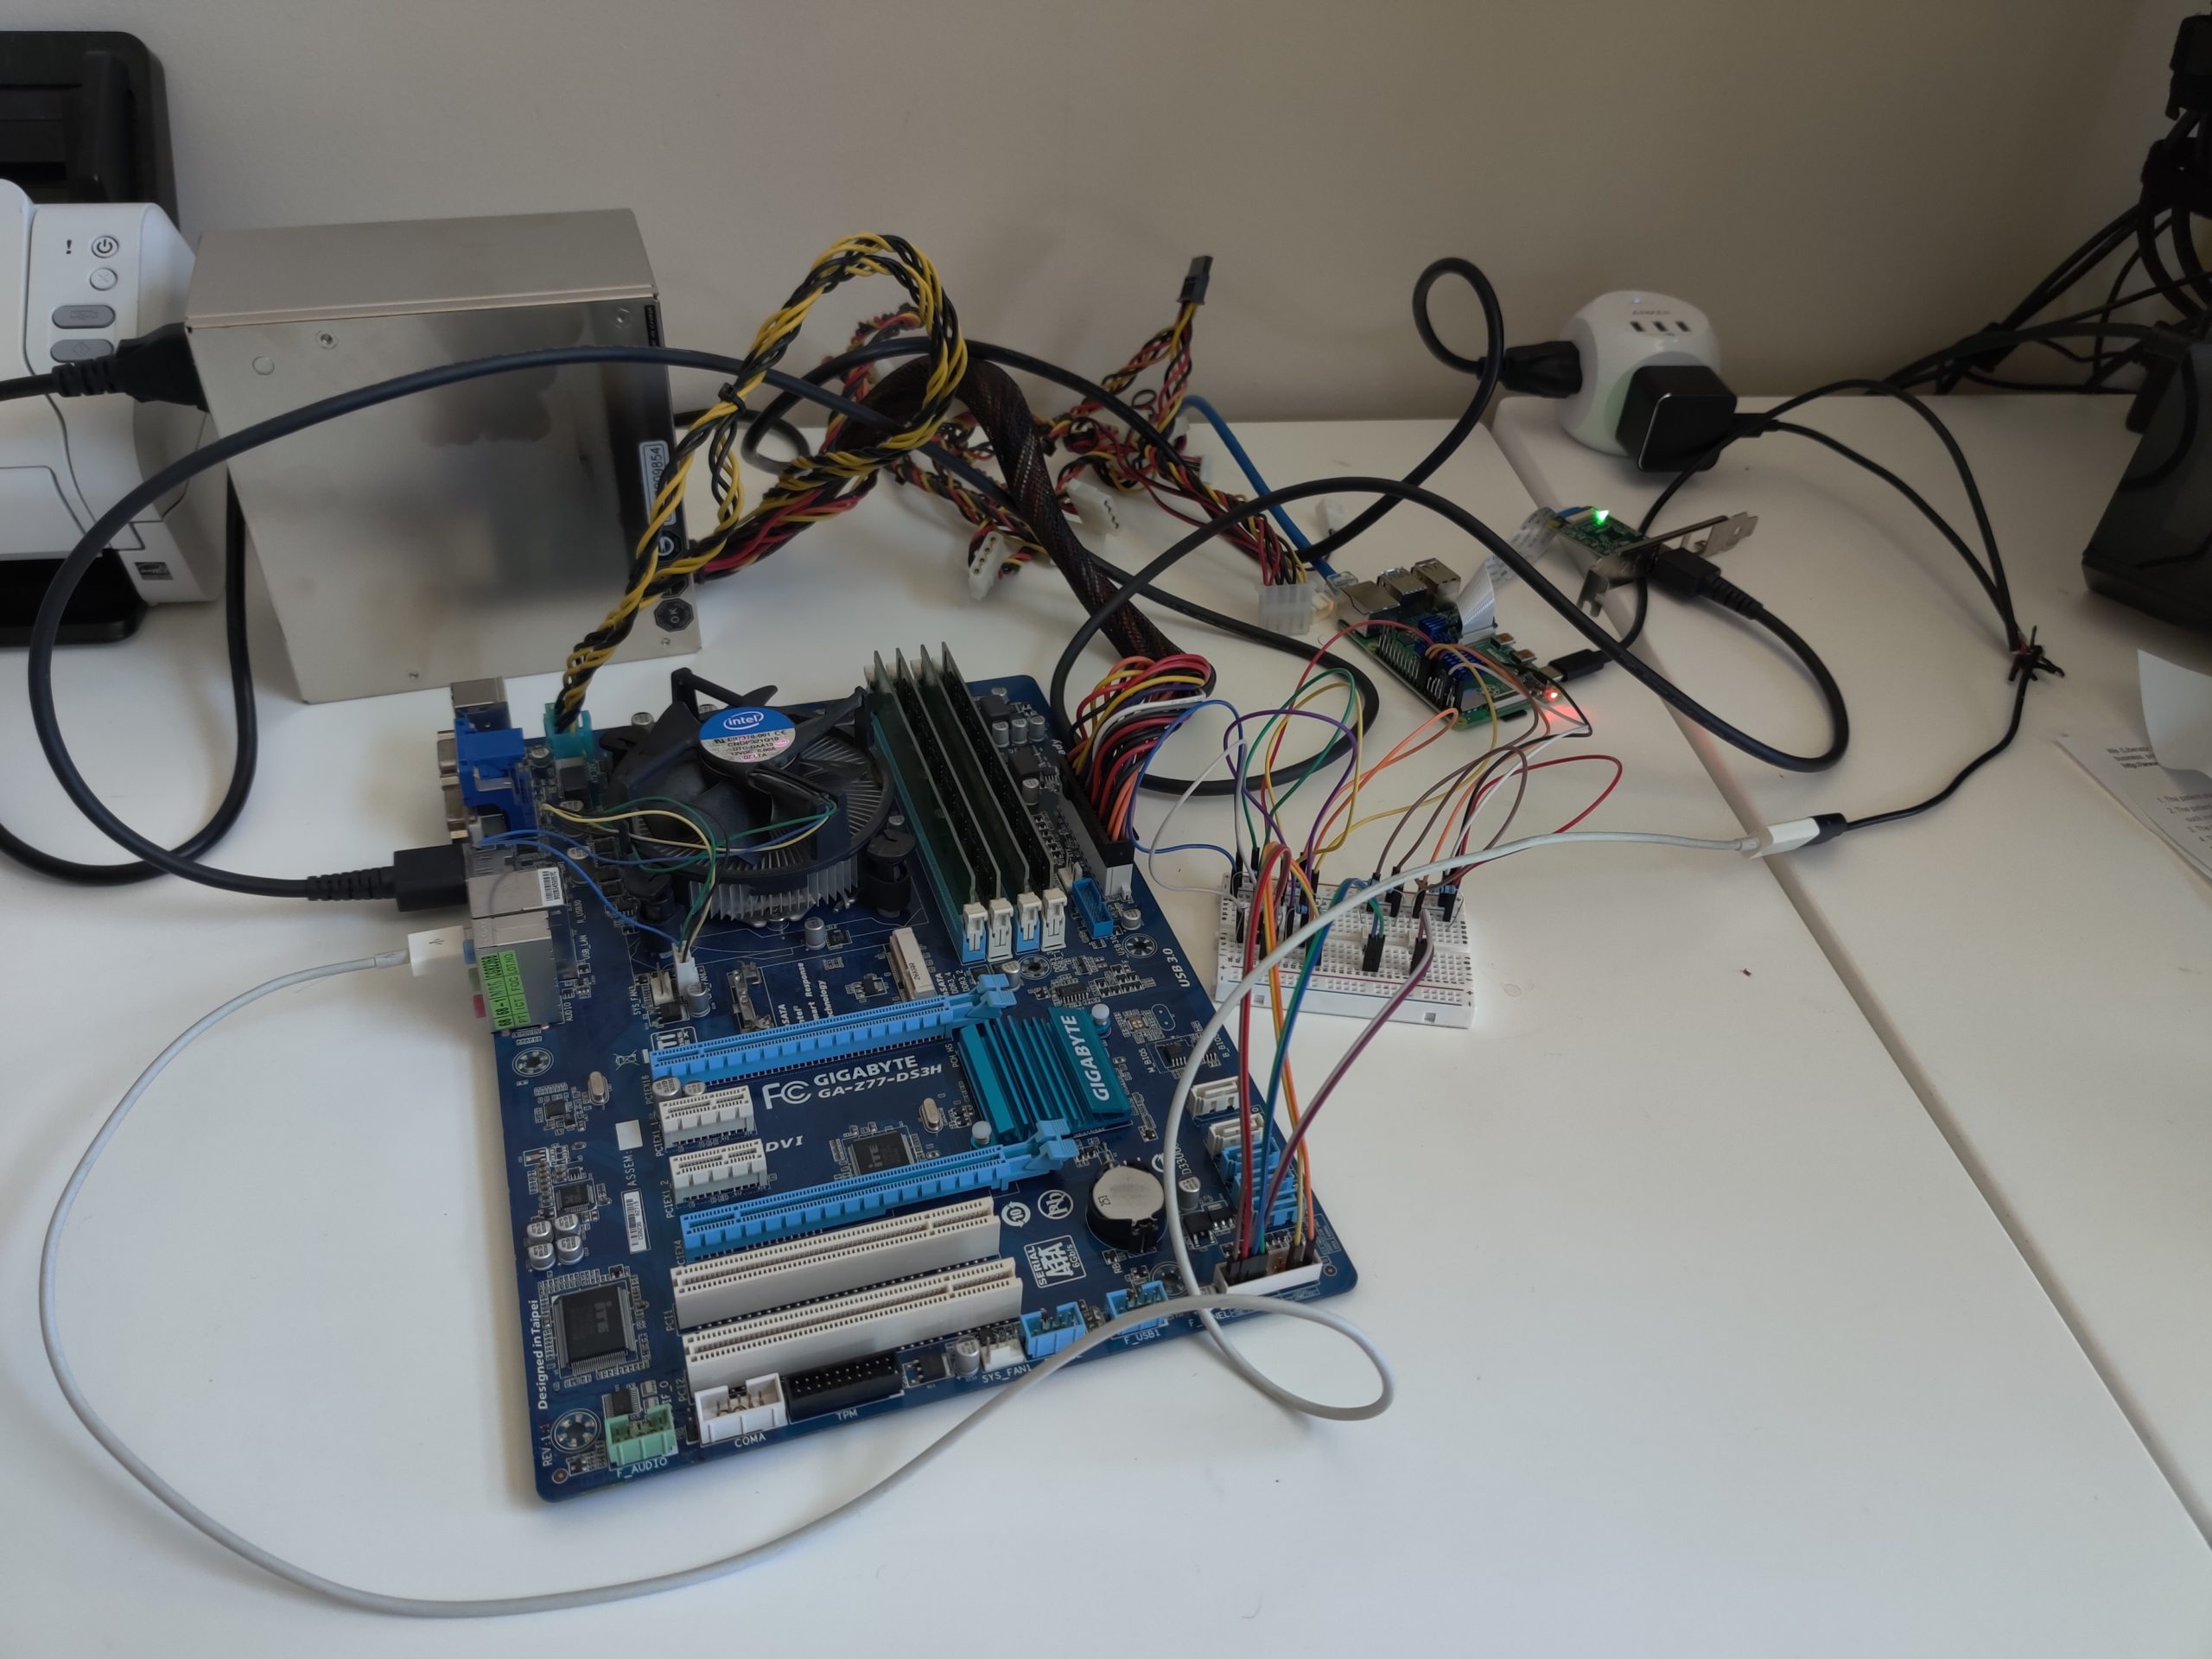
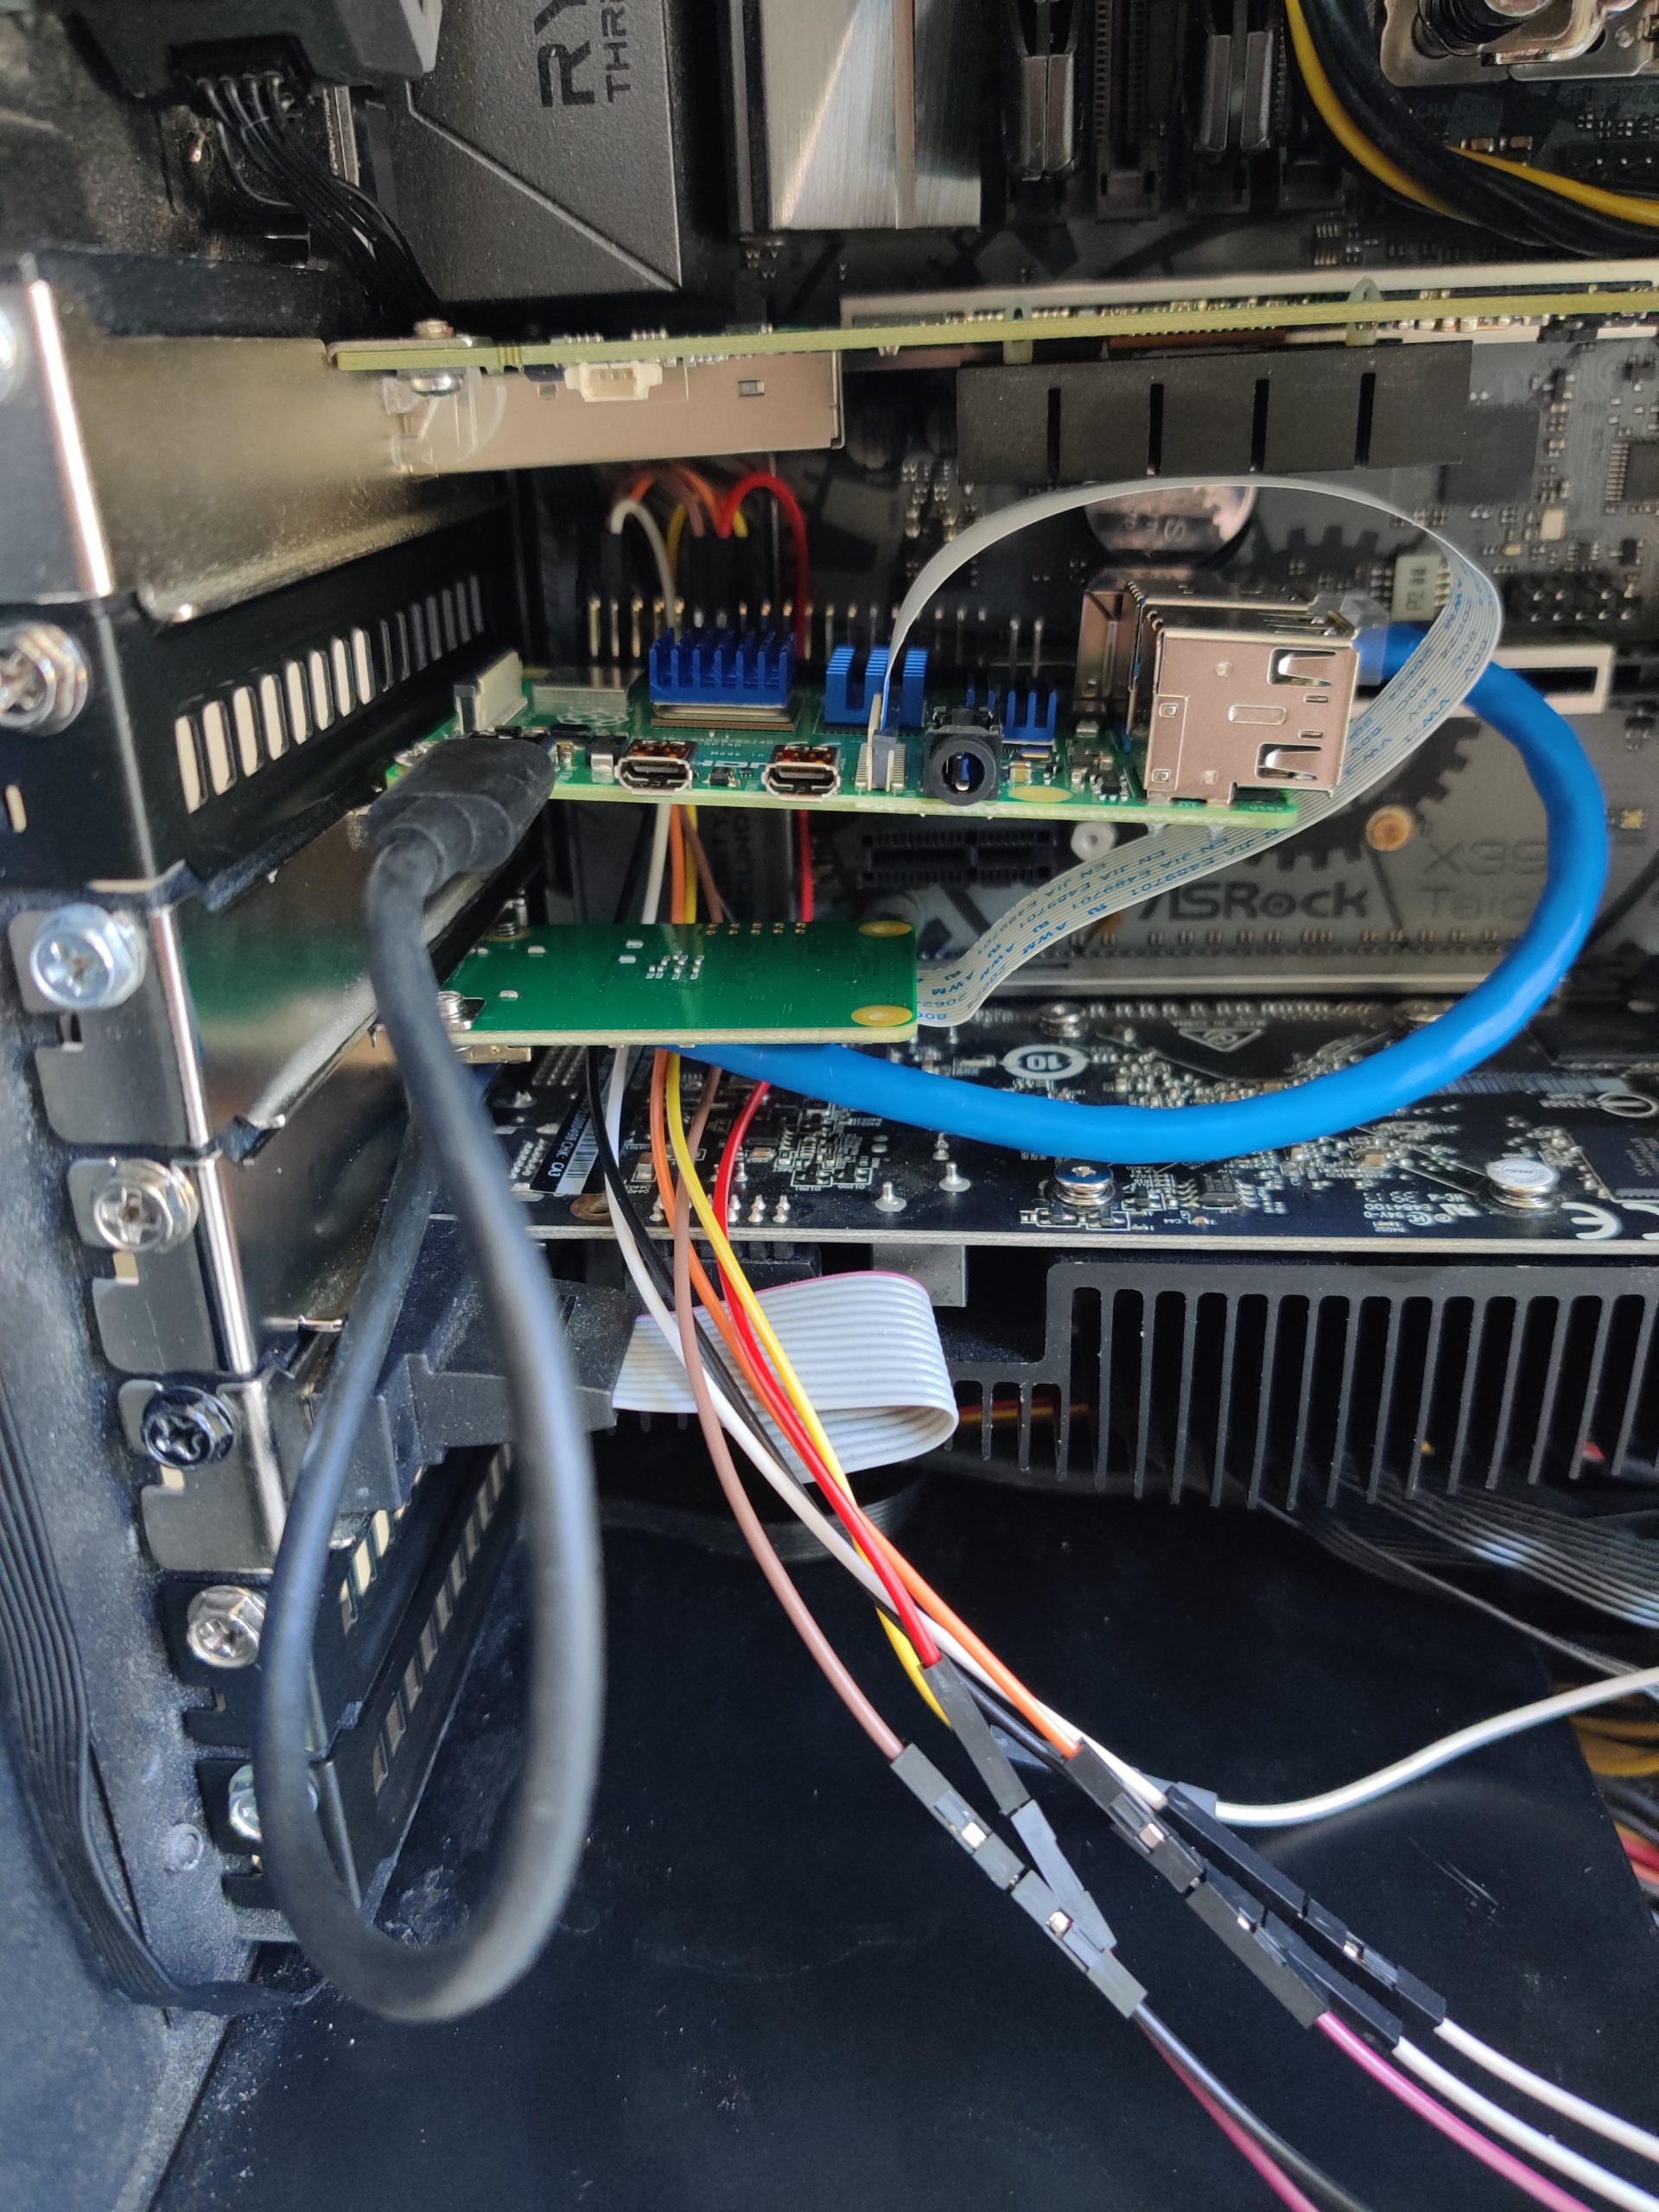
I scavenged the metal mounting bracket from some old networking adapter cards. With those I was able to mount the pi and the HDMI-in module to two standard PCI express card slots. I accidentally destroyed one of my SD cards while doing this so be careful if you try it! The PI is mounted at a slight angle so as to not damage the SD card. I had to mount it backwards (ethernet in the back) because I couldn’t get power to it otherwise (power port right up against the motherboard.) My workaround for this was to custom make a short length ethernet cord and use an RJ45 coupler on the outside of the chassis to provide an easy to access network port for the pi.
I wired the power & reset switch, as well as HDD and power LEDs in parallel so they would function with the chassis as well as with the KVM. To do this simply get some male-to-male jumper wires. On one end plug into the chassis wire, and on the other plug into the corresponding positive and negative slots right next to the ones going to the pi.
Cable management nightmare. But it works XDFinished product
I upgraded to a shiny new AMD Ryzen 3rd gen processer (Threadripper 3960x.) After doing so I could not boot up my Windows 10 gaming VM (it uses VFIO / PCI Passthrough for the video card.) The message I kept getting as it tried to boot was:
The problem comes with a new speculative execution protection hardware feature in the Ryzen Gen 3 chipsets – stibp. Qemu doesn’t know how to handle it properly, thus the bluescreens.
There are two ways to fix it
Change host-model from host-passthrough to epyc
Add CPU parameters to your Virtual Machine’s XML file instructing it to not use the stibp CPU feature.
Since I have some software that checks CPU model and refuses to work if it’s not in the desktop class (Geforce Experience) I opted for route #2.
First, check the qemu logs to see which CPU parameters your VM was using (pick a time where it worked.) Replace ‘win10’ with the name of your VM.
in my case, it was -cpu host,migratable=on,topoext=on,kvmclock=on,hv-time,hv-relaxed,hv-vapic,hv-spinlocks=0x1fff,hv-vendor-id=1234567890ab,kvm=off \
Copy everything after -cpu and before the last backslash. Then edit your VM’s XML file (change last argument to the name of your VM)
sudo virsh edit win10
Scroll down to the bottom qemu:commandline section (if it doesn’t exist, create it right above the last line – </domain>. Paste the following information obtained from the above log (ignoring the qemu:commandline lines if they already exist.) In my case it looked like this:
What you’re doing is copying the CPU arguments you found in the log and adding them to the qemu:commandline section, with a twist – adding -amd-stibp which instructs qemu to remove that CPU flag.
I’ve once again switched from Proxmox to Arch Linux for my desktop machine. Both use KVM so it’s really just a matter of using the different VM manager syntax (virt-manager vs qm.) I used my notes from my previous stint with Arch, my article on GPU Passthrough in Proxmox as well as a thorough reading of the Arch wiki’s PCI Passthrough article.
Enable IOMMU
Configure GRUB to load the necessary iommu modules at boot. Append amd_iommu=on iommu=pt to the end of GRUB_CMDLINE_LINUX_DEFAULT (change accordingly if you have Intel instead of AMD)
sudo vim /etc/default/grub
...
GRUB_CMDLINE_LINUX_DEFAULT="loglevel=3 amd_iommu=on iommu=pt"
Run update-grub
sudo update-grub
Reserve GPU for VFIO
Reserve the GPU you wish to pass through to a VM for use with the vfio kernel driver (so the host OS doesn’t interfere with it)
Determine the PCI address of your GPU
Run lspci -v and look for your card. Mine was 01:00.0 & 01:00.1. You can omit the part after the decimal to include them both in one go – so in that case it would be 01:00
Run lspci -n -s <PCI address from above> to obtain vendor IDs. Example : lspci -n -s 01:00 01:00.0 0300: 10de:1b81 (rev a1) 01:00.1 0403: 10de:10f0 (rev a1)
Assign your GPU to vfio driver using the IDs obtained above. Example using above IDs: echo "options vfio-pci ids=10de:1b81,10de:10f0" >> /etc/modprobe.d/vfio.conf
Reboot the host to put the kernel / drivers into effect.
Assuming you’re using network manager for your connections, create a bridge (thanks to ciberciti.biz & the arch wiki for information on how to do so.) Replace interface names with ones corresponding to your machine:
sudo nmcli connection add type bridge ifname br0 stp no
sudo nmcli connection add type bridge-slave ifname enp4s0 master br0
sudo nmcli connection show
#Make note of the active connection name
sudo nmcli connection down "Wired connection 2" #from above
sudo nmcli connection up bridge-br0
Create a second bridge bound to lo0 for host-only communication. Change IP as desired:
sudo nmcli connection add type bridge ifname br99 stp no ip4 192.168.2.1/24
sudo nmcli connection add type bridge-slave ifname lo master br99
sudo nmcli connection up bridge-br99
Configure VM
Initial configuration
When creating the passthrough VM, make sure chipset is Q35.
Set the CPU model to host-passthrough (type it in, there is no dropdown for it.)
When adding disks / other devices, set the device model to virtio
Add your GPU by going to Add Hardware and finding it under PCI Host Device.
Windows 10 specific tweaks
If your passthrough VM is going to be windows based, some tweaks are required to get the GPU to work properly within the VM.
Ignore MSRs (blue screen fix)
Later versions of Windows 10 instantly bluescreen with kmode_exception_not_handled unless you pass an option to ignore MSRs. Add the kvm ignore_msrs=1 option in /etc/modprobe.d/kvm.conf to do so. Optionally add the report_ignored_msrs=0 option to squelch massive amounts of kernel messages every time an MSR was ignored.
Use the virsh edit command to make some tweaks to the VM configuration. We need to hide the fact that this is a VM otherwise the GPU drivers will not load and will throw Error 43. We need to add a vendor_id in the hyperv section, and create a kvm section enabling hidden state, which hides certain CPU flags that the drivers use to detect if they’re in a VM or not.
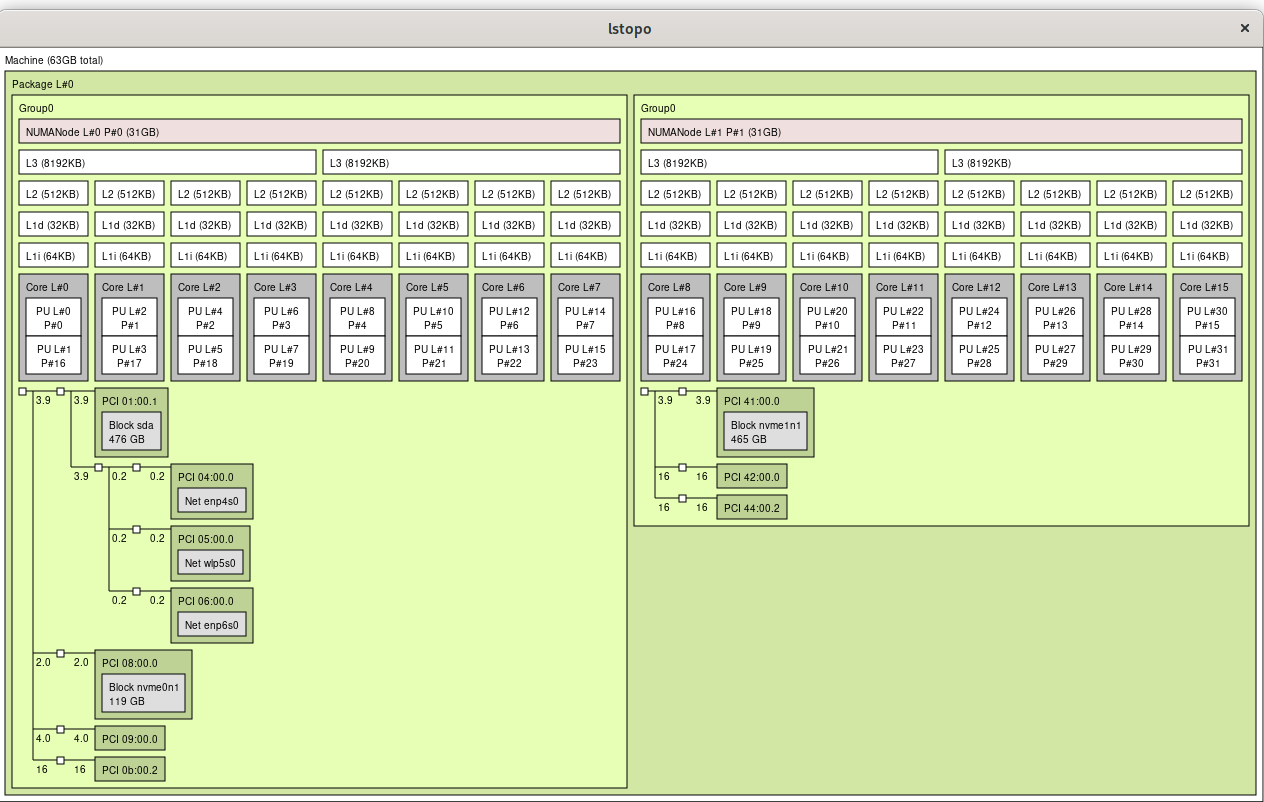
If you operate on a multi-core system such as my AMD Ryzen Threadripper the you will want to optimize your CPU core configuration in the VM per the CPU Pinning section in the Arch Wiki
Determine your CPU topology by running lscpu -e and lstopo The important things to look for are the CPU number and core number. On my box, it looks like this:
From the above output I see my CPU core 0 is shared by CPUs 0 & 16, meaning CPU 0 and CPU 16 (as seen by the Linux kernel) are hyperthreaded to the same physical CPU core.
Especially for gaming, you want to keep all threads on the same CPU cores (for multithreading) and the same CPU die (on my threadripper, CPUs 0-7 reside on one physical die, and CPUs 8-15 reside on the other, within the same socket.)
In my case I want to dedicate one CPU die to my VM with its accompanying hyperthreads (CPUs 0-7 & hyperthreads 16-23) You can accomplish this using the virsh edit command and creating a cputune section (make sure you have a matching vcpu count for the number of cores you’re configuring.) Also edit CPU mode with the proper topology of 1 socket, 1 die, 8 cores with 2 threads. Lastly, configure memory to only be from the proper NUMA node the CPU cores your VM is using (Read here for more info.)
Non-uniform memory access is essential for 1st and 2nd gen Ryzen chips. It turns out that by default my motherboard hid the real NUMA configuration from the operating system. Remedy this by changing the BIOS setting to set Memory Interleaving = Channel (for my ASRock X399 motherboard it’s in CBS / DF options.) See here: https://www.reddit.com/r/Amd/comments/6vrcq0/psa_threadripper_umanuma_setting_in_bios/
After changing BIOS setting, lstopo now shows proper configuration:
CPU frequency
Change CPU frequency setting to use performance mode:
Append default_hugepagesz=1G hugepagesz=1G hugepages=16 to the kernel line in /etc/default/grub and re-run sudo grub-mkconfig -o /boot/grub/grub.cfg
Configure FIFO CPU scheduling
The Arch Wiki mentions to run qemu-system-x86_64 with taskset and chrt but doesn’t mention how to do so if you’re using virt-manager. Fortunately this reddit thread outlined how to accomplish it: libvirt hooks. Create the following script and place it in /etc/libvirt/hooks/qemu , change the VM variable to match the name of your VM, mark that new file as executable (chmod +x /etc/libvirt/hooks/qemu ) and restart libvirtd
#!/bin/bash
#Hook to change VM to FIFO scheduling to decrease latency
#Place this file in /etc/libvirt/hooks/qemu and mark it executable

#Change the VM variable to match the name of your VM
VM="win10"

if [ "$1" == "$VM" ] && [ "$2" == "started" ]; then
  if pid=$(pidof qemu-system-x86_64); then
     chrt -f -p 1 $pid
    echo $(date) changing CPU scheduling to FIFO for VM $1 pid $pid >> /var/log/libvirthook.log
  else
    echo $(date) Unable to acquire PID of $1 >> /var/log/libvirthook.log
  fi
fi
#Additional debug
#echo $(date) libvirt hook arg1=$1 arg2=$2 arg3=$3 arg4=$4 pid=$pid >> /var/log/libvirthook.log
Isolate CPUs
Update 7/28/20: I no longer do this in favor of the qemu hook script above, which prioritizes to p1 the qemu process for the cores it needs. I’m leaving this section here for historical/additional tweaking purposes.
Update 6/28/20: Additional tuning since I was having some stuttering and framerate issues. Also read here about the emulatorpin option
Dedicate CPUs to the VM (host will not use them) – append isolcups, nohz_full & rcu_nocbs kernel parameters into /etc/default/grub
Update 7/8/2020: I found this article and this reddit thread (and this one) on how to use pulseaudio for your guest VM to get low latency guest VM audio piped to the host machine.
Update qemu config
edit /etc/libvirt/qemu.conf: uncomment the line #user = "root" and replace “root” with your username
Update pulseaudio config
Edit /etc/pulse/daemon.conf and uncomment the following lines (remove semicolon)
I had a pet project (folding@home) where I wanted to maximize computing power. I became frustrated with default CPU scheduling of my folding@home threads. Ideal performance would keep similar threads on the same CPU, but the threads were jumping all over the place, which was impacting performance.
Step one was to figure out which threads belonged to which physical cores. I found on this site that you can use cat to find out what your “sibling threads” are:
The above command is for my Threadripper & Epyc systems, which each have 16 cores hyperthreaded to 32 cores. Adjust the {0..15} number to match your number of cores (core 0 being the fist core.) This was my output:
Now that I know the sibling threads are offset by 16, I can use this information to optimize my folding@home VMs. I modified my CPU pinning script to take this into consideration. The script ensures that each VM is pinned to only use sibling threads (ensuring they all stay on the same physical CPU.)
This script should be used with caution. It pins processes to specific CPUs, which limits the kernel scheduler’s ability to move things around if needed. If configured badly this can cause the machine to lock up or VMs to be terminated.
I saw some impressive results spinning up four separate 8 core VMs and pinning them to sibling cores using this script. It almost doubled the rate at which I completed folding@home work units.
And now, the script:
#!/bin/bash
#Properly assign CPU cores to their respective die for EPYC/Threadripper systems
#Based on how hyperthreads are done in these systems
#cat /sys/devices/system/cpu/cpu{0..15}/topology/thread_siblings_list

#The script takes two arguments - the ID of the Proxmox VM to modify, and the core to begin the VM on
#If running this against multiple VMs, make sure to increment this second number by half of the cores of the previous VM
#For example, if I have one 8 core VM and I run this script specifying 0 for the offset, if I spin up a second VM, the second argument would be 4
#this would ensure the second VM starts on core 4 (the 5th core) and assigns sibling cores to match

set -eo pipefail

#take First argument as which VMID to pin CPU cores to, the second argument is which core to start pinning to
VMID=$1
OFFSET=$2

#Determine offset for sibling threads
SIBLING_THREAD_OFFSET=$(cat /sys/devices/system/cpu/cpu0/topology/thread_siblings_list| sed 's/,/ /g' | awk '{print $2}')

#Function to determine number of CPU cores a VM has
cpu_tasks() {
	expect <<EOF | sed -n 's/^.* CPU .*thread_id=\(.*\)$/\1/p' | tr -d '\r' || true
spawn qm monitor $VMID
expect ">"
send "info cpus\r"
expect ">"
EOF
}

#Only act if VMID & OFFSET are set
if [[ -z $VMID  || -z $OFFSET ]]
then
	echo "Usage: cpupin.sh <VMID> <OFFSET>"
	exit 1
else
	#Get PIDs of each CPU core for VM, count number of VM cores, and get even/odd PIDs for assignment
	VCPUS=($(cpu_tasks))
	VCPU_COUNT="${#VCPUS[@]}"
	VCPU_EVEN_THREADS=($(for EVEN_THREAD in "${VCPUS[@]}"; do echo $EVEN_THREAD; done | awk '!(NR%2)'))
	VCPU_ODD_THREADS=($(for ODD_THREAD in "${VCPUS[@]}"; do echo $ODD_THREAD; done | awk '(NR%2)'))

	if [[ $VCPU_COUNT -eq 0 ]]; then
		echo "* No VCPUS for VM$VMID"
		exit 1
	fi

	echo "* Detected ${#VCPUS[@]} assigned to VM$VMID..."
	echo "* Resetting cpu shield..."

	#Start at offset CPU number, assign odd numbered PIDs to their own CPU thread, then increment CPU core number
	#0-3 if offset is 0, 4-7 if offset is 4, etc
	ODD_CPU_INDEX=$OFFSET
	for PID in "${VCPU_ODD_THREADS[@]}"
	do
		echo "* Assigning ODD thread $ODD_CPU_INDEX to $PID..."
		taskset -pc "$ODD_CPU_INDEX" "$PID"
		((ODD_CPU_INDEX+=1))
	done

	#Start at offset + CPU count, assign even number PIDs to their own CPU thread, then increment CPU core number
	#16-19 if offset is 0,	20-23 if offset is 4, etc
	EVEN_CPU_INDEX=$(($OFFSET + $SIBLING_THREAD_OFFSET))
	for PID in "${VCPU_EVEN_THREADS[@]}"
	do
		echo "* Assigning EVEN thread $EVEN_CPU_INDEX to $PID..."
		taskset -pc "$EVEN_CPU_INDEX" "$PID"
		((EVEN_CPU_INDEX+=1))
	done
fi
I decided to contribute my GPU on my Ubuntu-based system to the Folding@Home effort for COVID-19. I kept getting this error message for my NVIDIA GeForce GTX 1050 TI when I tried:
ERROR:WU00:FS00:Failed to start core: OpenCL device matching slot 0 not found, make sure the OpenCL driver is installed or try setting 'opencl-index' manually
I had the nvidia opencl packages installed but apparently missed something. I finally found on the folding at home forum what I was missing – ocl-icd-opencl-dev
sudo apt install ocl-icd-opencl-dev
After running the above command and restarting the FAHClient service, the GPU started folding. For science!
EDIT 5/6/2020: After a re-install I had the issue where the GPU wouldn’t show up at all. It addition to ocl-icd-opencl-dev, it looks like you also need nvidia-cuda-dev.
I recently acquired some 5TB Western Digital Blue drives (WD50EZRZ.) These particular drives were shucked from external USB enclosures. When I tried to add them into my ZFS raid array, though, I ran into constant problems. I would continually get errors like this from the kernel:
After a couple of said errors, the drive would be marked as bad and taken out of the array. A battery of tests on a different system revealed the drives to be fine. It did not matter where I inserted these drives on my NAS, they did the same thing, even on ports I knew had working drives. It wasn’t a cabling or other hardware issue.
The drives would resilver back into the array just fine, and then pop out again at random intervals – sometimes minutes later, other times hours later. After a lot of research I came across this post that got me thinking – this sounds like a drive spindown issue! The random nature of it could simply be the drives not being used and then powering themselves down.
I tried using hdparm to set the spindown timer but was greeted with this lovely error:
sudo hdparm -B /dev/sdk
/dev/sdk:
 APM_level	= not supported
I eventually found this post complaining about their Western Digital drives spinning down aggressively.
idle3 to the rescue
The above post mentions apmtimer which did not help me, however more searches reveled this godsend: idle3-tools
idle3-tools is an open source utility to handle spindown on Western Digital drives themselves (not the OS level.)
Download & compile idle3:
wget https://sourceforge.net/projects/idle3-tools/files/latest/download
cd idle3-tools-0.9.1/
make
sudo make install
Use idle3 to query current spindown status (update drive letters to suit your needs)
for drive in {a..p}; do echo /dev/sd$drive; sudo idle3ctl -g /dev/sd$drive; done
For anything that doesn’t say Idle3 timer is disabled run the following:
I really banged my head on the wall on this one. I recently decided to re-architect my networking setup in proxmox to utilize bonded network configuration. I followed this writeupexactly. The problem is it didn’t work.
I would copy the example exactly, only changing the interface name, and yet every time I tried to start the networking service I would get this lovely error:
rawdevice bond0 not present
I finally found on the Debian Wiki one critical line :
First install the ifenslave package, necessary to enable bonding
For some reason the ProxMox howtos don’t speak of this – I guess because it comes installed by default. I discovered, however, that if you install ifupdown2 it removes ifenslave. I had installed ifupdown2 in the past to reload network configuration without rebooting. Aha!
I re-installed ifenslave (which removed ifupdown2 and re-installed ifupdown) and suddenly, the bond worked!
Bond not falling back to primary intrerface
I had configured my bond in active – backup mode. I wanted it to prefer the faster link, but if there was a failure in that link it wouldn’t switch back automatically (thanks to this site for showing me the command to check:
cat /proc/net/bonding/bond0
I read again in Debian bonding wiki that I needed to add this directive to the bond:
bond-primary enp2s0
Here is my complete working active-backup configuration, assigning vlan 2 to the host, and making enp2s0 (the 10gig nic) the primary, with a 1gig backup (eno1)
auto bond0
iface bond0 inet manual
        slaves enp2s0 eno1
        bond-primary enp2s0
        bond_miimon 100
        bond_mode active-backup

iface bond0.2 inet manual

auto vmbr0v2
iface vmbr0v2 inet static
        address 192.168.2.2
        netmask 255.255.255.0
        gateway 192.168.2.1
        bridge_ports bond0.2
        bridge_stp off
        bridge_fd 0

auto vmbr0
iface vmbr0 inet manual
        bridge_ports bond0
        brideg_stp off
        bridge_fd 0
I recently acquired an Intel based server and plugged it into my AMD-based Proxmox cluster. I ran into an issue transferring from AMD to Intel boxes (the other direction worked fine.) After a few moments, every VM that moved from AMD to Intel would kernel panic.
Fortunately I found here that the fix is to add a few custom CPU flags to your VMs. Once I did this they could move back and forth freely (assuming they had the kvm64 CPU assigned to them – host obviously won’t work.)
qm set *VMID* --args "-cpu 'kvm64,+ssse3,+sse4.1,+sse4.2,+x2apic'"
In trying to passthrough some LSI SAS cards to a VM I kept receiving this error:
kvm: -device vfio-pci,host=0000:03:00.0,id=hostpci0,bus=ich9-pcie-port-1,addr=0x0,rombar=0: vfio 0000:03:00.0: failed to setup container for group 7: Failed to set iommu for container: Operation not permitted
I found on this post that the fix is to add a line to /etc/modprobe.d/vfio.conf with the following:


